Severe steel corrosion
Existing lintels had developed heavy section loss, scaling and rust expansion. As the steel swelled, it lifted and displaced the brick masonry above the window openings.
A majority of the window lintels around the J. David Stewart Armoury had already been replaced once. They were failing again, with corrosion expansion damaging the surrounding brickwork at a building exposed to salt air only a short distance from Charlottetown Harbour.
DinoMac's repair went beyond removing rusted steel. Opening the wall exposed drainage, flashing, movement-joint and previous brick-repair problems that all had to be corrected if the masonry was going to perform differently after the second replacement.
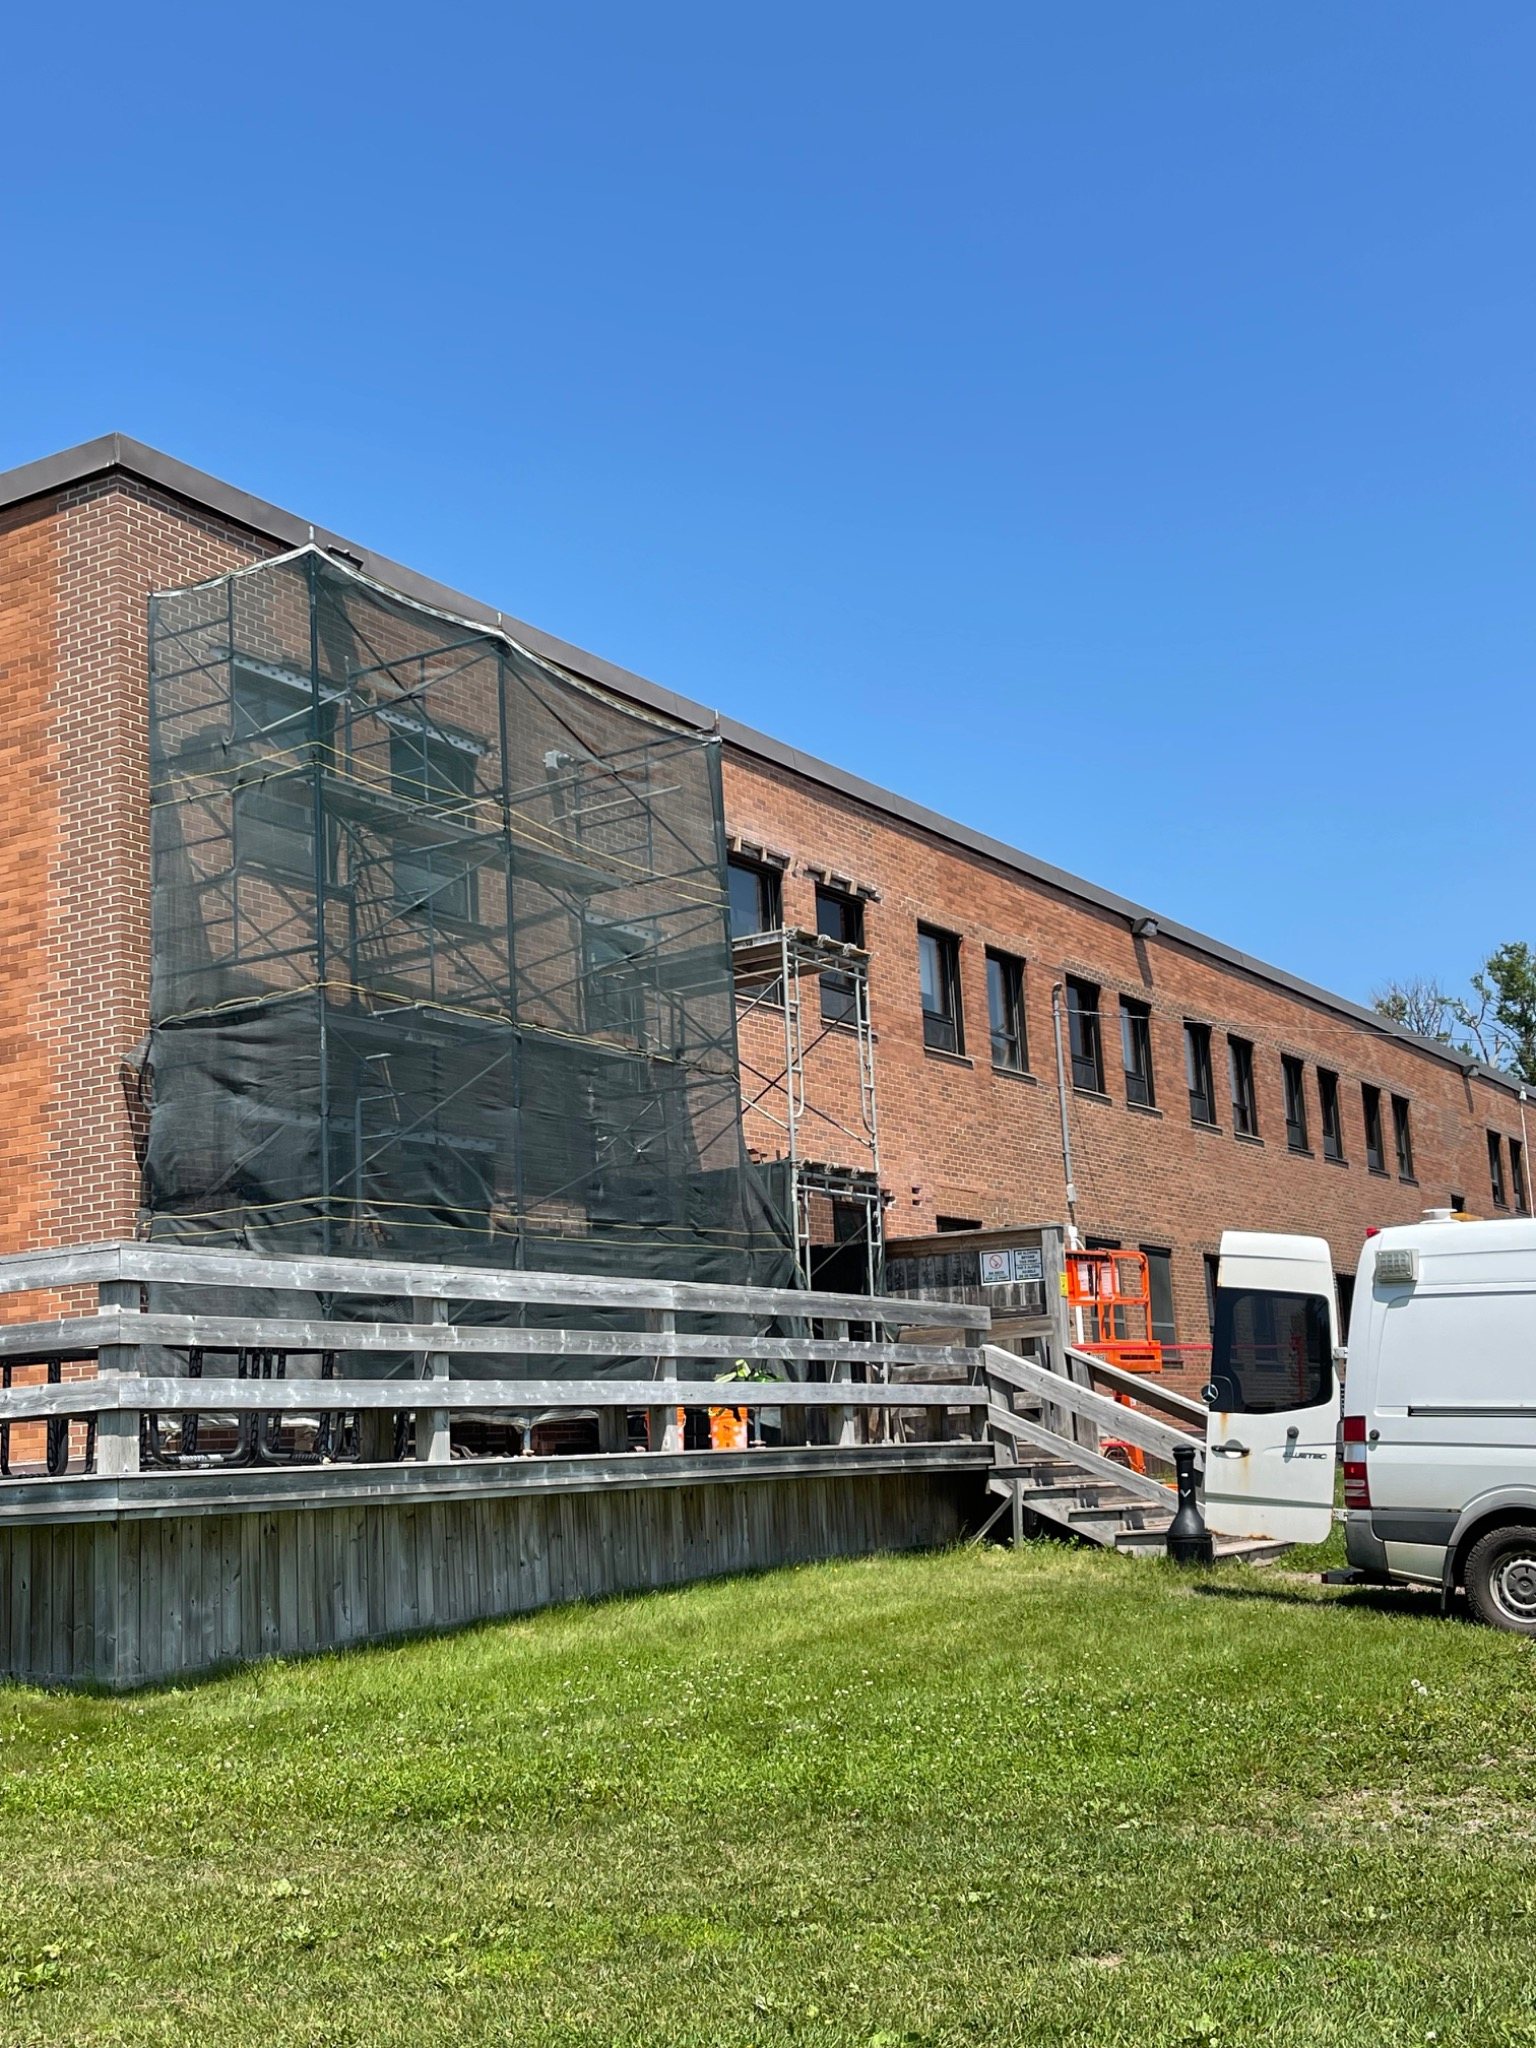
A building-scale repair: the work involved lintels and surrounding brickwork at many window openings rather than one isolated failure.
The previous steel replacement had not addressed all of the conditions controlling how water and movement were handled around the brick openings.
Once masonry was removed, the reason for a repeat repair became clearer. Several different envelope details were working against the wall.
Existing lintels had developed heavy section loss, scaling and rust expansion. As the steel swelled, it lifted and displaced the brick masonry above the window openings.
Existing lintels were found sloping back toward the building instead of encouraging drainage outward, contributing to water being directed into the wall assembly.
Openings did not have the drainage vents needed to give water collected above the lintel a clear path back to the exterior.
Some joints that appeared to provide masonry movement relief had only been cut superficially. They did not extend through the masonry sufficiently to function as intended.
Some replacement bricks had been cut undersized and finished with only a shallow amount of mortar at the exposed face rather than being rebuilt as fully supported masonry units.
Deteriorated sealant at window perimeters was another pathway for water, so the repair included complete recaulking rather than treating the masonry in isolation.
The original problem was visible as cracks and displaced brick, but removing the masonry revealed how much corrosion had accumulated at the lintels themselves.
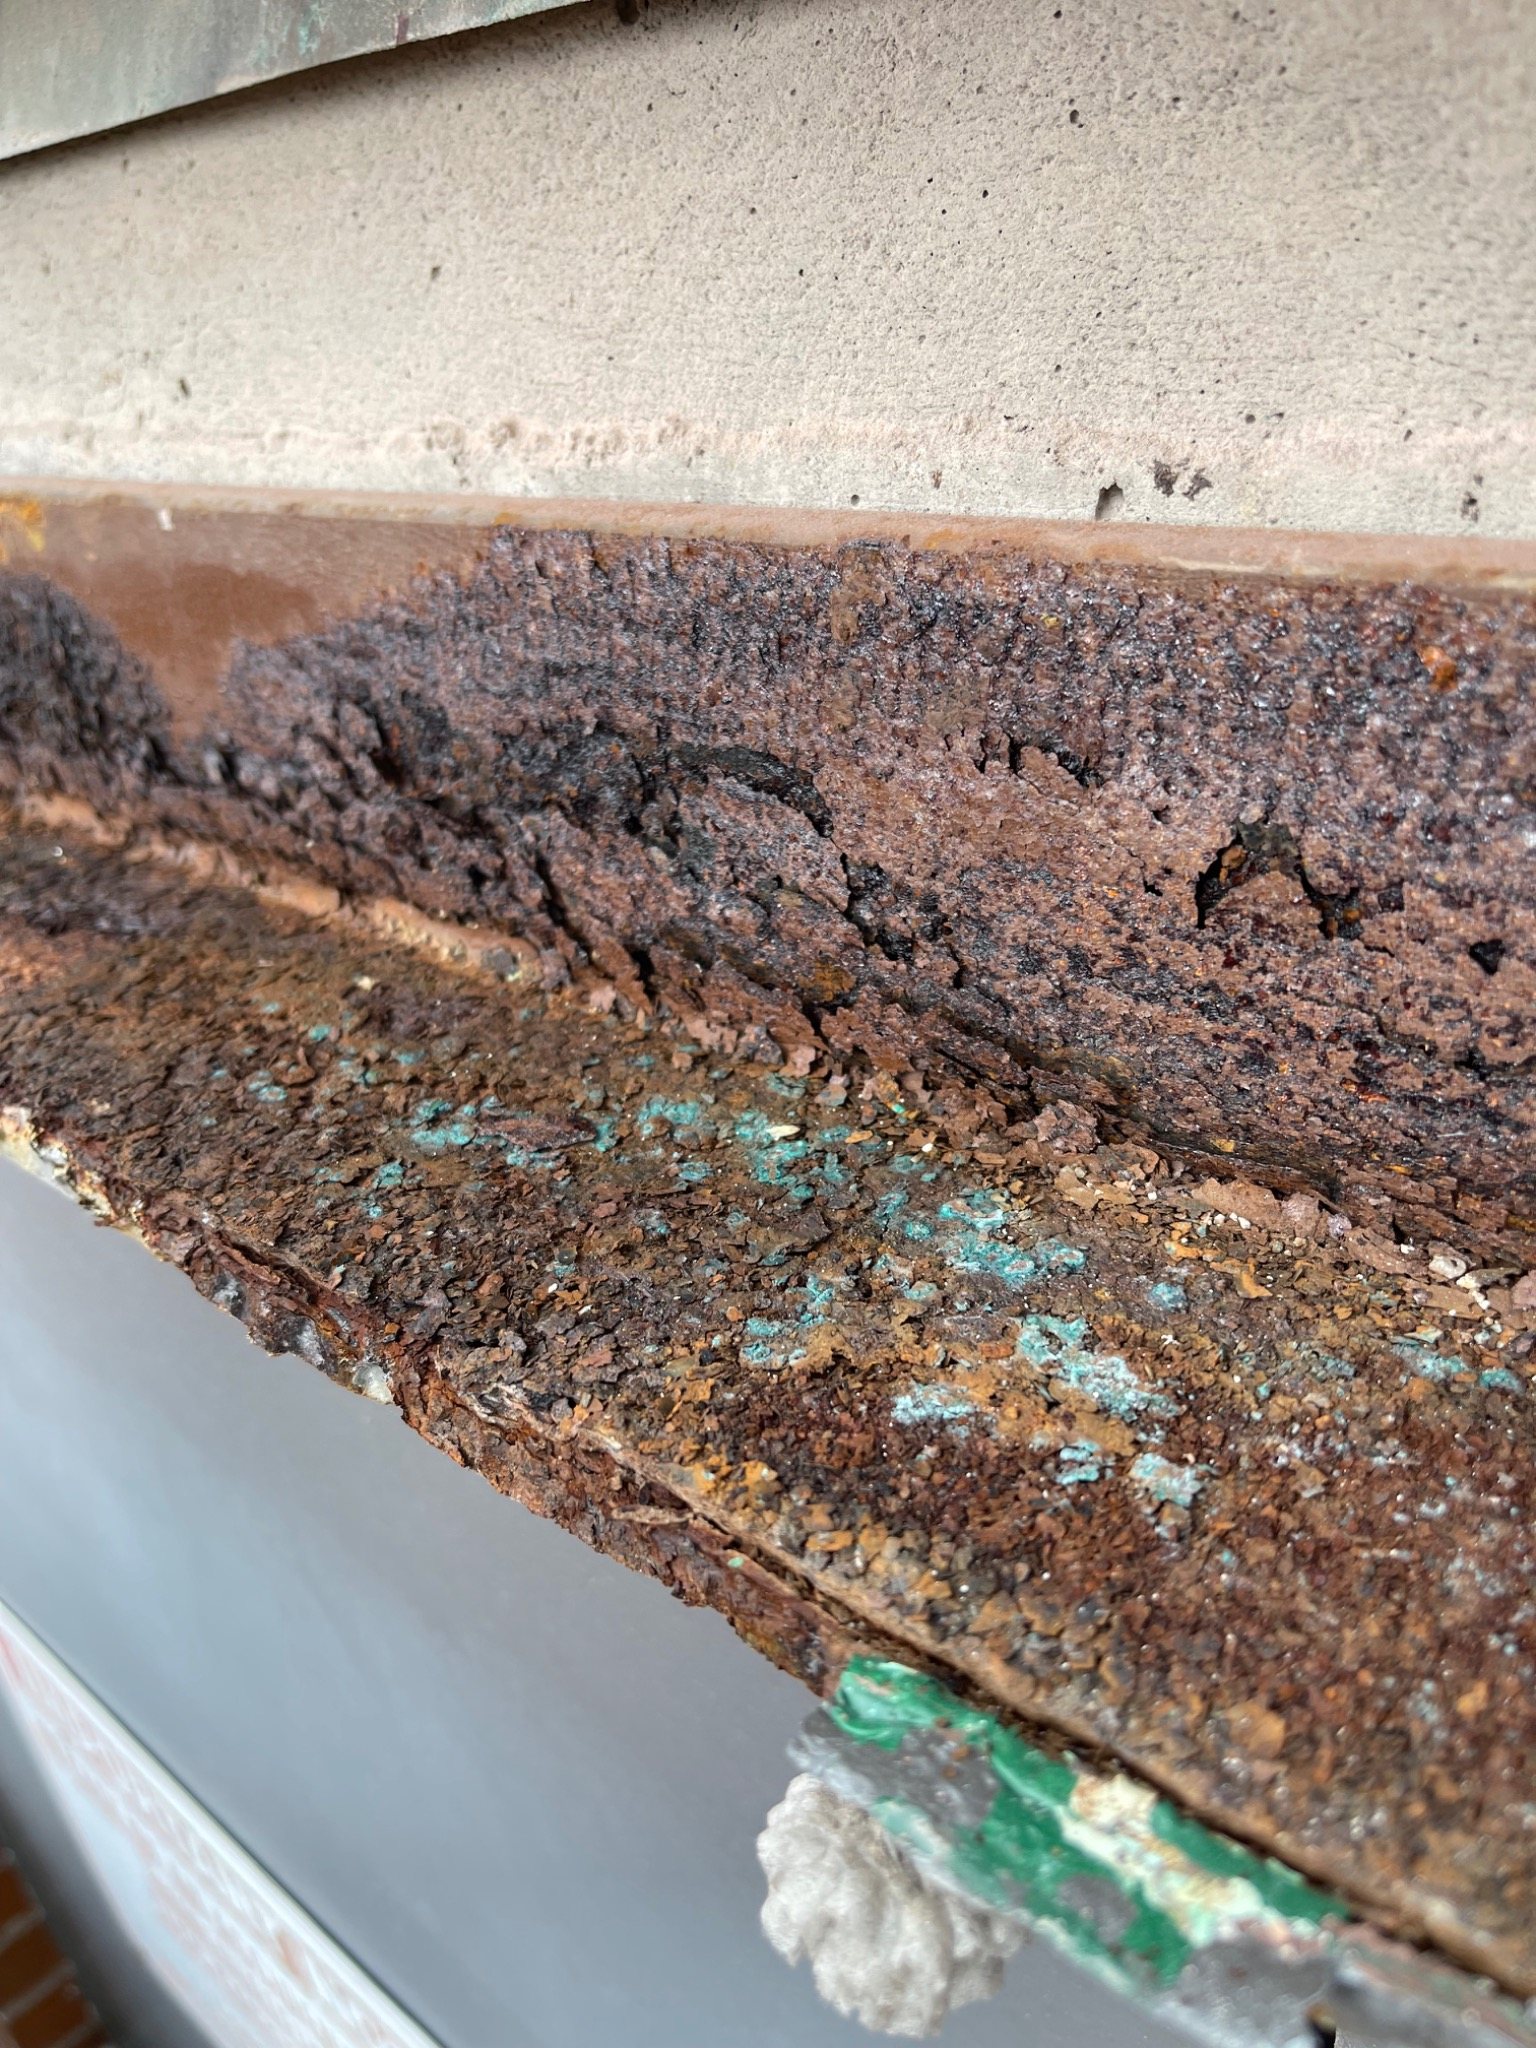
Heavy corrosion: scaling and expansion were substantial enough to disrupt the masonry supported above the opening.
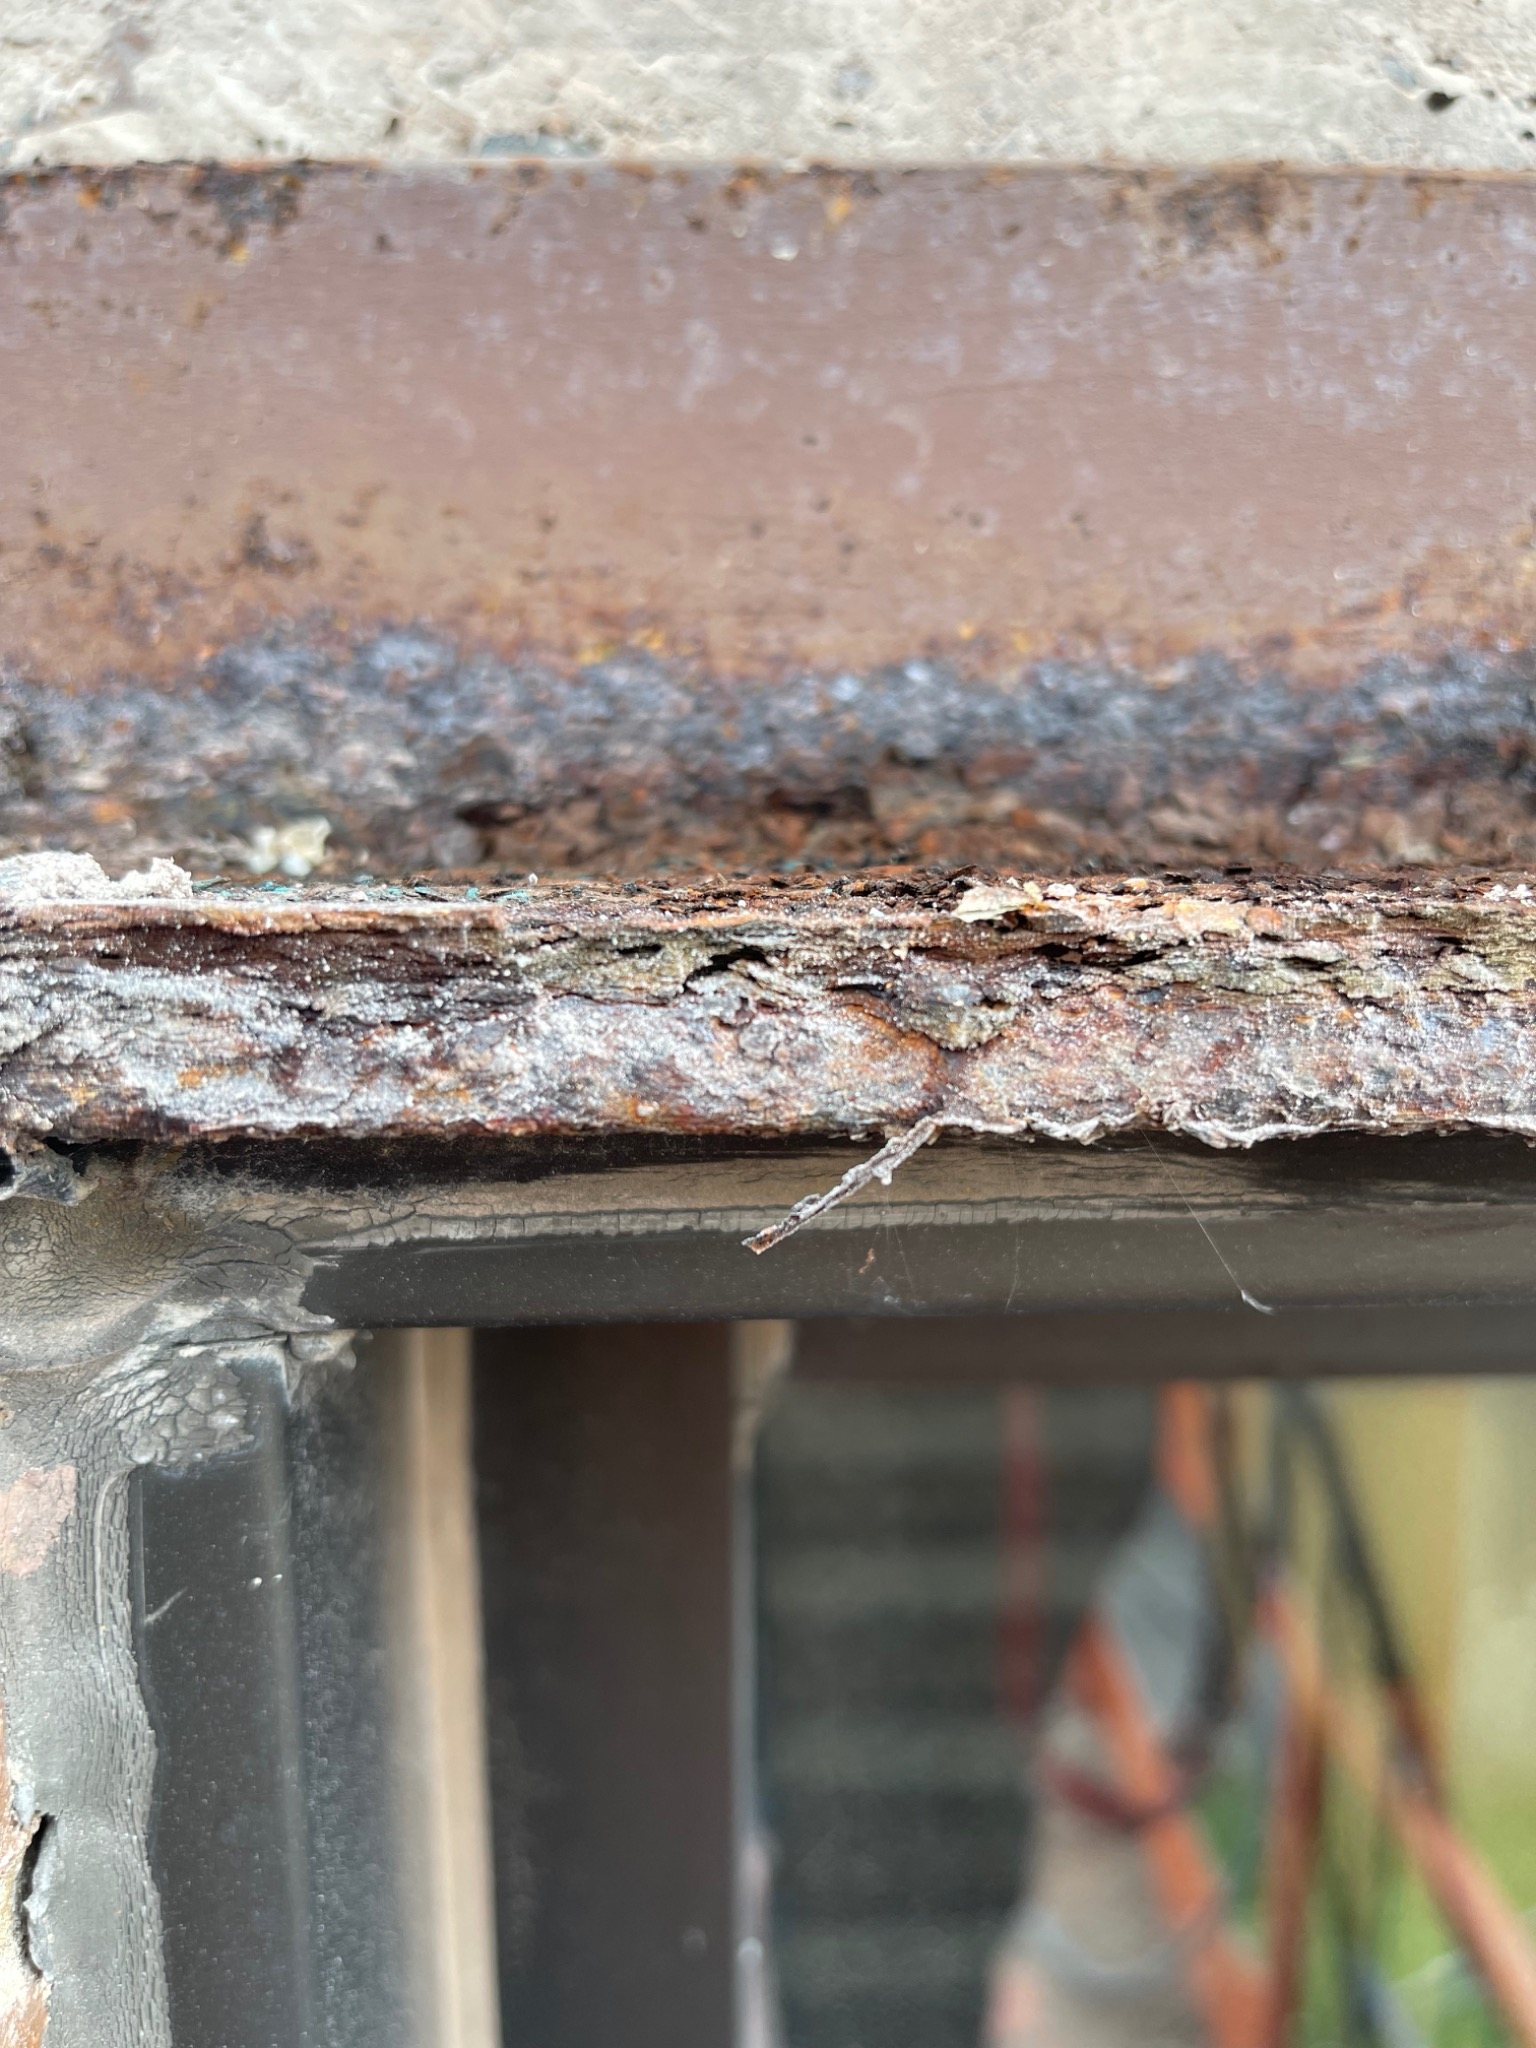
Expanding steel: layered rust buildup increased the effective thickness of the lintel and transferred force into the brickwork.
This was not a case of original steel simply reaching the end of its life. The window lintels had previously been replaced, yet widespread problems had returned. That made the surrounding construction details just as important as the replacement steel itself.
During dismantling, some previously replaced bricks were found cut down rather than installed as complete units. At the face they could appear normally pointed, but removal showed that only a limited depth of mortar was present in places.
Existing movement joints also required closer examination. Some were essentially surface treatments rather than properly formed joints through the brick masonry. New full-depth movement joints were cut where required so the wall could accommodate movement instead of transferring it into nearby openings.
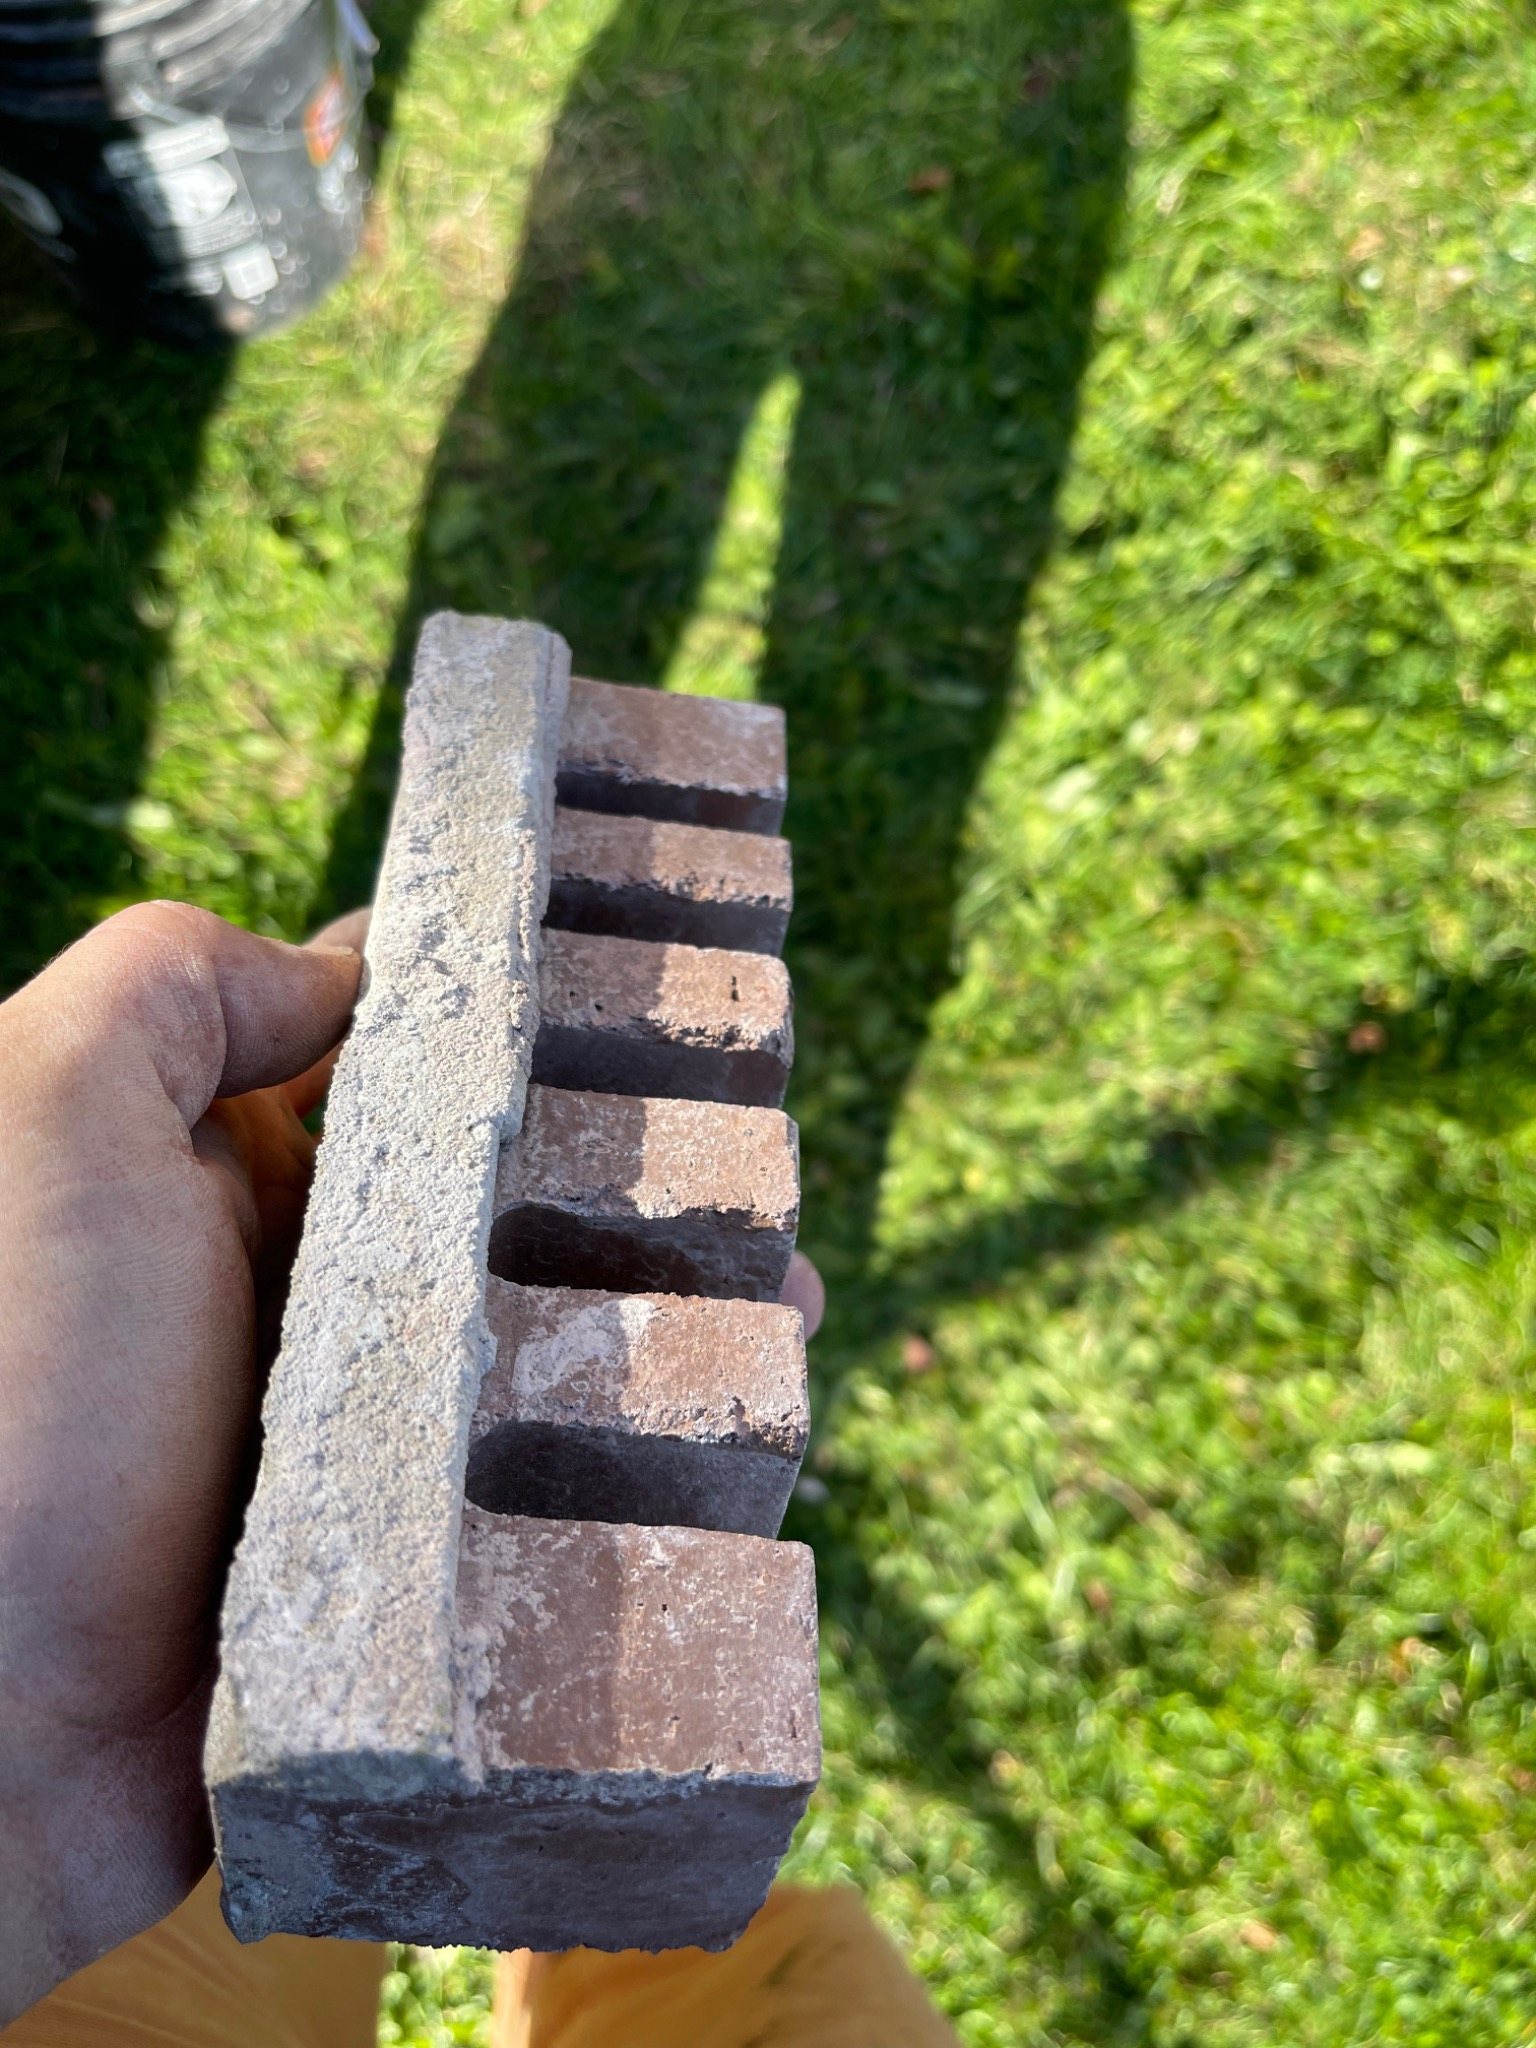
Previous brick repair: removal exposed bricks that had been cut down, reducing the amount of full masonry support behind the finished face.
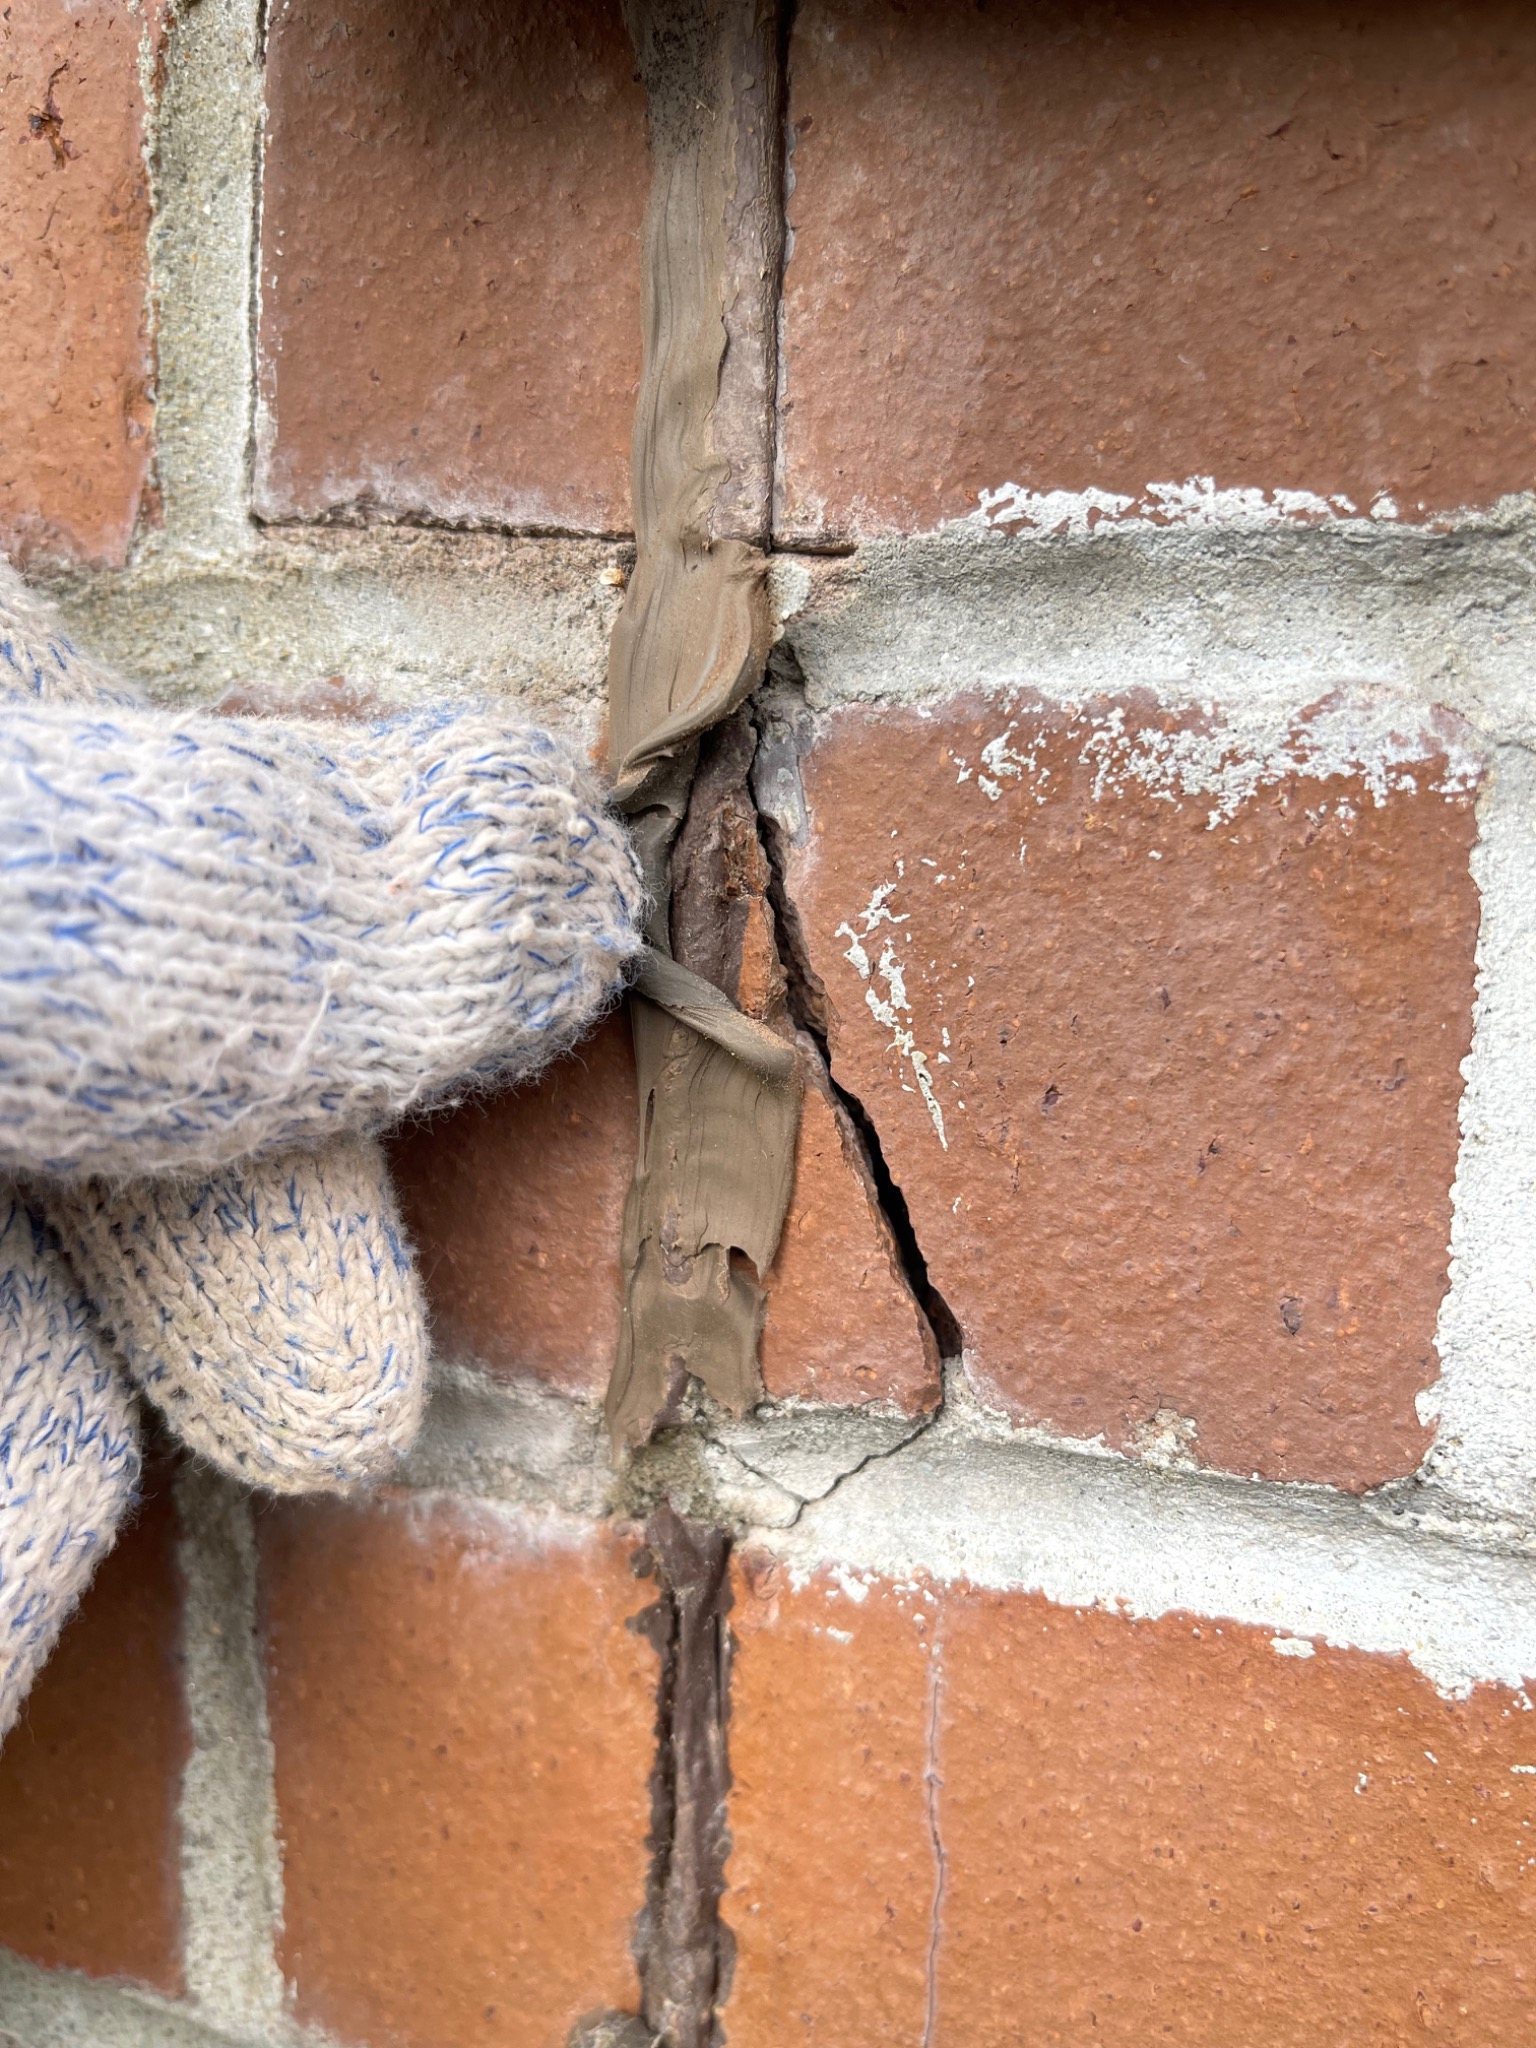
Incomplete movement joint: what appeared to be a control joint at the surface did not provide the full-depth separation the masonry needed.
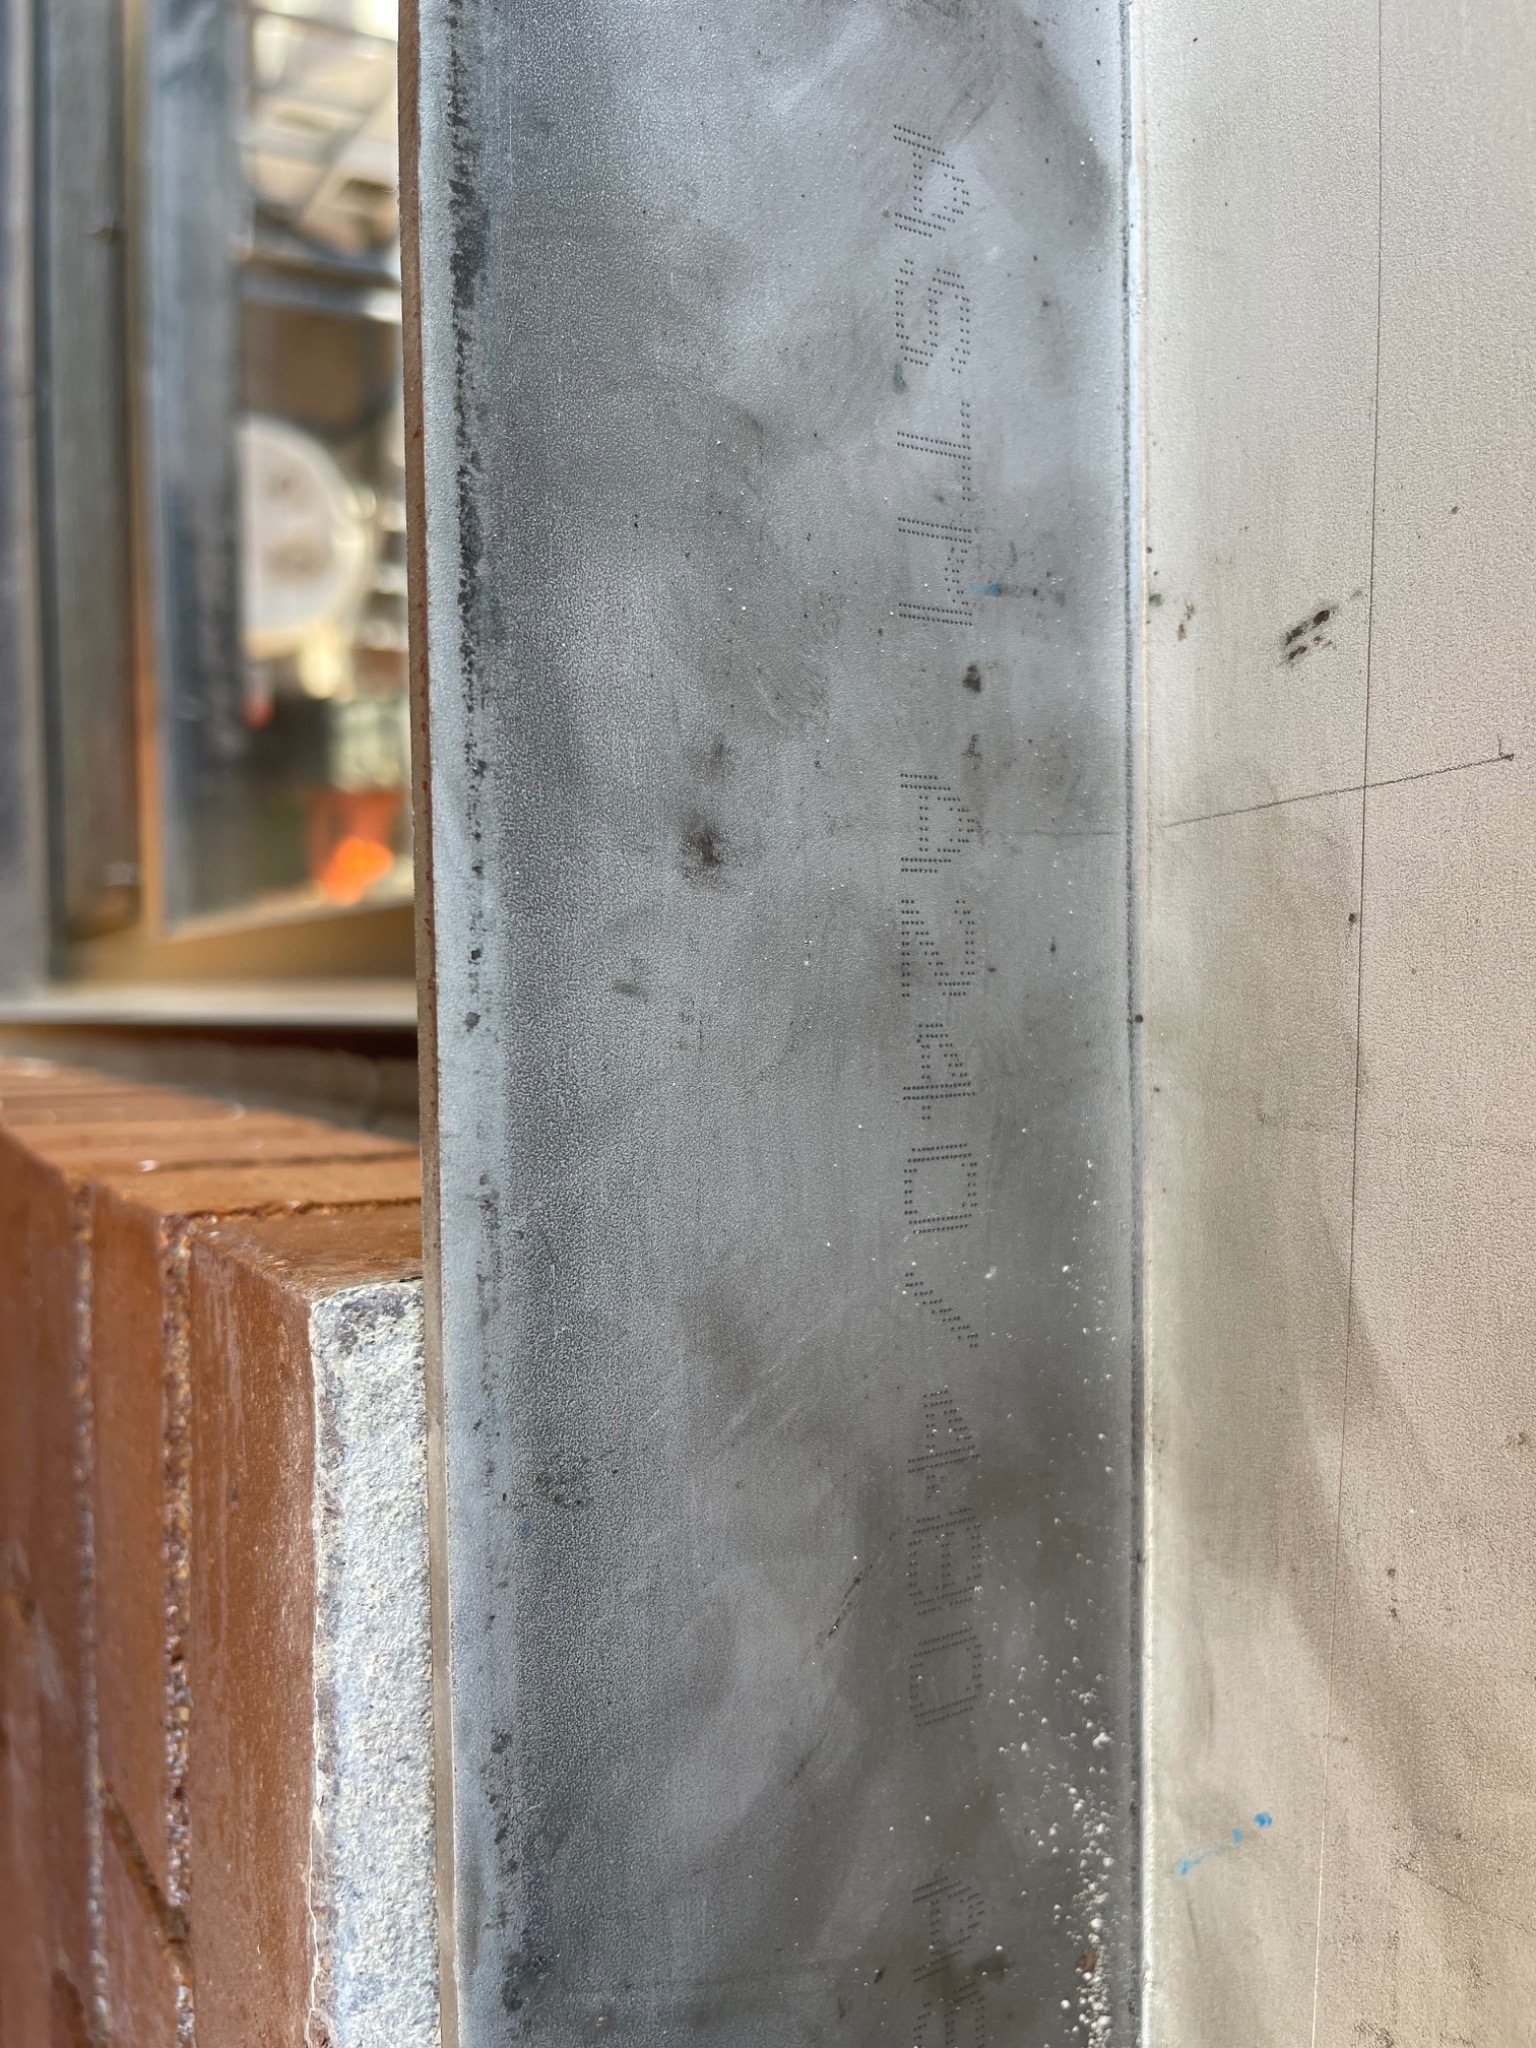
1/4-inch stainless steel: the replacement lintels were selected for greatly improved corrosion resistance in the building's marine exposure.
Rather than install another ordinary steel angle and repeat the same maintenance cycle, DinoMac used 1/4-inch stainless-steel lintels at the repaired openings.
Stainless steel was chosen to dramatically reduce the corrosion-expansion risk that had damaged the brickwork previously. The goal was not simply to make the new lintel stronger. It was to remove the dominant failure mechanism from an extremely aggressive coastal environment.
Damaged masonry around the openings was then rebuilt with properly sized brick and full mortar support, restoring the wall above each lintel rather than preserving weak remnants of the previous repair.
The repaired opening needed to support the brick, shed water outward and allow the different materials in the assembly to move without being bonded into one rigid layer.
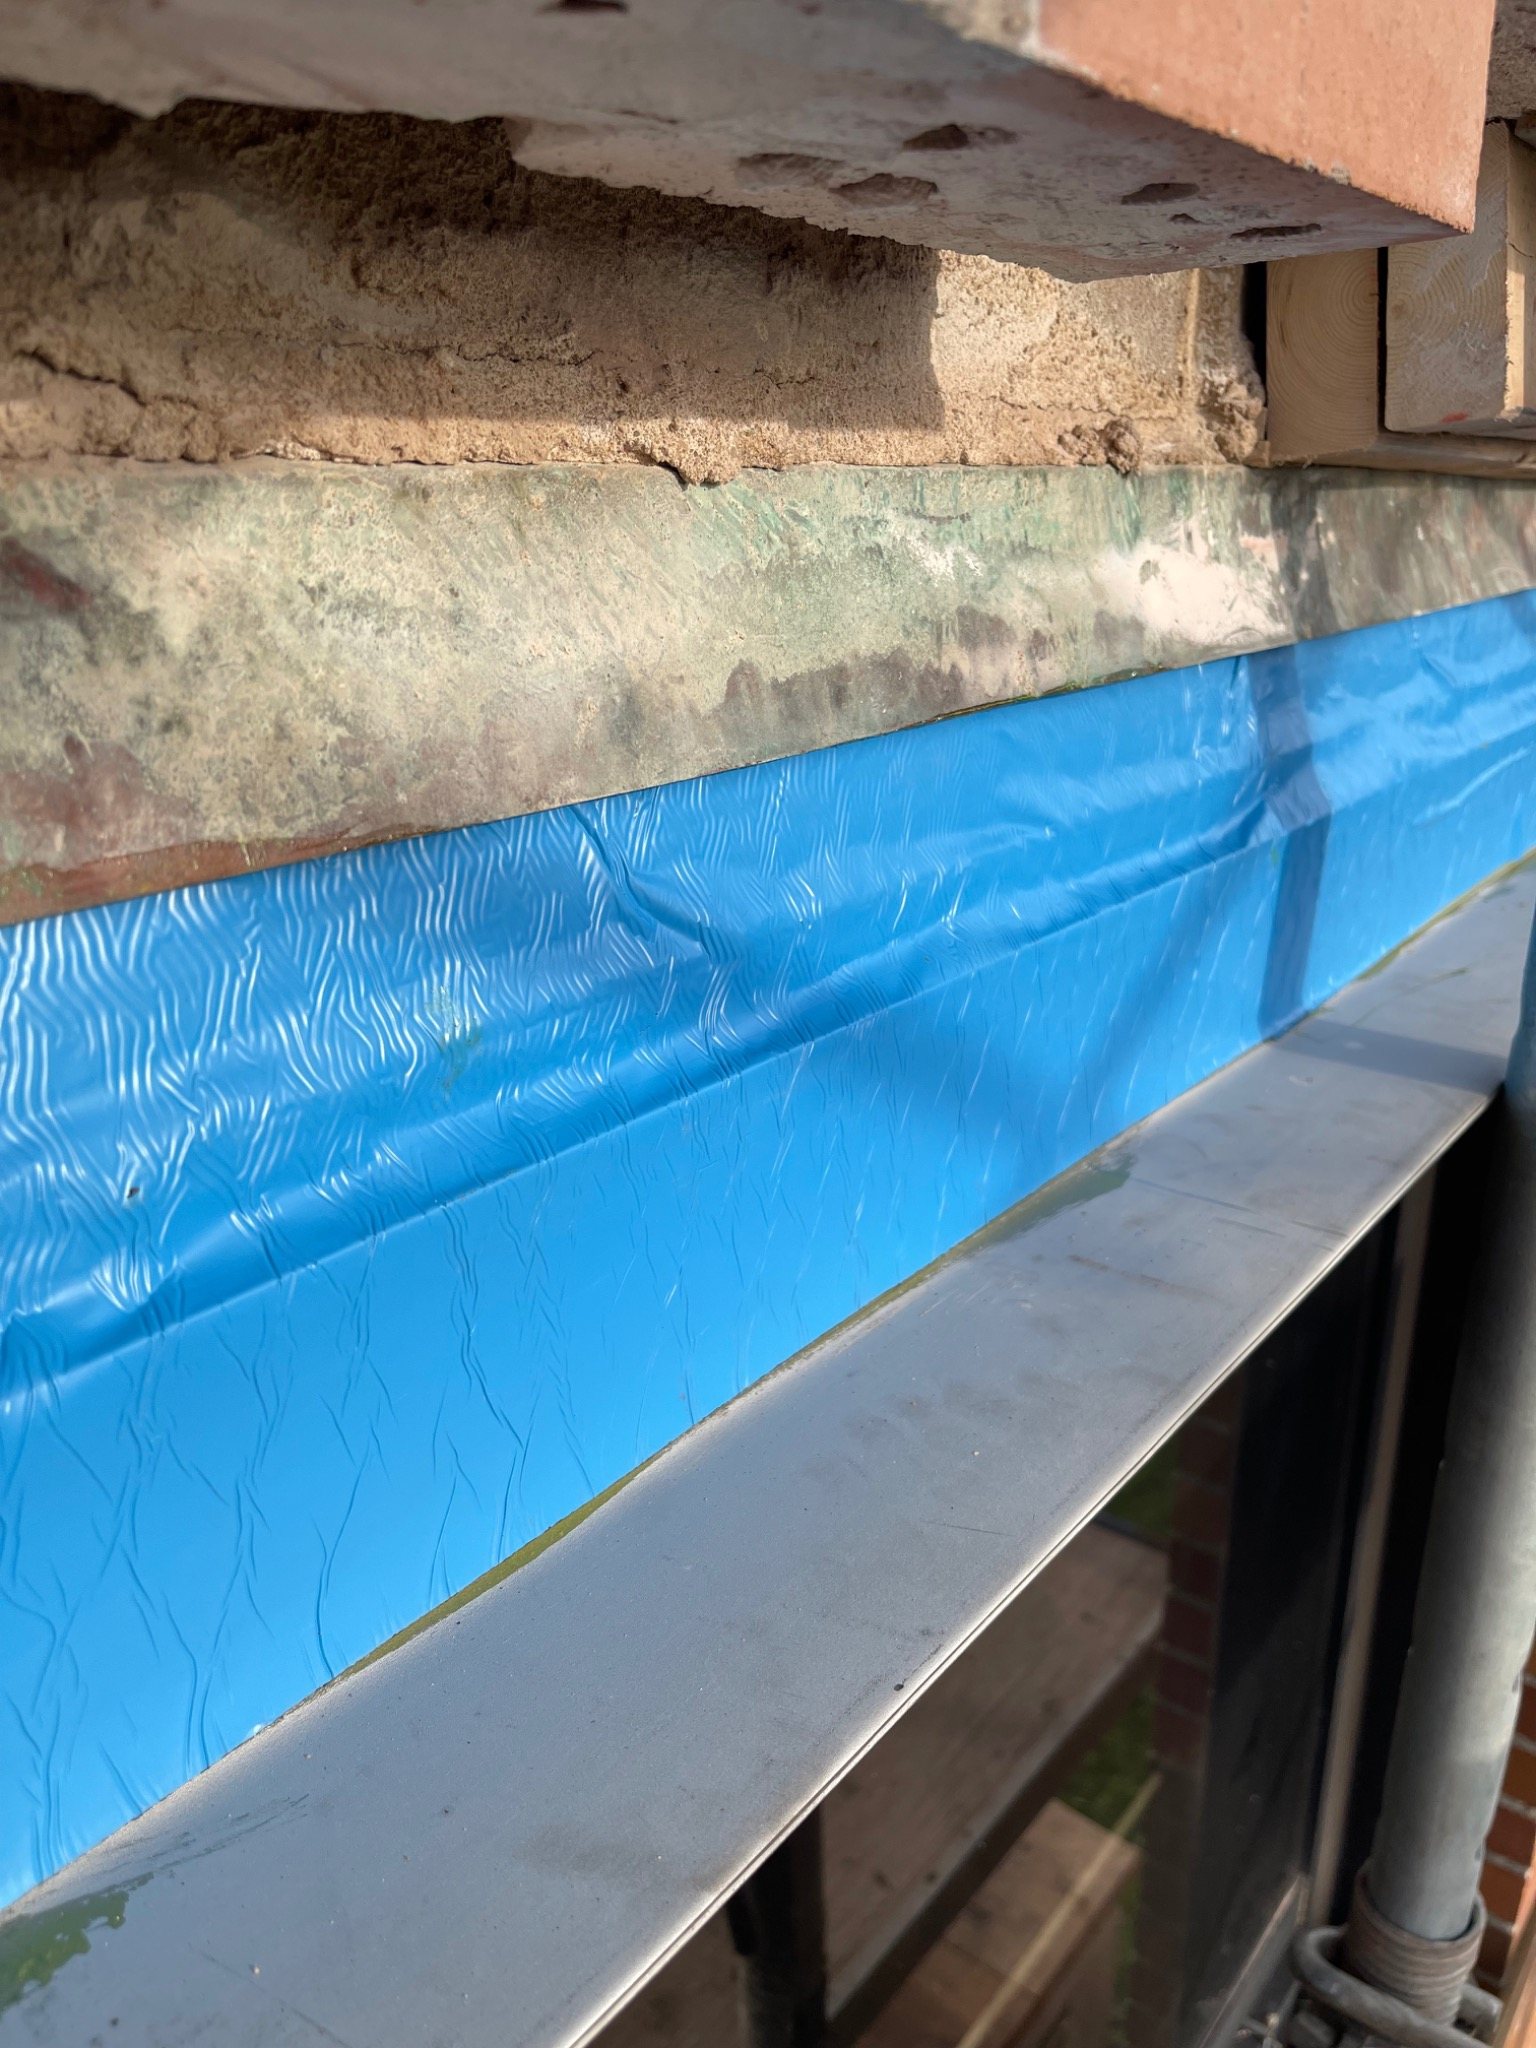
New lintel and flashing detail: primed BlueSkin membrane was installed over the new stainless lintel and the existing through-wall copper flashing was lapped over it, creating a continuous drainage transition and a separation/slip plane within the assembly.
The existing through-wall copper flashing was retained where serviceable. BlueSkin membrane flashing was installed with primer at the new lintel and positioned so the existing copper overlapped the new membrane.
This detail allowed water reaching the existing through-wall flashing to continue onto the new membrane and toward the exterior rather than being trapped behind the repaired masonry. The membrane also provided separation between materials at the lintel interface.
New weep vents were incorporated where they had been missing so water collected at the flashing level had a deliberate exit path. That matters because even well-built brick veneer is expected to manage some water behind the exterior face.
Failed steel lintels were removed and replaced with 1/4-inch stainless-steel lintels for substantially improved corrosion resistance.
A significant amount of cracked, displaced or inadequately repaired brickwork was removed and rebuilt around the window openings.
Primed BlueSkin membrane was integrated with the retained through-wall copper flashing to create a continuous outward drainage path.
Missing drainage vents were added at repaired openings so water reaching the flashing could escape to the exterior.
New joints were cut where required to provide genuine movement relief instead of relying on incomplete surface cuts.
Window perimeter sealant was renewed to close another recurring water-entry path adjacent to the repaired masonry.
The armoury sits very close to Charlottetown Harbour. Salt-laden moisture, wind-driven rain and repeated wetting create a much more aggressive environment for exposed and embedded metal than a sheltered inland wall.
That does not mean every coastal lintel must be stainless steel. It does mean material selection, drainage and water-management details deserve more attention when the wall has already demonstrated a history of corrosion.
In this case, the second replacement was an opportunity to change the system rather than simply repeat the material and detailing that had failed before.
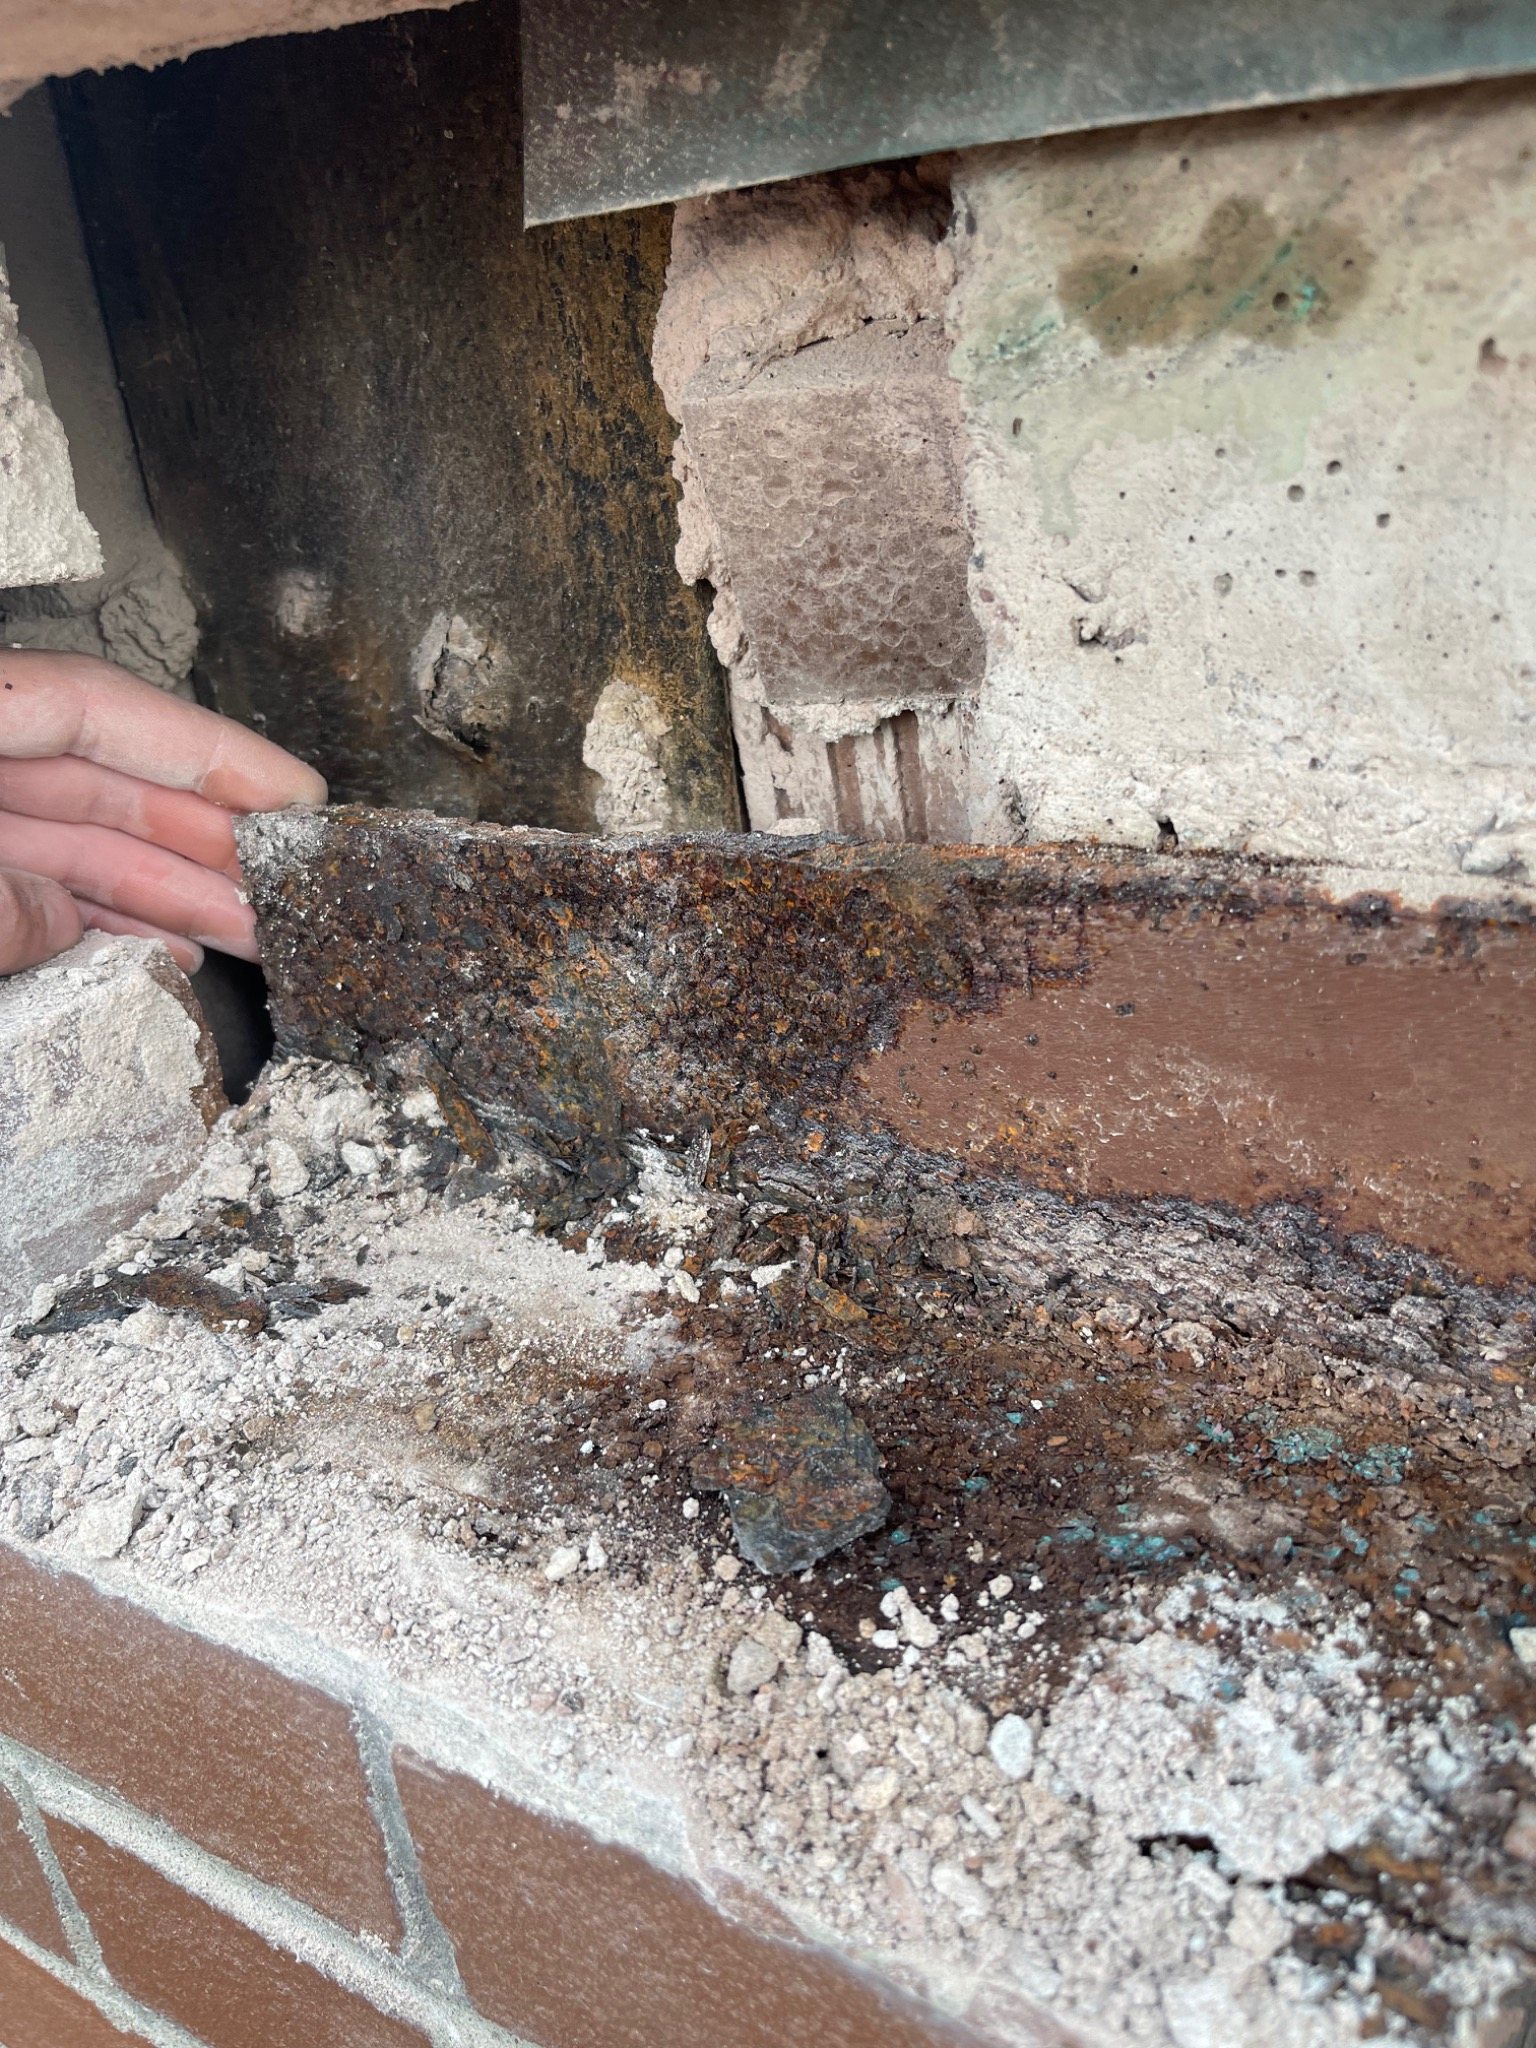
Hidden condition: once the brick was removed, the amount of corrosion and deterioration behind the finished wall became much easier to understand.
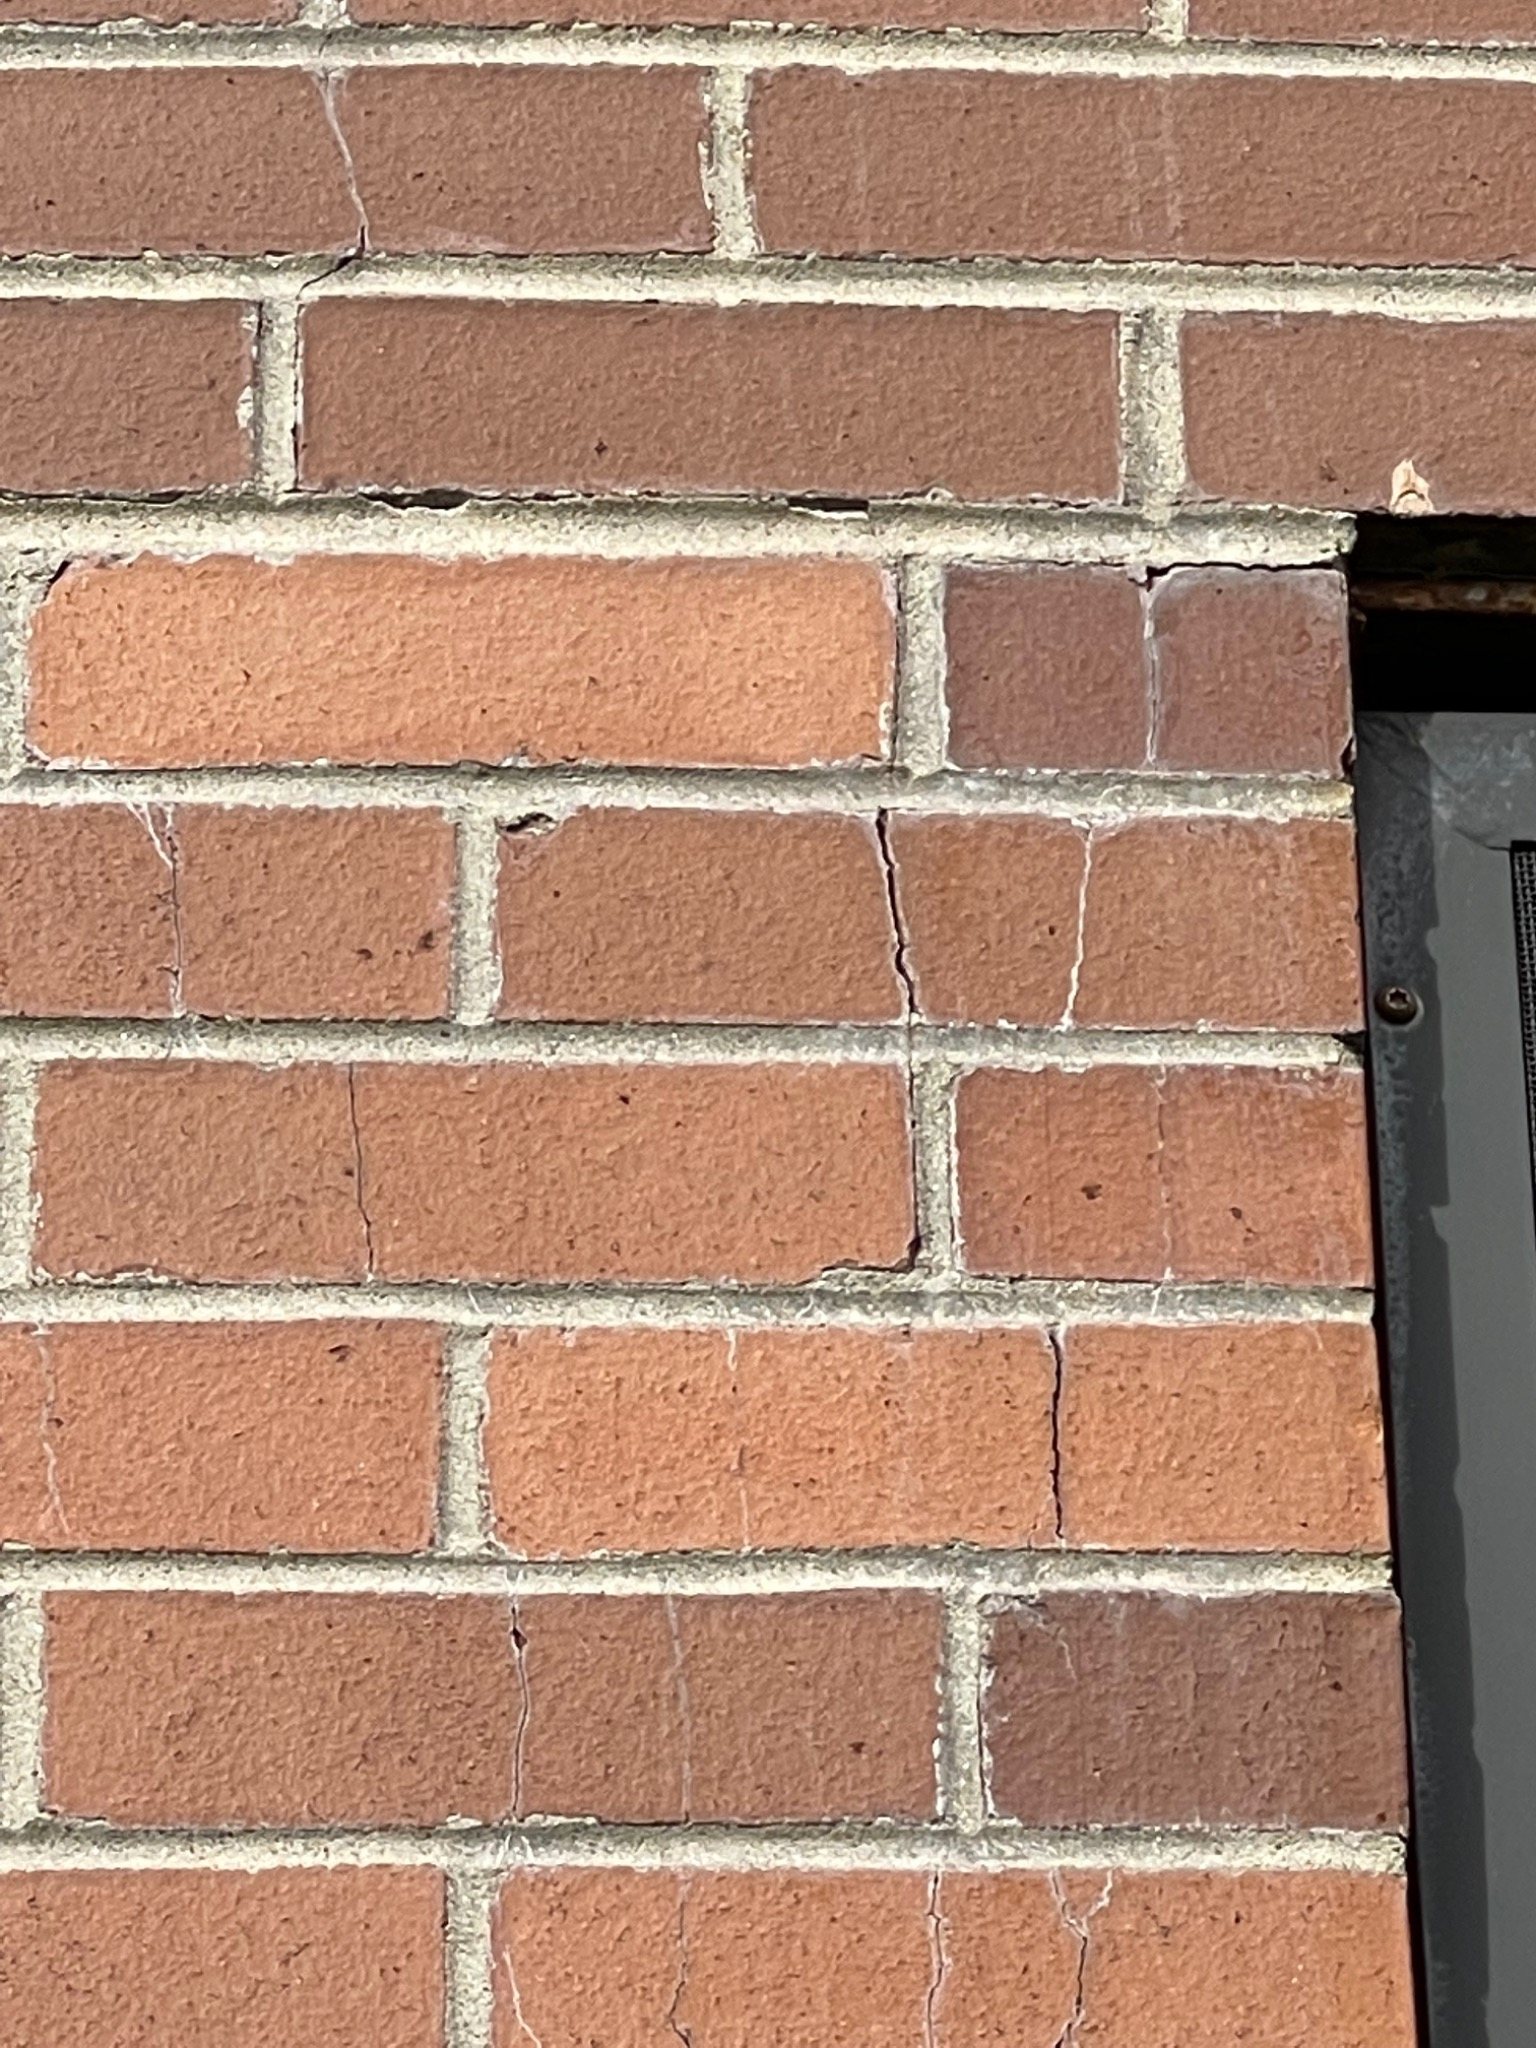
Movement expressed at the face: cracking and displacement around openings reflected restraint and deterioration within the wall assembly.
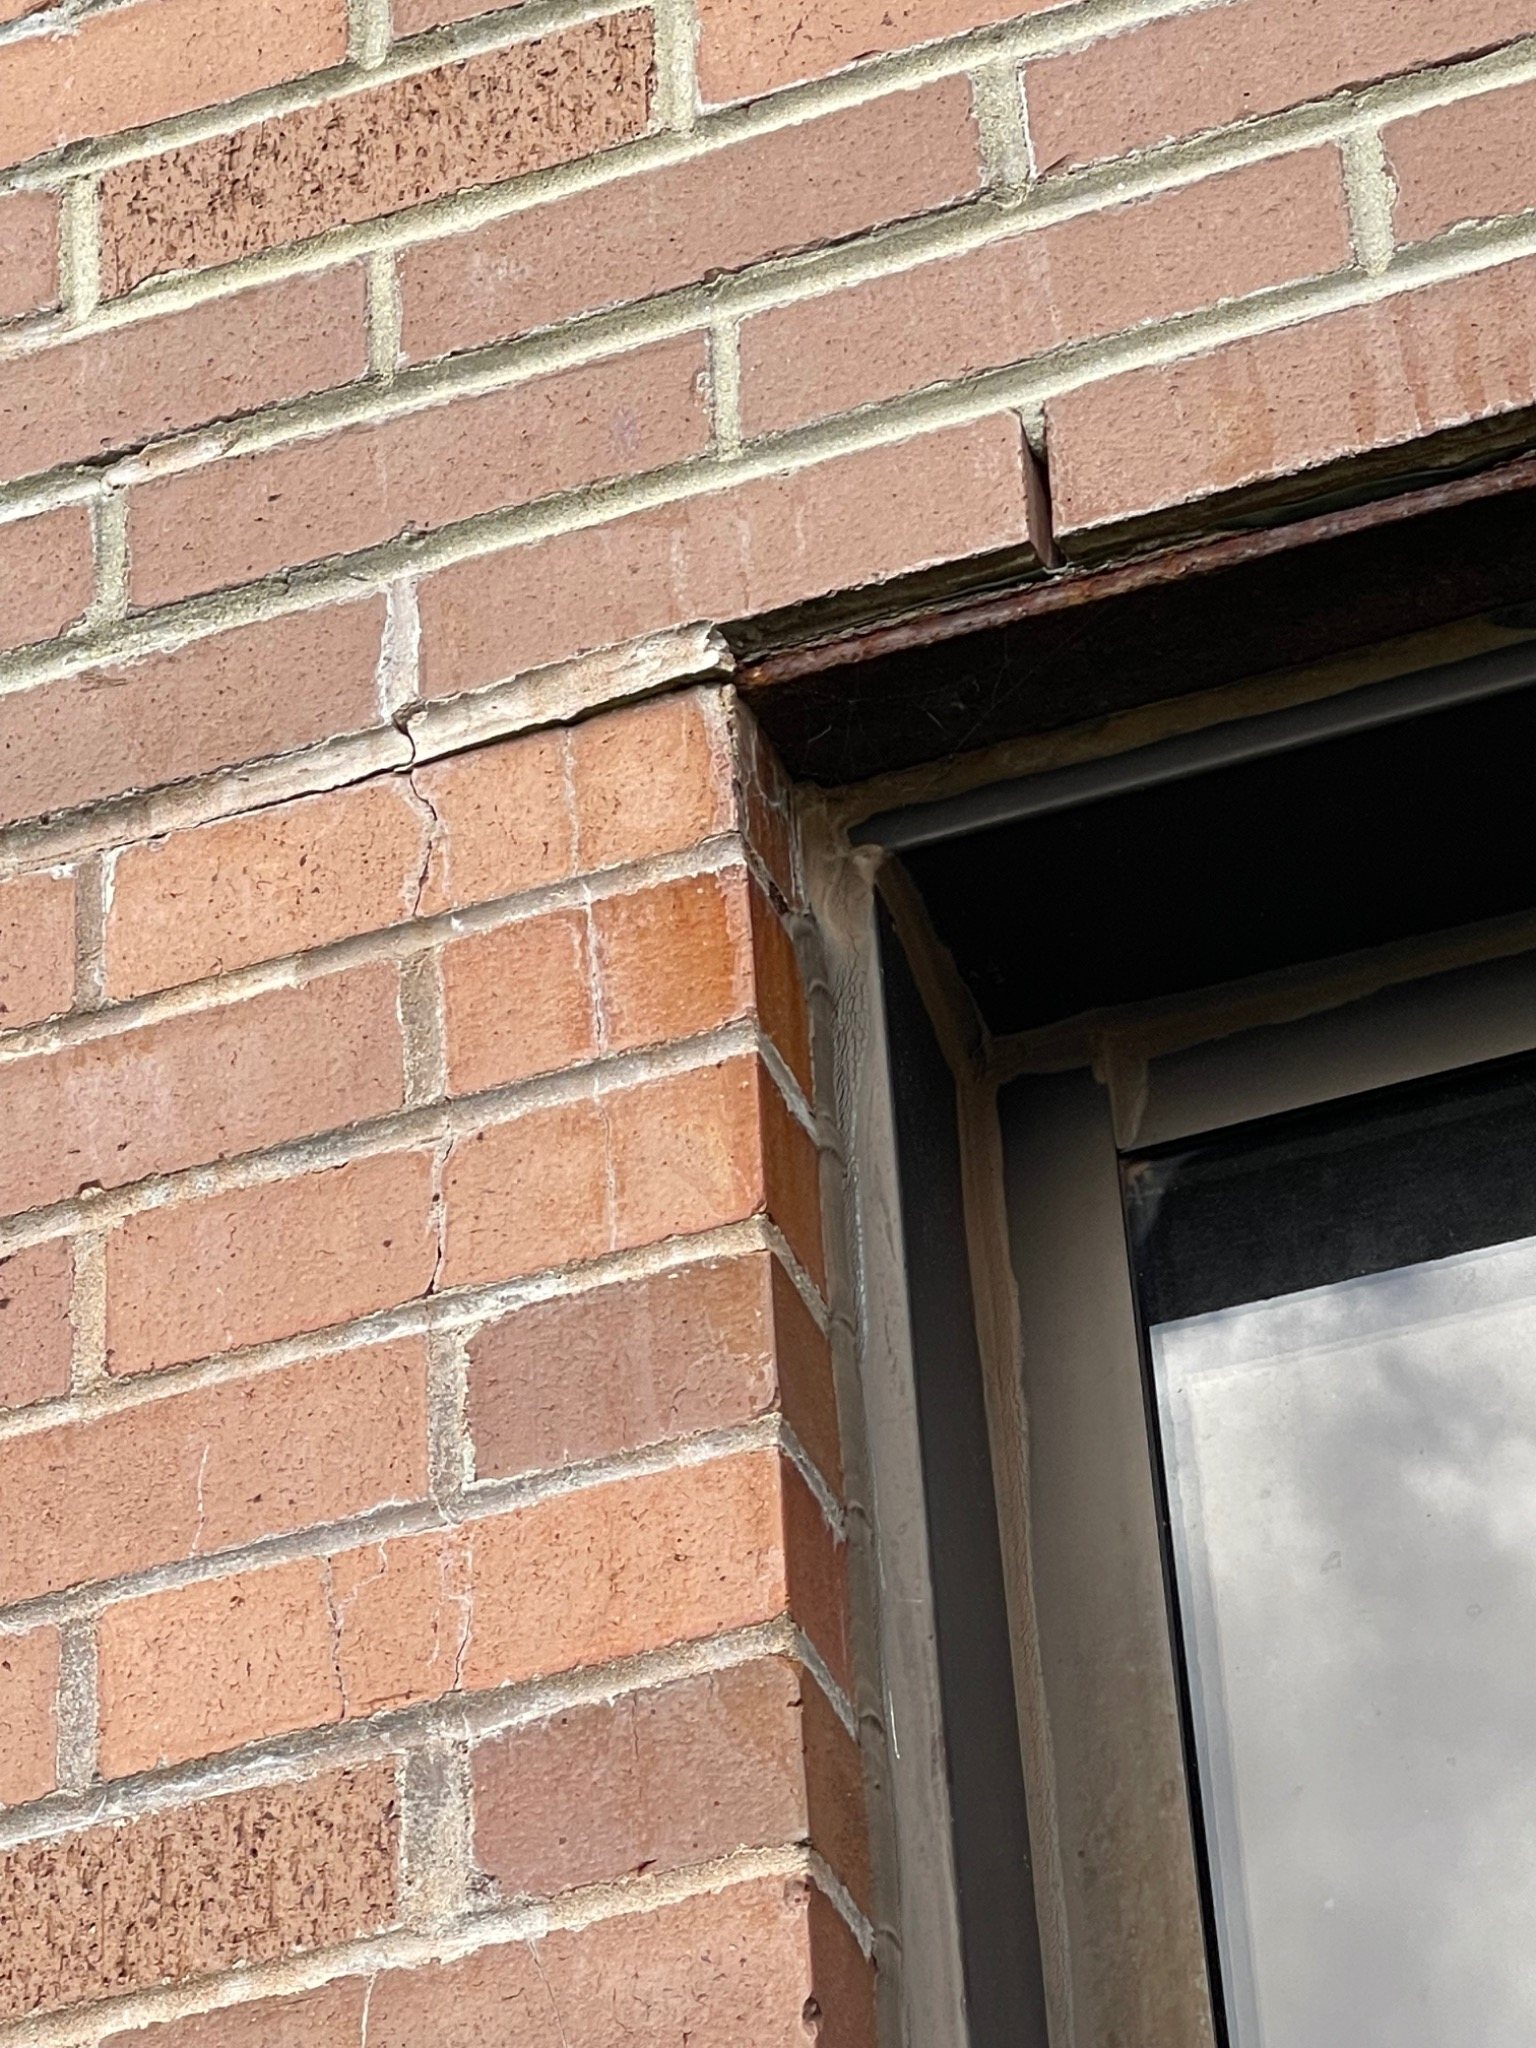
Opening condition: repairs had to extend beyond the lintel itself where surrounding masonry had already been compromised.
A previous repair history changed the question from “how do we replace the lintel?” to “why did the replacement fail?”
The lintel carries the masonry, while flashing, slope and weeps control what happens to water at the same opening.
A bead of sealant over a shallow saw cut is not equivalent to a properly formed movement joint through the brick masonry.
Stainless steel was used to materially reduce the corrosion risk that had repeatedly damaged the brickwork in this exposure.
Brick, lintel, flashing, weeps, window sealant and movement joints all influence whether an opening stays dry and stable.
The project record documents what was found after dismantling, not just the appearance of the wall before and after repair.
Federal records identify Queen Charlotte Armoury at 3 Haviland Street in Charlottetown, and Department of National Defence procurement records identify Queen Charlotte Armoury as one of its PEI facilities. The detailed repair conditions and methods on this page come from DinoMac's direct field work and project photographs.
1. Dalvay by the Sea, flagship heritage case study →
2. Mont-Carmel monument & war memorial restoration →
3. J. David Stewart Armoury lintel & brick restoration
A useful assessment looks beyond the visible crack. Lintel condition, flashing, drainage, movement joints, brick support and window perimeter seals can all be part of the same failure.
Prepared by Dean MacArthur, DinoMac Masonry Ltd., a third-generation mason with more than 20 years of hands-on masonry experience.
Repair-method descriptions, observed conditions and project photographs on this page are drawn from DinoMac's direct involvement in the lintel and brick restoration.
Reviewed August 26, 2026.
Dalvay remains DinoMac's primary featured heritage case study, documenting sandstone, mortar compatibility, drainage corrections and fireplace restoration.
Read the Dalvay Case Study