Brick face breaking away
Often called: spalling or face loss.
Look next at: moisture exposure, freeze-thaw, salts, hard adjacent repairs, coatings and whether the damage is localized or widespread.
Brick, stone and mortar often show visible warning signs before a repair becomes obvious. The useful part is not simply naming the symptom. It is understanding what that symptom may be telling you about moisture, movement, material compatibility and the condition of the wall around it.
This field guide is based on more than 20 years of hands-on masonry experience and uses real DinoMac project photographs from Prince Edward Island. The visible conditions and diagnostic principles are also relevant across Atlantic Canada and other cold, wet climates.
A spalled brick may point to saturation. A cracked joint may point to movement. A wet basement wall may point to exterior drainage. Good repair work starts by separating the symptom from the mechanism behind it.
After years in the field, one of the most useful habits is to step back before getting close. A close-up tells you what the damaged material looks like. A wide view tells you where it is happening and whether that location makes sense.
Is the deterioration concentrated below a chimney crown? Only at the base of a wall? Around one window? On one weather-facing elevation? Directly below a metal flashing detail? At the same height all the way across a foundation? Those patterns often tell you more than the damaged joint itself.
When reviewing any masonry condition, consider four questions:
Wide view: show the whole chimney, wall, foundation or building elevation so the location makes sense.
Close view: show the actual joint, brick, stone, crack or stain in enough detail to see the condition.
Add a ruler or another safe scale reference when size matters. Do not climb onto roofs, unstable walls or other unsafe locations just to obtain a photo.
These are starting points. More than one mechanism can produce a similar visual symptom, and several problems often occur together.
Often called: spalling or face loss.
Look next at: moisture exposure, freeze-thaw, salts, hard adjacent repairs, coatings and whether the damage is localized or widespread.
Often indicates: weathered or failed joints.
Look next at: joint depth, remaining bond, condition of the brick or stone, water exposure and whether prior pointing was only a thin surface smear.
Can indicate: movement following mortar joints.
Look next at: foundations, openings, lintels, settlement, seasonal movement and whether the crack is widening.
Often called: efflorescence.
Look next at: the source of moisture moving through the wall and where the wall is drying.
Can indicate: loss of bond, internal deterioration, movement or loss of support.
Look next at: whether the shape is changing, whether units are loose and what loads the wall is carrying.
Often points toward: concentrated water exposure.
Look next at: cracks, slope, drip edges, flashing, open joints and whether water is being directed back into the masonry.
Spalling ranges from a thin surface flake to the loss of a substantial portion of the brick face. Once the fired exterior surface is lost, the softer interior of some bricks can weather more quickly.
Across PEI and Atlantic Canada, I pay particular attention to spalling around chimneys, parapets, wall tops, sills, grade-level masonry and other areas exposed to repeated wetting. Freeze-thaw exposure can accelerate damage when a brick contains enough moisture as it freezes.
National Research Council Canada research has shown that freeze-thaw durability depends both on the brick itself and on the conditions it experiences in service, including moisture content, geographic exposure and wall orientation.
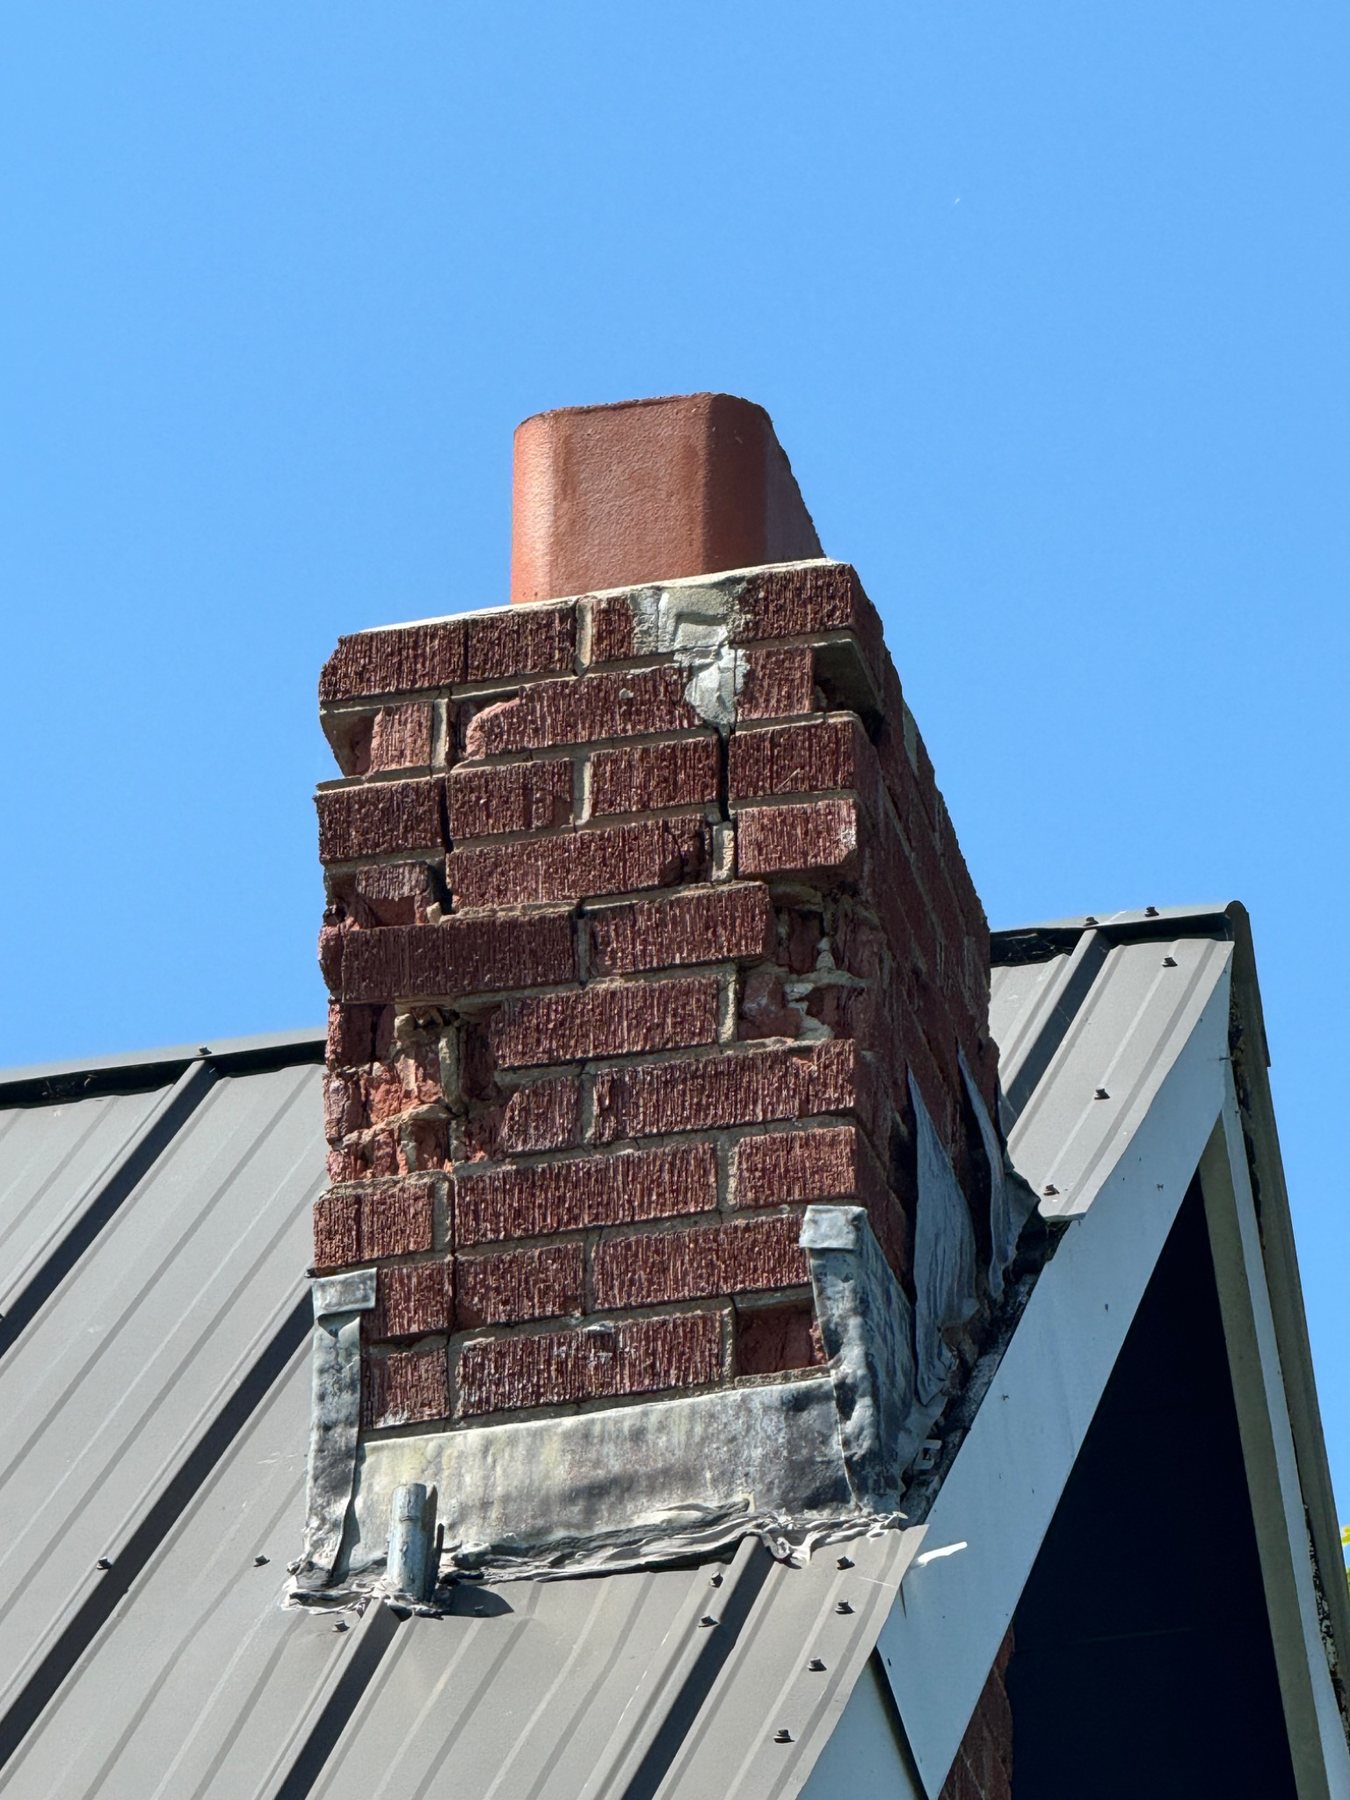
Field example: Advanced deterioration has progressed beyond isolated surface weathering. Multiple units have lost material and the surrounding joints and roof-to-chimney details also deserve investigation. At this stage, the repair decision is about how much sound masonry remains, not simply filling individual joints.
Weathered mortar can become recessed, sandy, cracked or loose. In older masonry, that is often preferable to having the brick or stone fail first, because traditional mortar was intended to be the more repairable part of the wall.
A joint that looks freshly filled at the surface can still be poorly repaired if the new mortar is only a thin cap over loose material. Proper repointing requires removing failed mortar back to sound material while protecting the edges of the surrounding brick or stone.
I also look for a change in joint character. If one area is very hard, smooth and dense while the original work is softer and more open, that can identify a later repair campaign and help explain why deterioration is concentrated beside it.
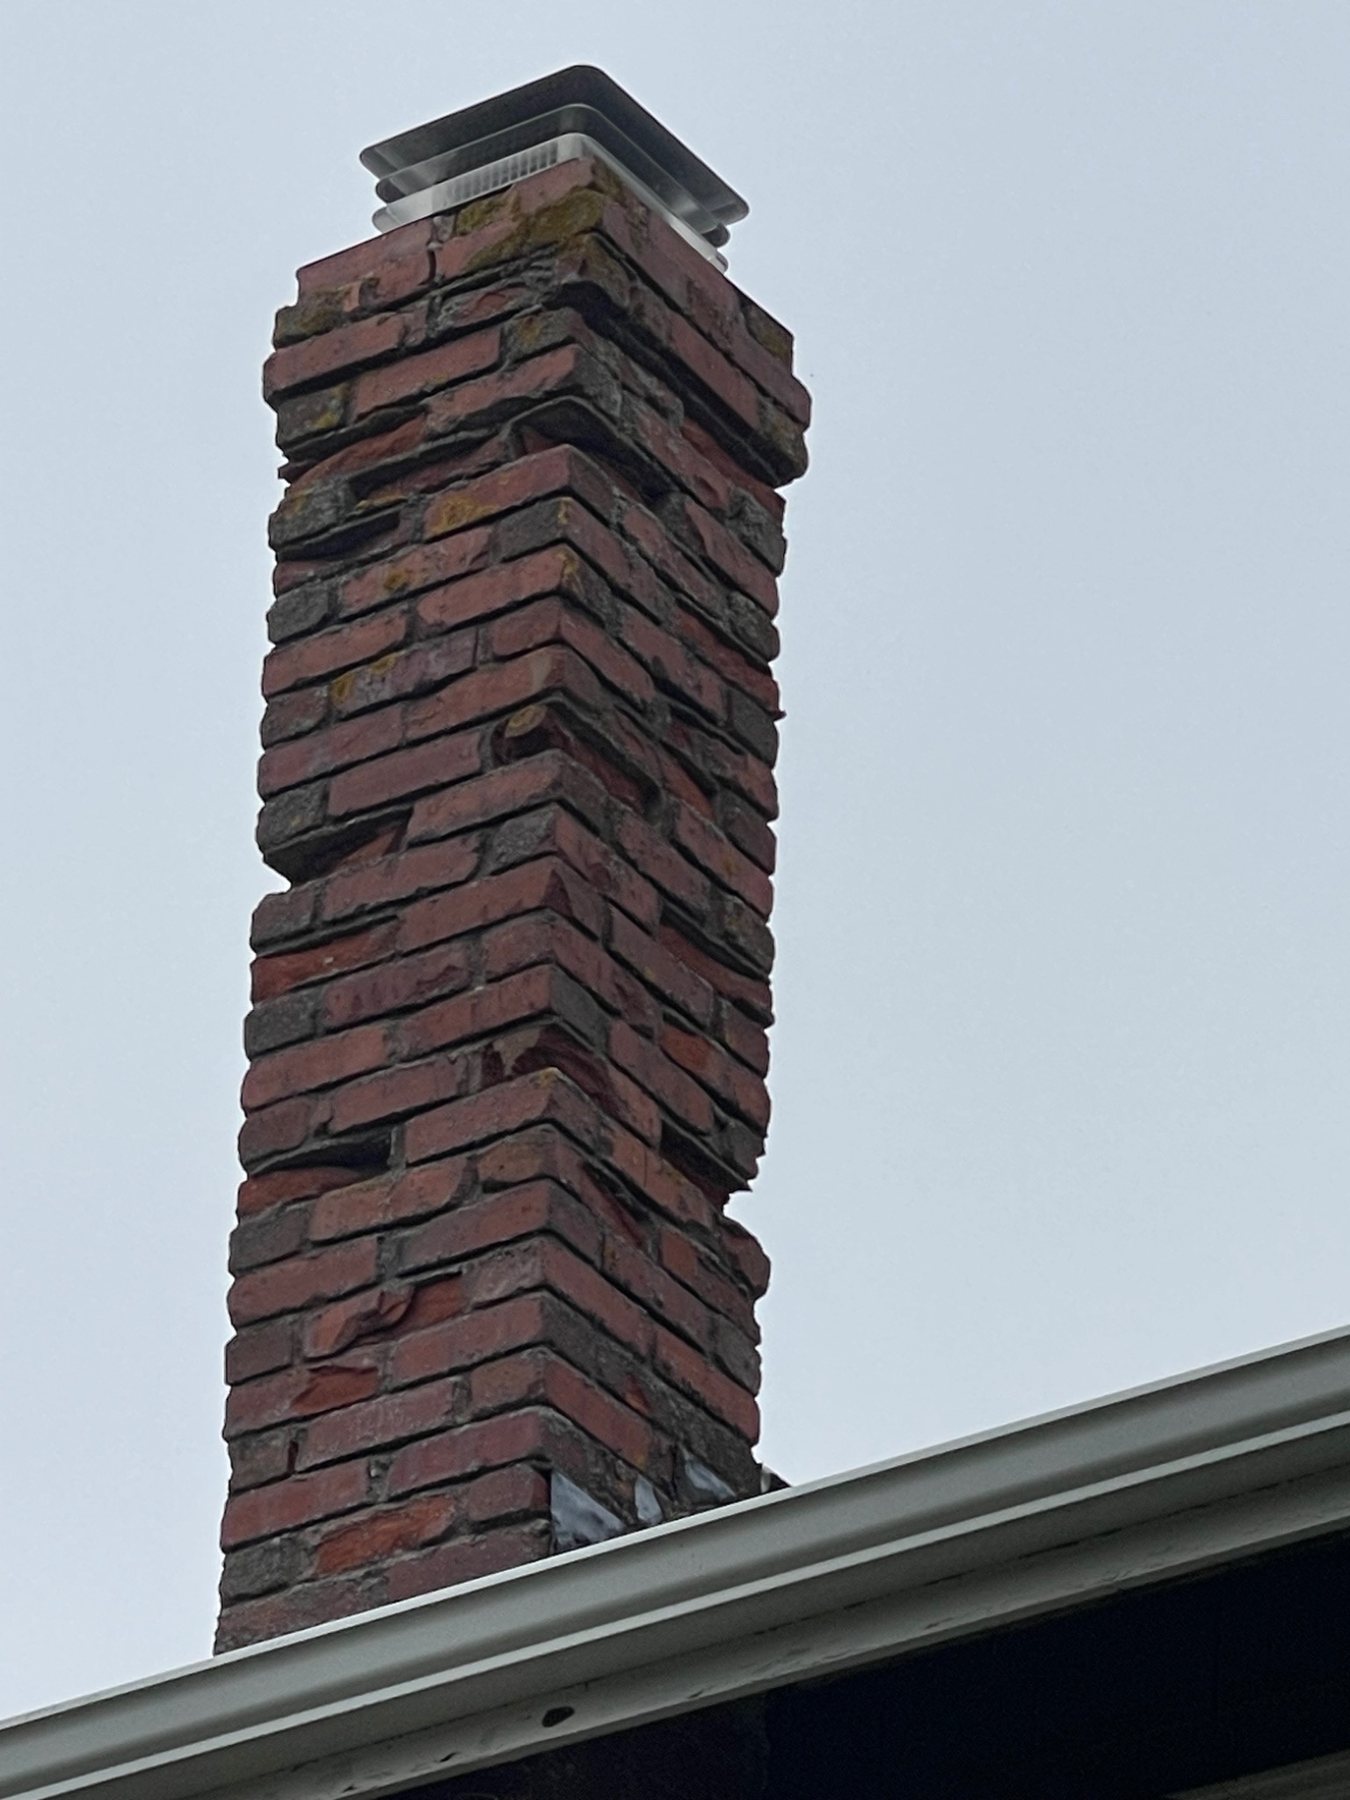
Field example: The open joints are only part of the story. Several courses have visibly shifted out of plane, so this is not a simple repointing condition. The wall shape, remaining bond and stability of the masonry have to be considered before selecting the repair.
Masonry cracks can follow mortar joints, pass directly through brick or stone, form vertically beside an opening, or create a stair-step pattern. Each pattern deserves a different question.
A stair-step crack often follows the path of least resistance through mortar joints. A vertical crack beside a window or door may involve an opening, lintel, support or movement concentration. Cracks that pass directly through masonry units can indicate that forces exceeded the unit itself rather than simply opening the joint.
What matters most in the field is whether the crack is old and stable or actively changing. Photographs with a date and simple repeat measurements can be more useful than guessing from a single snapshot.
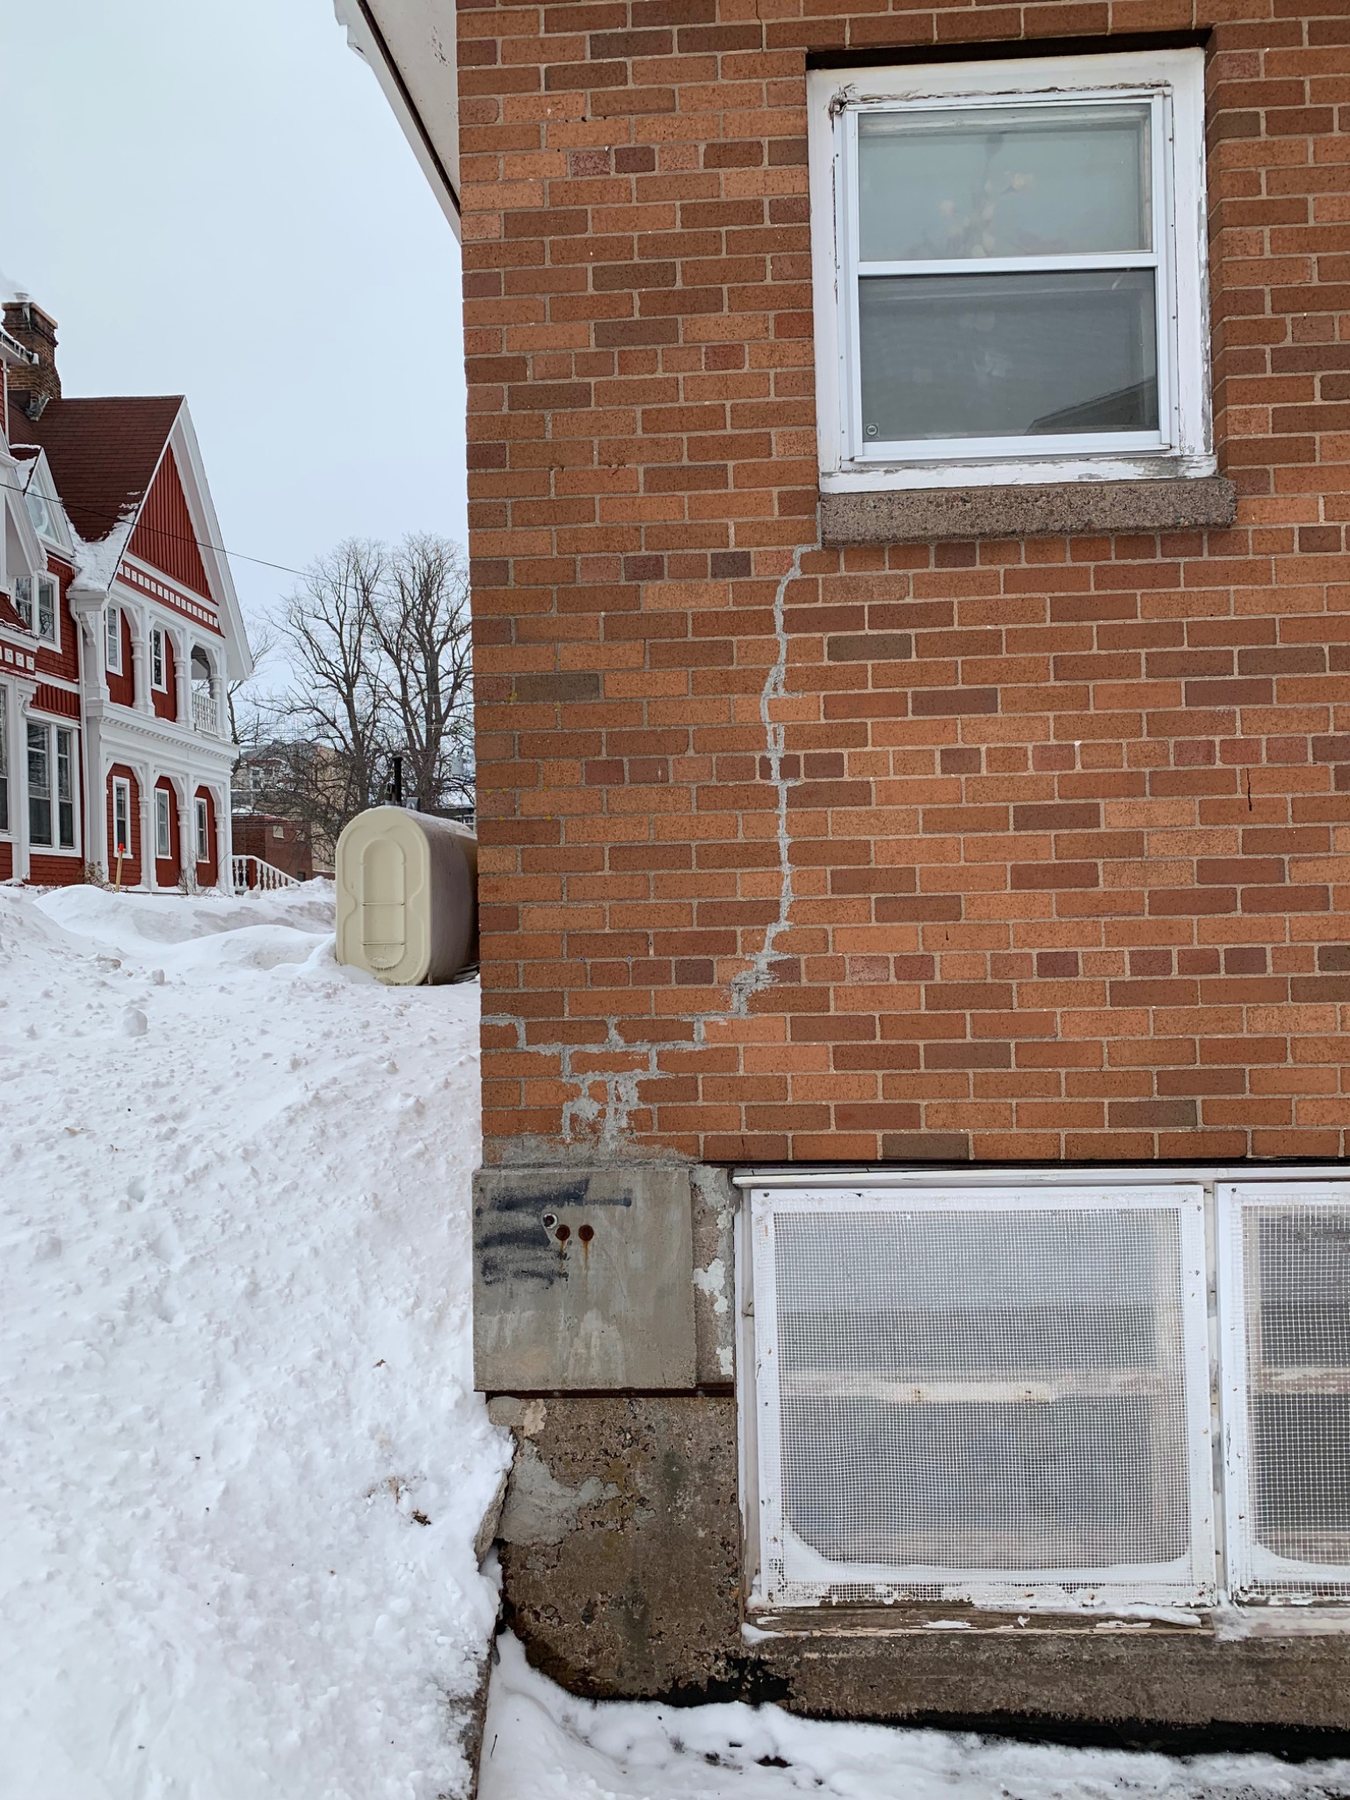
Field example: This crack begins at the window/sill area and travels downward through the masonry. The starting point matters. Rather than treating the visible line in isolation, the opening, support, wall movement and foundation conditions should all be considered.
Efflorescence forms when water dissolves soluble salts within masonry or mortar, carries them toward the surface and evaporates. The remaining salts can appear as a powdery or crystalline white deposit.
When I see efflorescence, I want to know what changed in the moisture pattern. Did a gutter fail? Was landscaping raised against the wall? Is there a leaking cap or flashing detail above? Did a new coating reduce drying? Is the deposit seasonal?
Cleaning the white deposit may improve appearance, but if moisture continues to travel through the wall, the deposit can return.
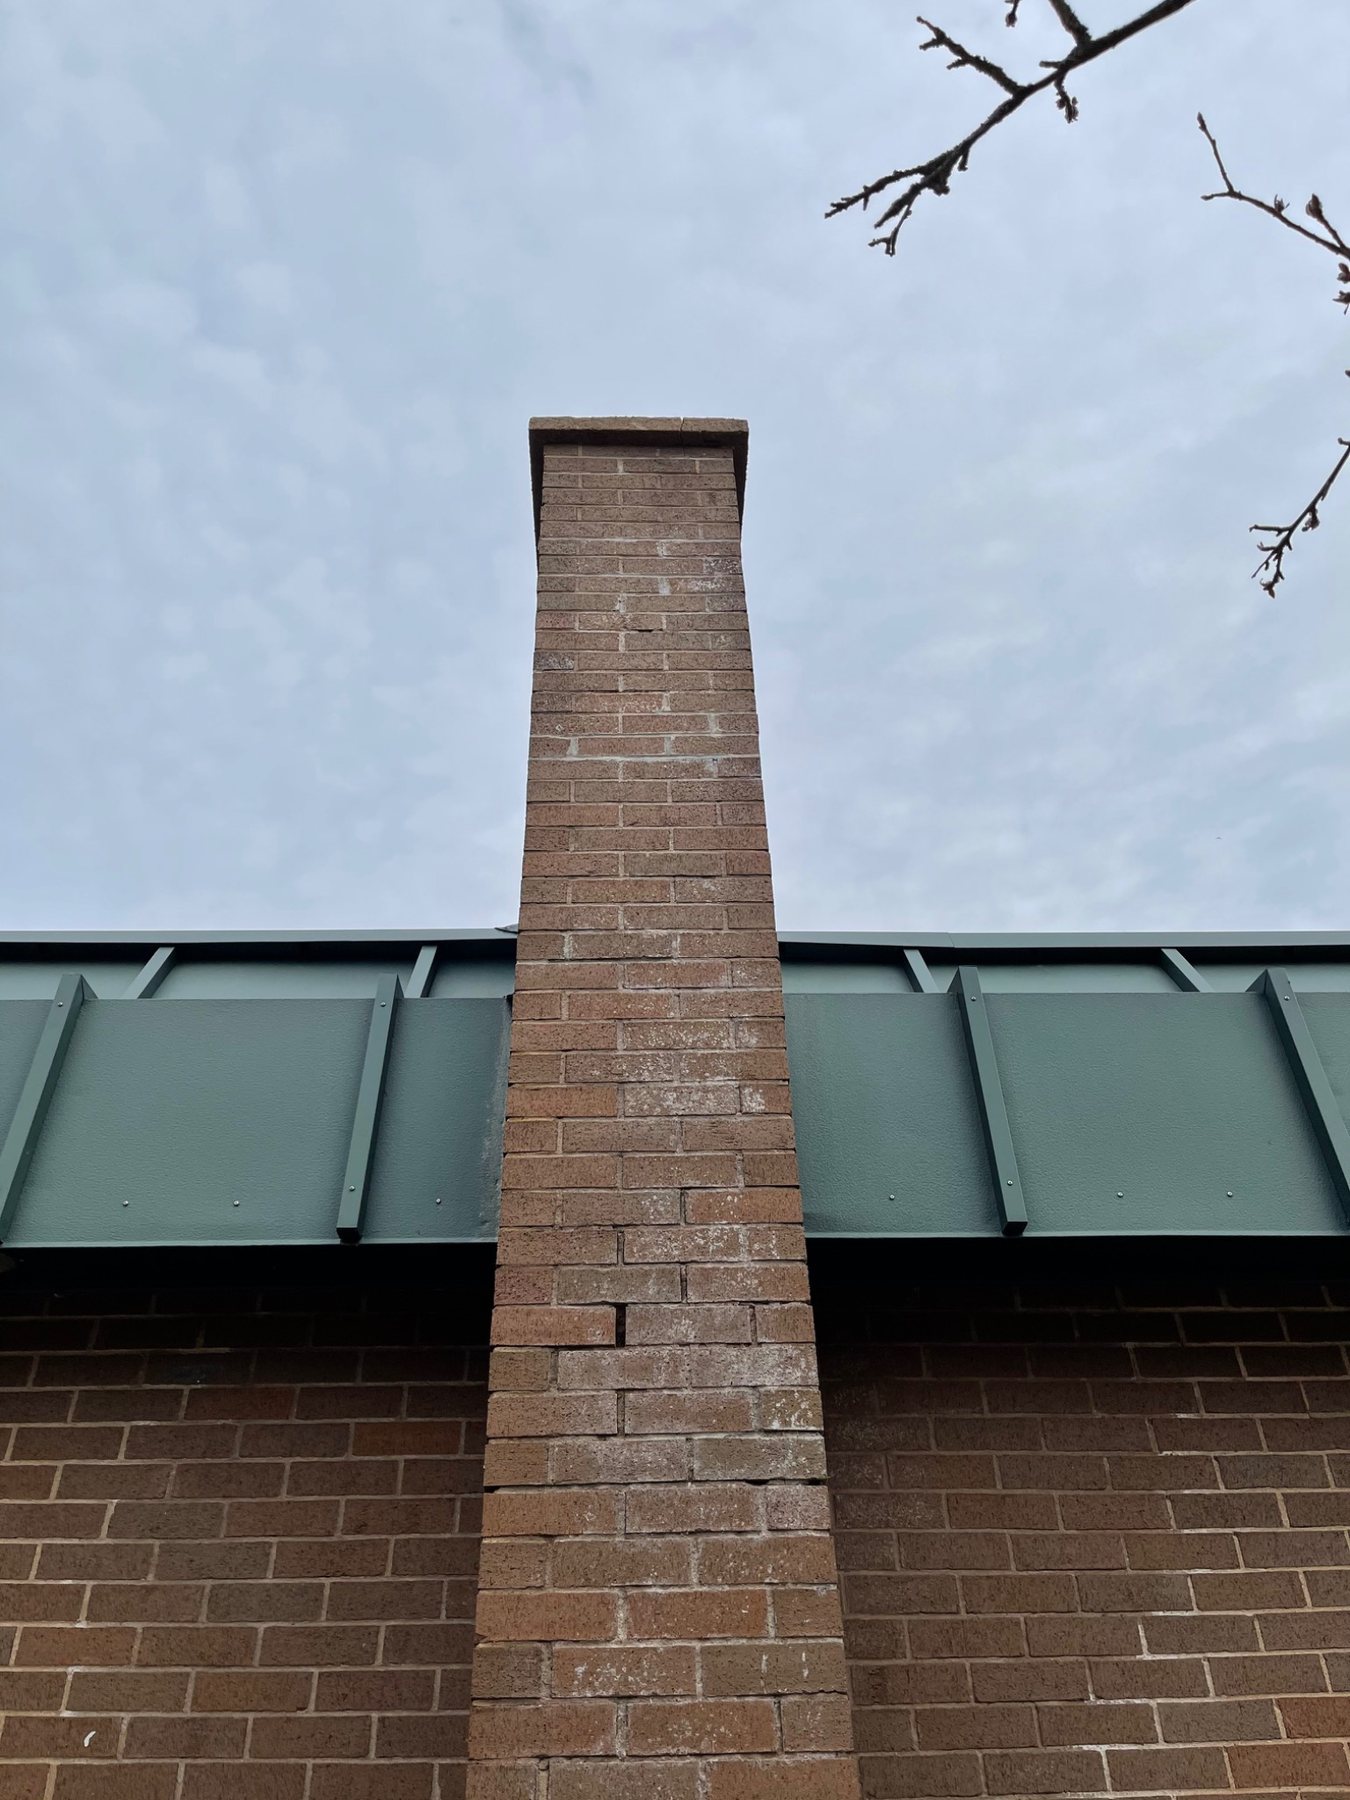
Field example: White deposits are visible over a broad vertical area of this exposed chimney. The deposit itself is not the repair. It is evidence that moisture has been moving through the masonry and drying at the surface, so the exposure and water-entry details should be reviewed.
A bulge, lean or group of displaced stones suggests that the issue is no longer limited to the exposed mortar joint. The wall may have lost internal bond, smaller packing stones may have shifted, ties or supports may have deteriorated, or movement may be occurring elsewhere in the structure.
On old stone foundations, irregularity is normal. The important distinction is whether the wall has always had that shape or whether it is progressively moving. Fresh gaps, loose packing stones, new cracks and changes from old photographs are useful clues.
Loose masonry overhead, particularly above doors, walkways or occupied areas, should be treated more urgently because falling units create a safety risk.
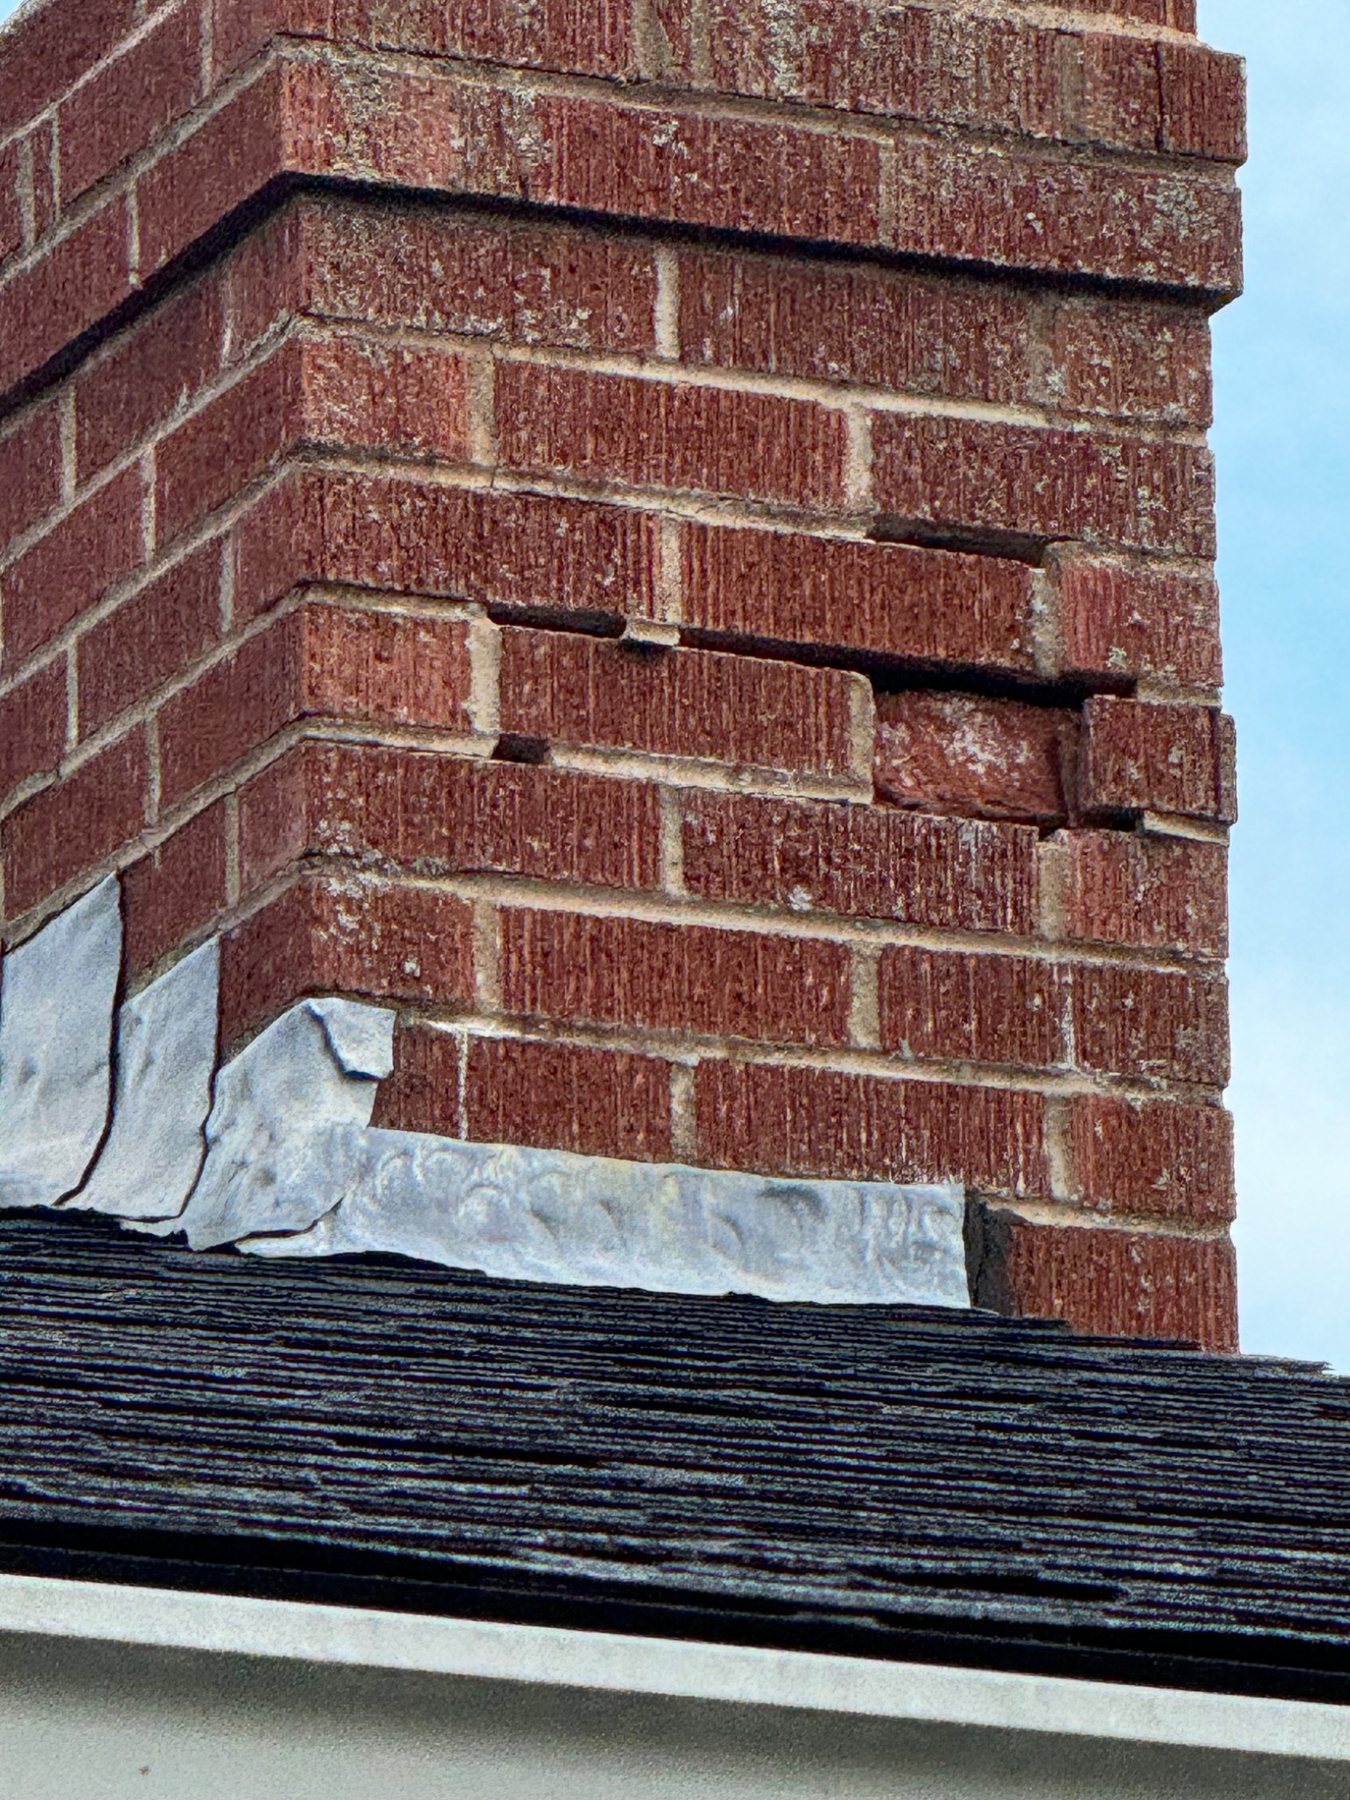
Field example: This chimney shows clear loss of alignment and open joints through several courses. Once individual units can move independently, adding mortar to the exposed joints does not restore the original bond of the wall. Selective or larger-scale rebuilding becomes a much more likely repair.
Vertical masonry can shed a surprising amount of rain. Horizontal or near-horizontal surfaces are different. Chimney crowns, wall caps, stone sills, coping and exposed tops can hold water long enough for small cracks or poor slopes to become significant.
When deterioration appears directly below one of these details, I inspect the upper surface before assuming the wall face itself is the problem. Cracks, inadequate slope, failed joints, missing drip details and open transitions can all keep the masonry below saturated.
Chimneys are especially exposed because they sit above the roofline and combine masonry, flue components, crowns, caps and flashing in one small area.
Chimney repointing vs rebuilding →
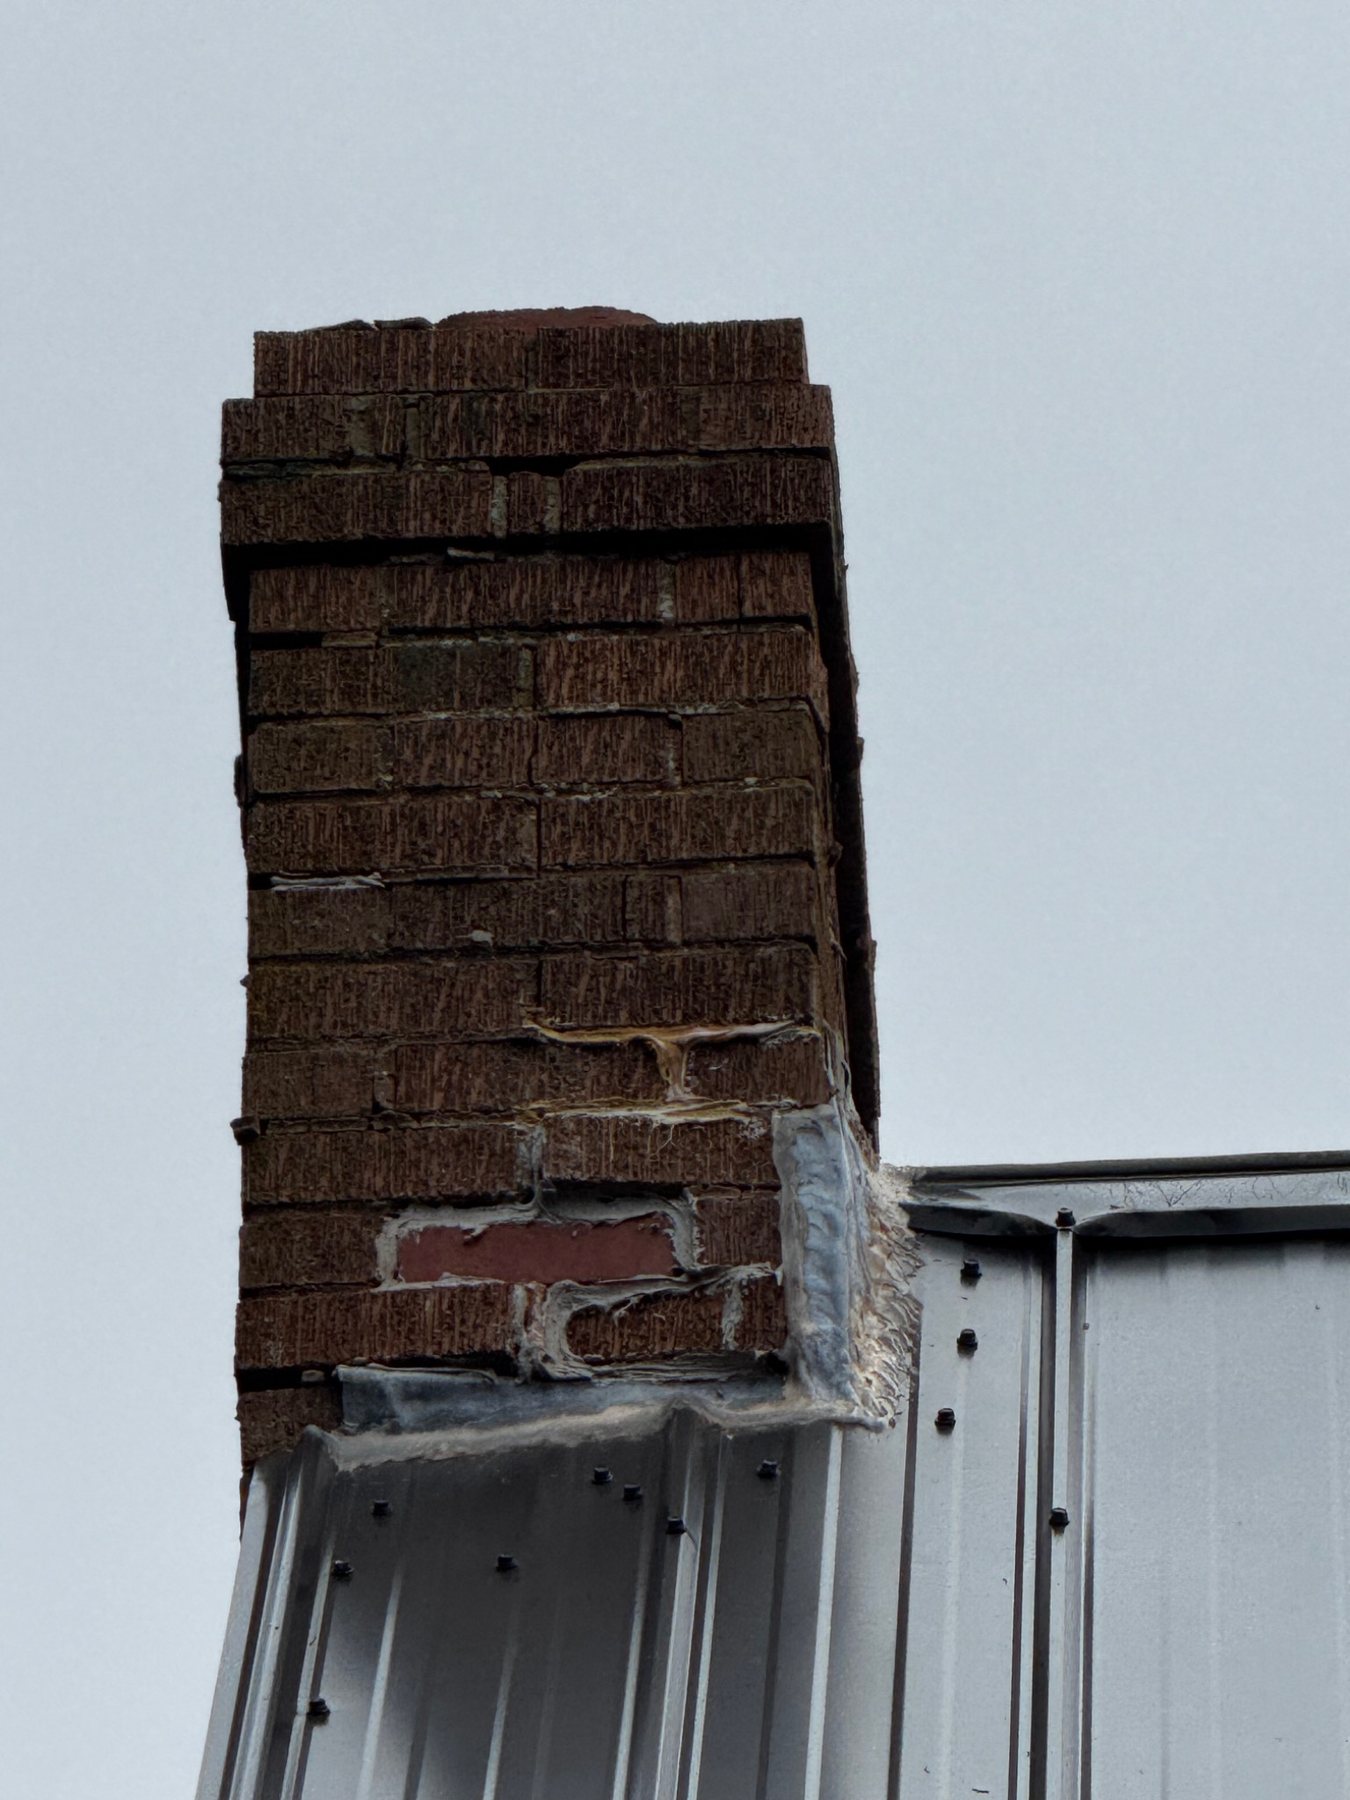
Roof intersection: Water-management details at the roofline can contribute to deterioration well above the flashing. Patching at the surface should not substitute for understanding how the flashing is integrated with the roof and chimney.
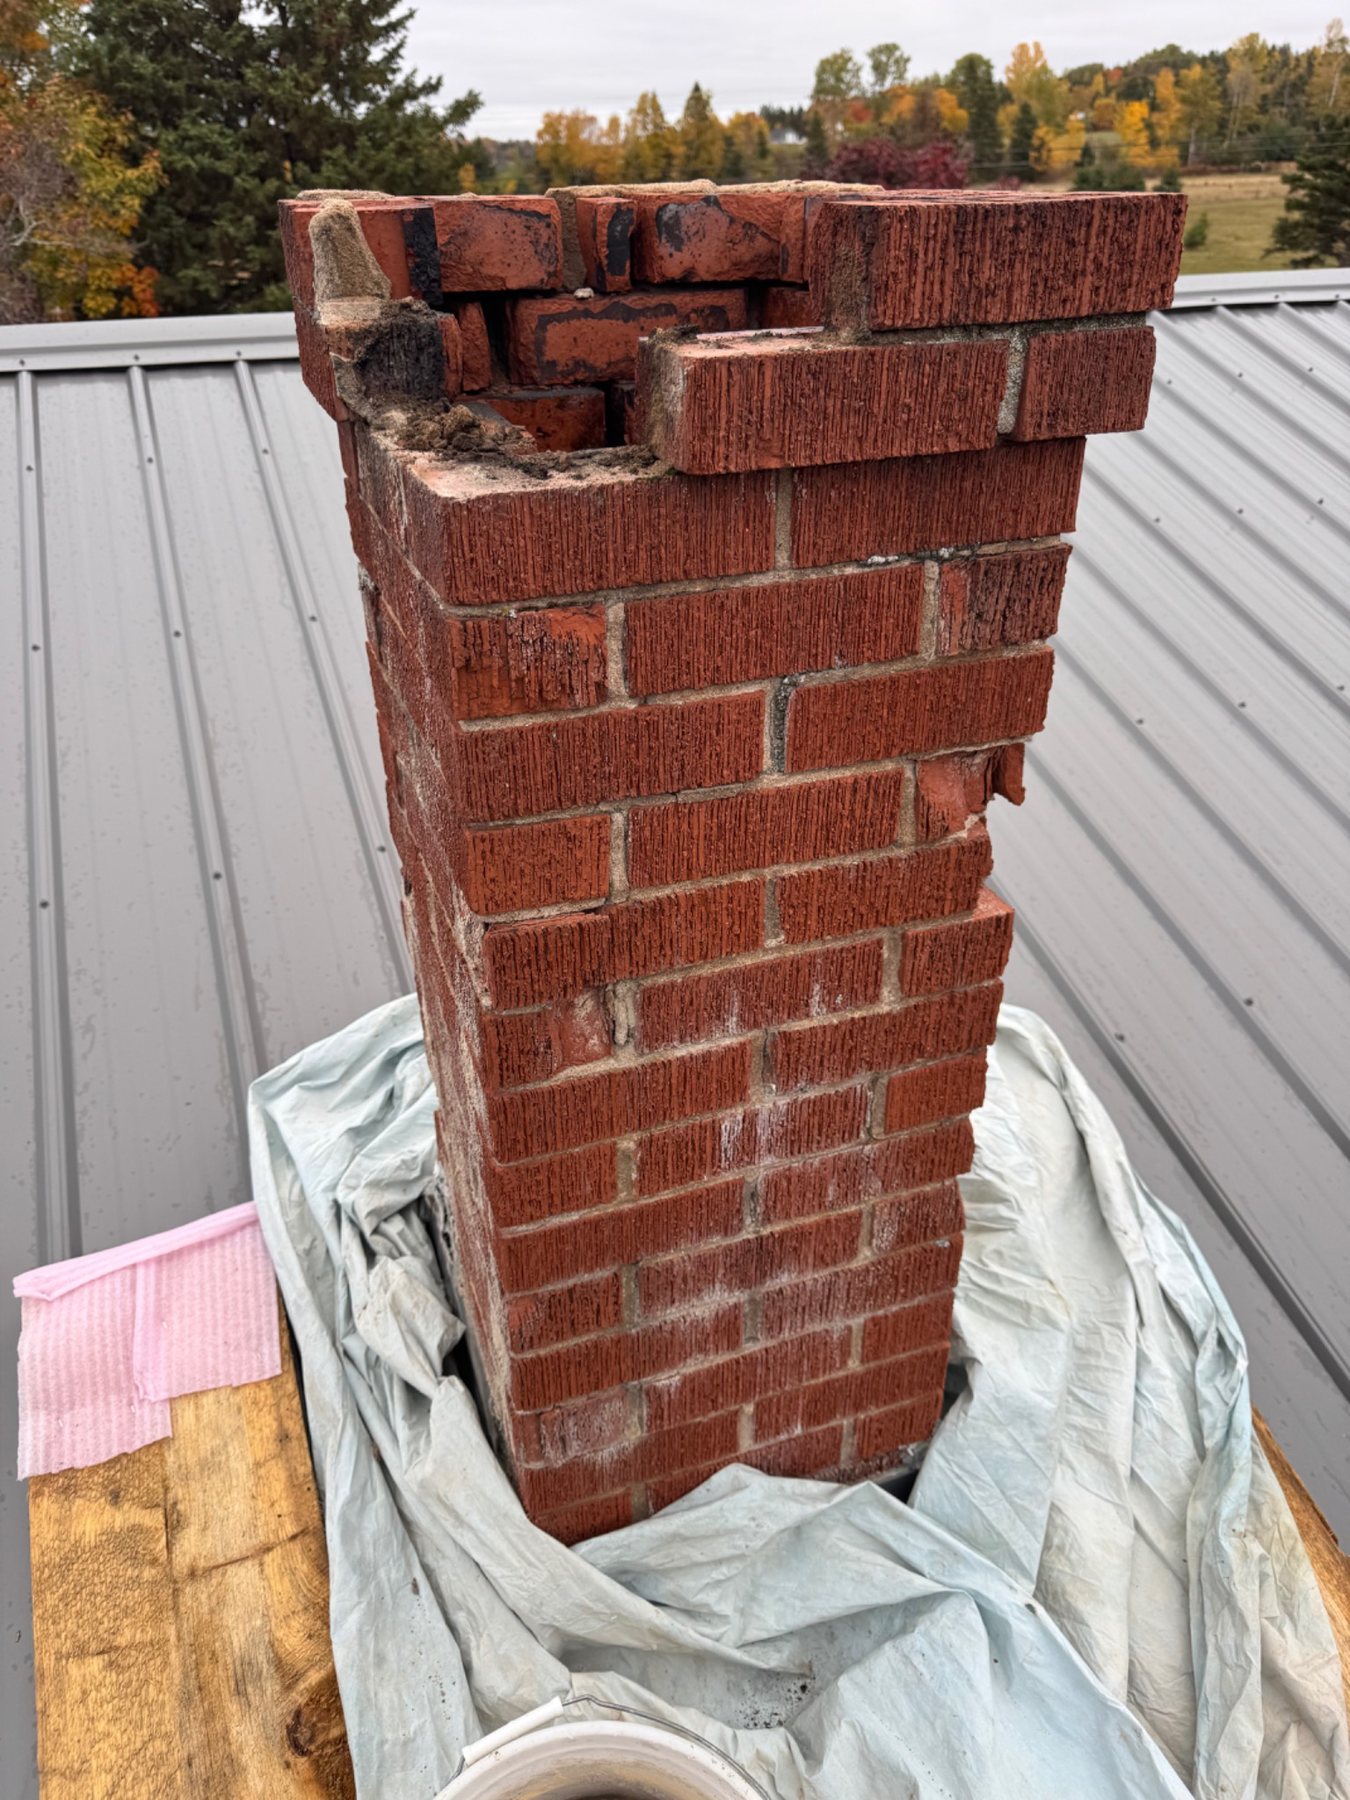
Advanced top failure: Once the upper courses have lost enough mortar and units are missing or unsupported, the condition has progressed well beyond routine pointing.
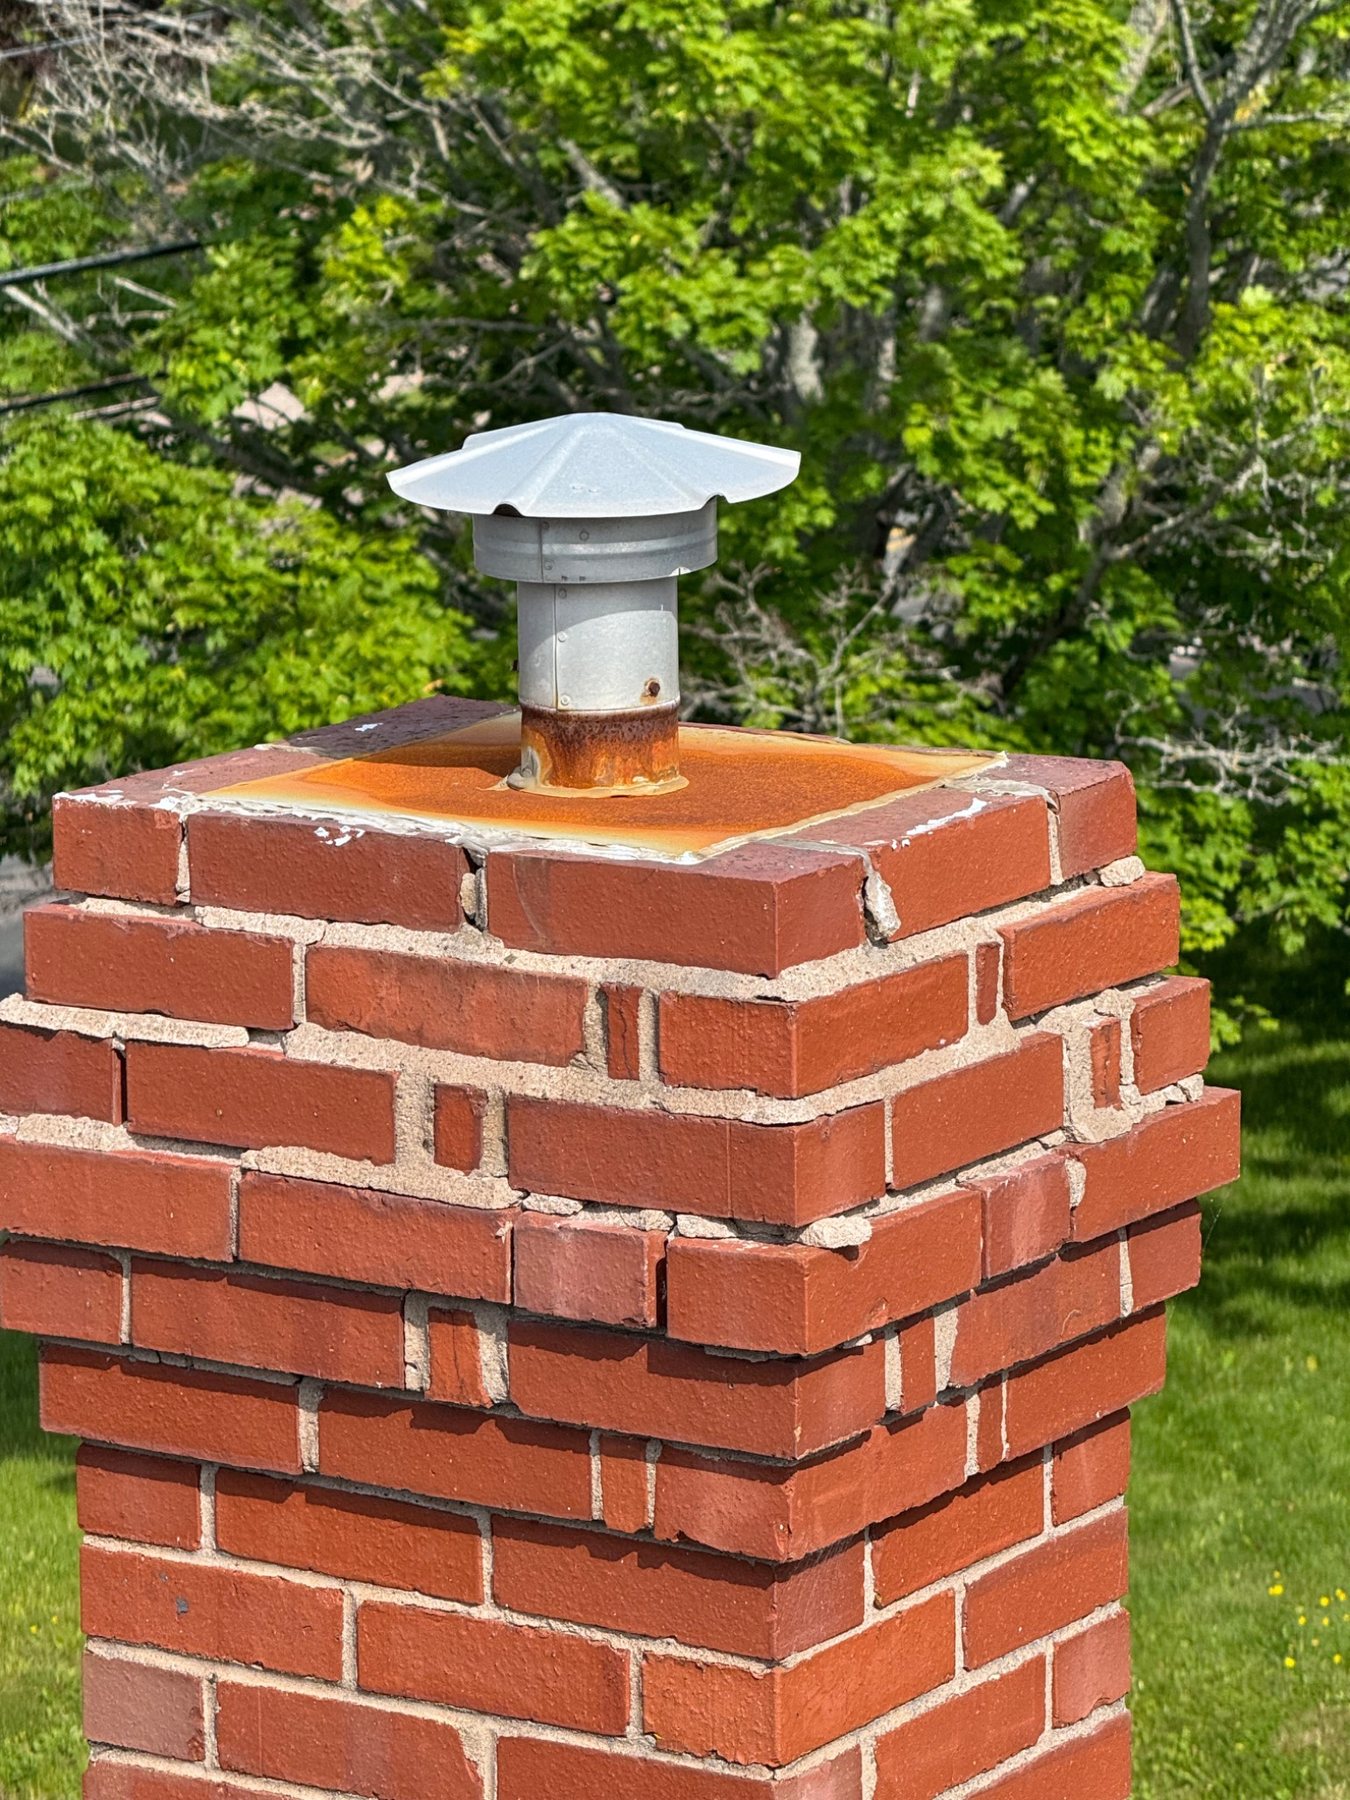
Open joints and cracking are concentrated immediately below the top surface. Because the upper courses receive direct rain and snow, the condition of the crown or top detail should be assessed together with the masonry below it.
On older masonry, one of the first things I look for is evidence of previous repair campaigns. Different colour, joint shape, hardness or tooling can reveal where a wall was repointed or patched decades after the original work.
The U.S. National Park Service warns that overly hard, less permeable mortar can accelerate deterioration of softer historic brick. It also notes that poor pointing technique can damage brick edges and alter the appearance of the wall.
Another common visual clue is mortar spread over the face of the brick or stone rather than kept within the joint. That can indicate rushed pointing, shallow patching or an attempt to cover deteriorated joints rather than properly prepare them.
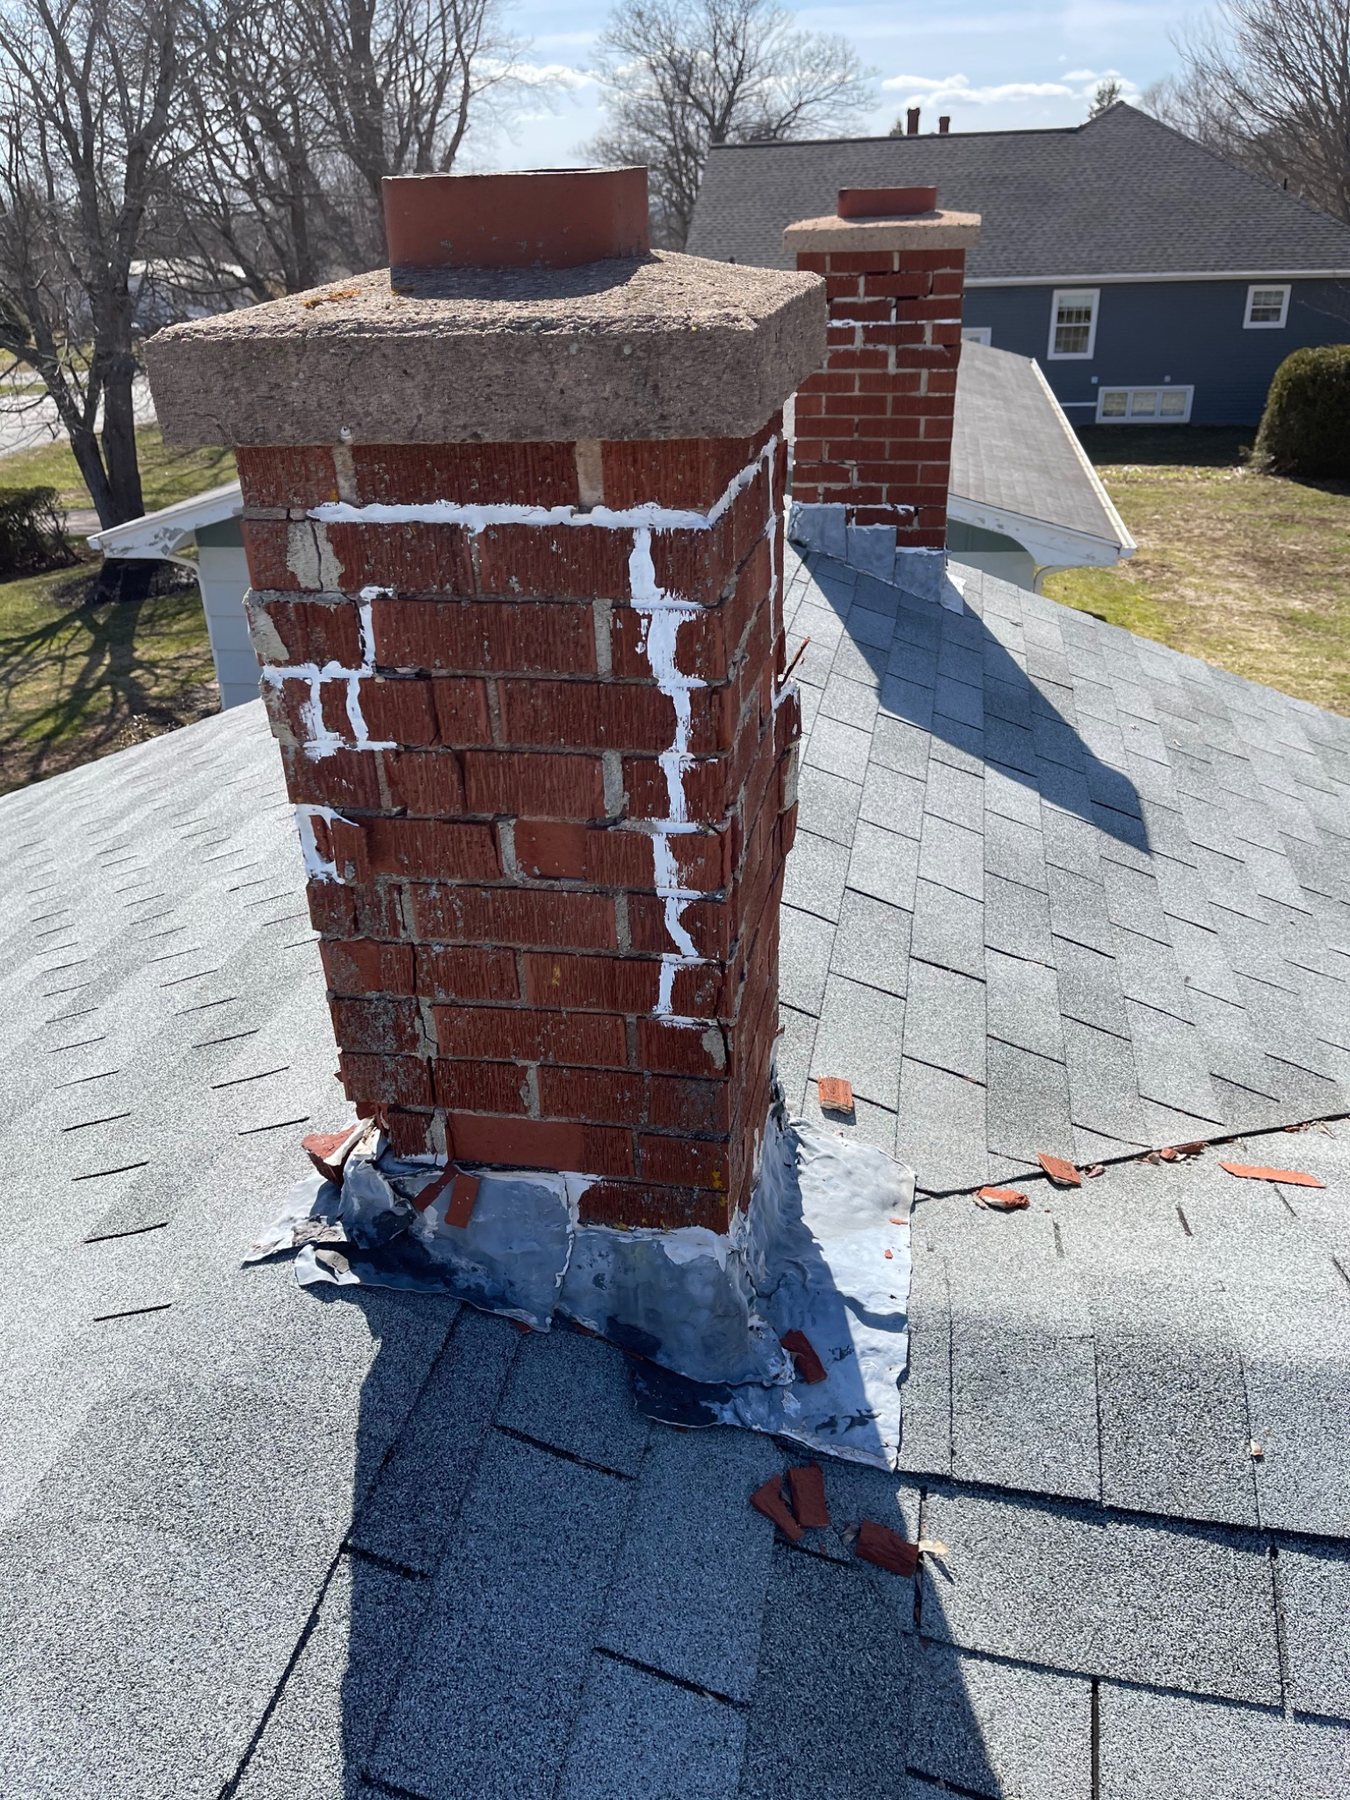
Field example: White patching and sealant have been applied over multiple joints while the chimney and flashing show broader signs of deterioration. Patch material can sometimes hide the original failure pattern, so the entire chimney should be read as a system rather than assuming every filled joint has been permanently repaired.
Paint, waterproof coatings and sealers are sometimes applied after masonry begins to deteriorate. The problem is that a surface coating does not fix a failed crown, open flashing, bad grading or water entering from another side of the wall.
If moisture continues to enter but can no longer dry through the coated surface as easily, deterioration can shift behind the coating or appear at its edges. Peeling, blistering, salt deposits and localized spalling can all justify a closer moisture investigation.
The National Park Service recommends diagnosing moisture sources before using water-repellent or waterproof treatments on historic masonry.
Not every crack is an emergency, and not every old mortar joint requires immediate work. The priority changes when stability or falling material becomes a concern.
Keep people away from loose or unstable overhead masonry until the condition can be assessed. Structural movement may also require engineering input in addition to masonry repair.
Ground-level photographs are often enough for an initial review. Avoid climbing onto roofs, unstable scaffolds, loose walls or unsafe ladders to photograph a defect.
Establishes orientation, roofline, grade and the location of the affected masonry.
Shows the deterioration pattern instead of isolating the worst defect.
Shows mortar texture, cracks, spalling, staining or displacement clearly.
Useful for finding crowns, caps, roof transitions, windows or water sources upstream.
Can show drainage, grade, debris, staining or where water is collecting.
Shows where staining, dampness or cracking appears relative to the exterior condition.
This guide is written from practical masonry experience, but several of the principles are also well established in building and conservation research. The references below are useful for readers who want to go deeper into freeze-thaw durability, historic mortar and moisture behaviour.
U.S. National Park Service: Common Problems with Brick Masonry →
National Park Service: Preservation Brief 2, Repointing Historic Masonry →
National Park Service: Controlling Unwanted Moisture in Historic Buildings →
National Research Council Canada: Freeze-Thaw Action on Brick →
Dean is a third-generation mason with more than 20 years of hands-on experience with brick, natural stone, chimneys, foundations, repointing and masonry restoration in Prince Edward Island.
Field context: Prince Edward Island, with regional relevance across Atlantic Canada
Last reviewed: August 26, 2026
A photo can identify visible symptoms and often narrow the repair category, but hidden wall construction, depth of deterioration, structural movement and concealed water paths may require an on-site review.
Spalling is loss of part of the brick or masonry surface, usually seen as flaking, scaling or a face breaking away. Moisture, freeze-thaw exposure, salts, incompatible repairs and material condition can all contribute.
No. Mortar can crack from weathering, shrinkage, local movement or incompatible repairs. Pattern, location and change over time are more useful than the crack alone.
Not necessarily. It is a salt deposit left as moisture evaporates. It is useful because it tells you moisture has been moving through the masonry.
No. The amount of material lost, exposure, stability and whether the deterioration is continuing all matter. Selective replacement is often preferable to unnecessary wholesale replacement when surrounding masonry is sound.
Loose masonry overhead, rapidly increasing bulging or leaning, falling units, major loss of bearing or movement affecting the structure above deserve quicker assessment than ordinary weathering.
The visual guide identifies symptoms. These detailed resources explain the repair decisions and building mechanisms behind them.
Include the property location, approximate age if known, when you first noticed the condition and whether it changes after rain or winter.