Flue
The internal passage that carries combustion gases to the exterior. A chimney can contain one flue or several separate flues.
The visible brickwork is only one part of a chimney. The flue, liner, crown, cap, flashing, roof intersection and masonry below the roofline all have different jobs, and failure in one area can show up somewhere else.
DinoMac's field examples come from Prince Edward Island, while the chimney components and failure patterns in this guide apply broadly. Atlantic Canada's wet, windy and freeze-thaw conditions make moisture control at crowns, flashing and upper masonry especially important.
This guide is based on more than 20 years of hands-on masonry experience from third-generation mason Dean MacArthur and uses real DinoMac field photographs from Prince Edward Island.
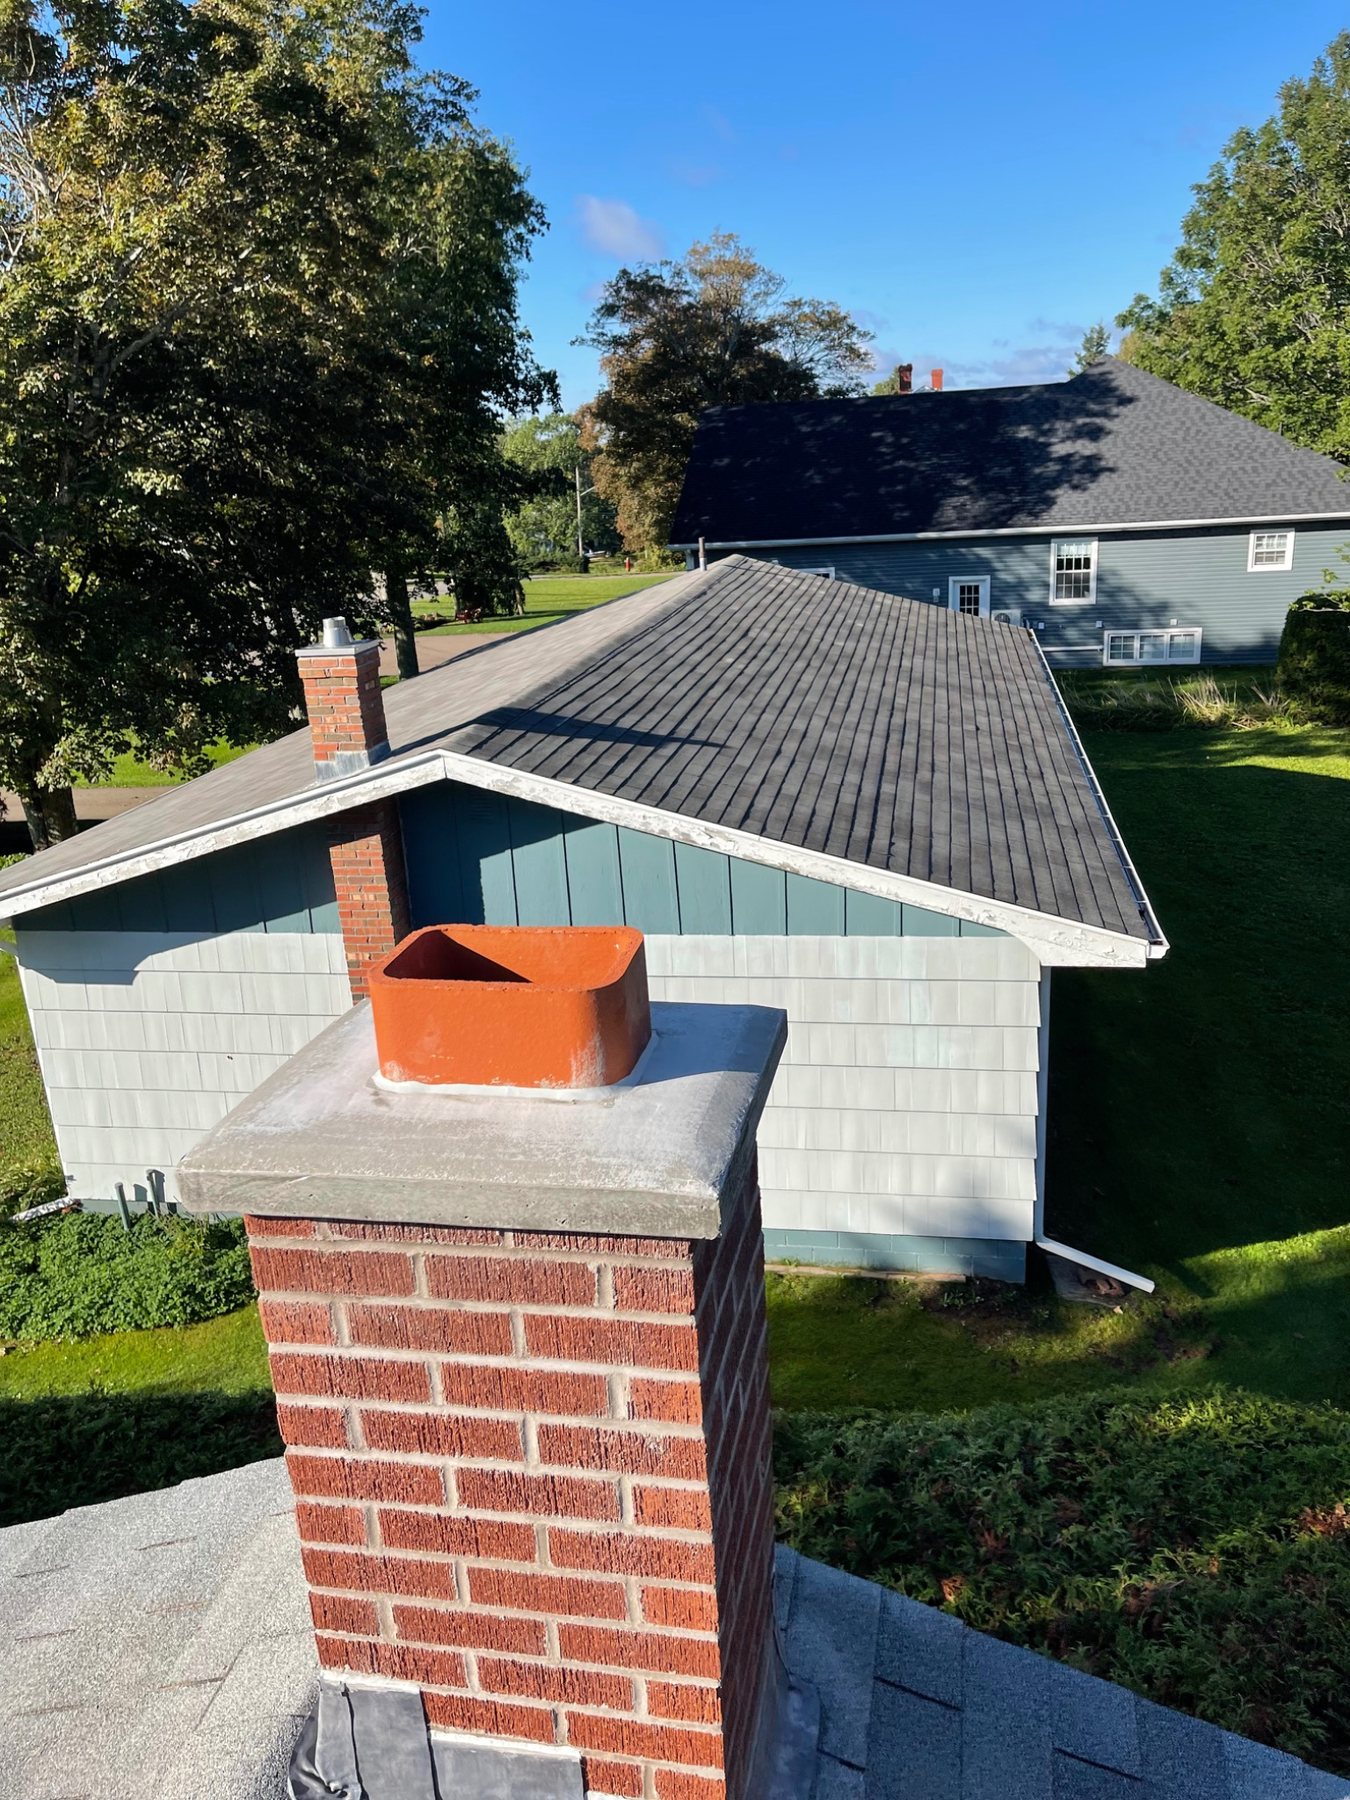
Field view: This completed chimney shows several visible components at once: the brick stack, mortar joints, roof flashing, sloped crown and flue termination.
Not every chimney has the exact same configuration. Fireplace chimneys, furnace chimneys and multi-flue chimneys can differ, but these are the components most homeowners encounter.
The internal passage that carries combustion gases to the exterior. A chimney can contain one flue or several separate flues.
The material lining the flue passage. Existing masonry chimneys commonly contain clay tile liners, while some are relined with listed metal systems.
The brick, block or stone structure surrounding the flue. It provides enclosure, mass, weather protection and structural support.
The sloped top surface around the flue. Its job is to shed water away from the flue and chimney walls rather than allow water to sit on top.
A separate cap fitted over the flue opening on many chimneys. It can help reduce direct precipitation and debris entry while allowing exhaust out.
The sheet-metal water-control system where the chimney passes through the roof. Base flashing and counterflashing work together at this joint.
Changes in chimney width or direction. These transitions create horizontal or sloped surfaces that deserve careful water detailing.
Some appliance chimneys include a cleanout opening near the base. It provides access for removing debris and inspecting lower sections.
Chimneys are heavy. The masonry ultimately depends on suitable support, whether a foundation, structural masonry, or another designed bearing condition.
These terms are often used interchangeably, but they are not the same. The chimney includes the masonry, liner, top details and roof intersection. The flue is the internal route the exhaust actually follows.
A large chimney can contain more than one flue. One flue might serve a fireplace while another serves a separate appliance. Each flue needs to be considered as its own venting path even though the masonry outside appears to be one chimney.
This distinction matters during repair. Rebuilding damaged brickwork can restore the chimney shell, but it does not automatically confirm that the liner inside is sound or suitable for the connected appliance.
In many older masonry chimneys, the liner is clay tile. The liner creates a continuous passage intended to contain combustion gases and isolate them from the surrounding masonry and building.
Clay liners can crack, break, separate at joints or deteriorate at the top. Relining may be possible with an appropriate listed system, but liner selection depends on the appliance, fuel, chimney configuration and applicable installation requirements.
From the roof, only the upper portion may be visible. A sound-looking top tile does not prove that the full liner is intact deeper inside the chimney. Where concealed damage is suspected, a more detailed chimney or venting inspection may be needed.
WETT's inspection guidance distinguishes between visual, technical and invasive levels of inspection, reflecting the fact that concealed chimney components cannot always be evaluated from a basic exterior view.
Field case: inspecting a metal chimney liner after a lightning strike →
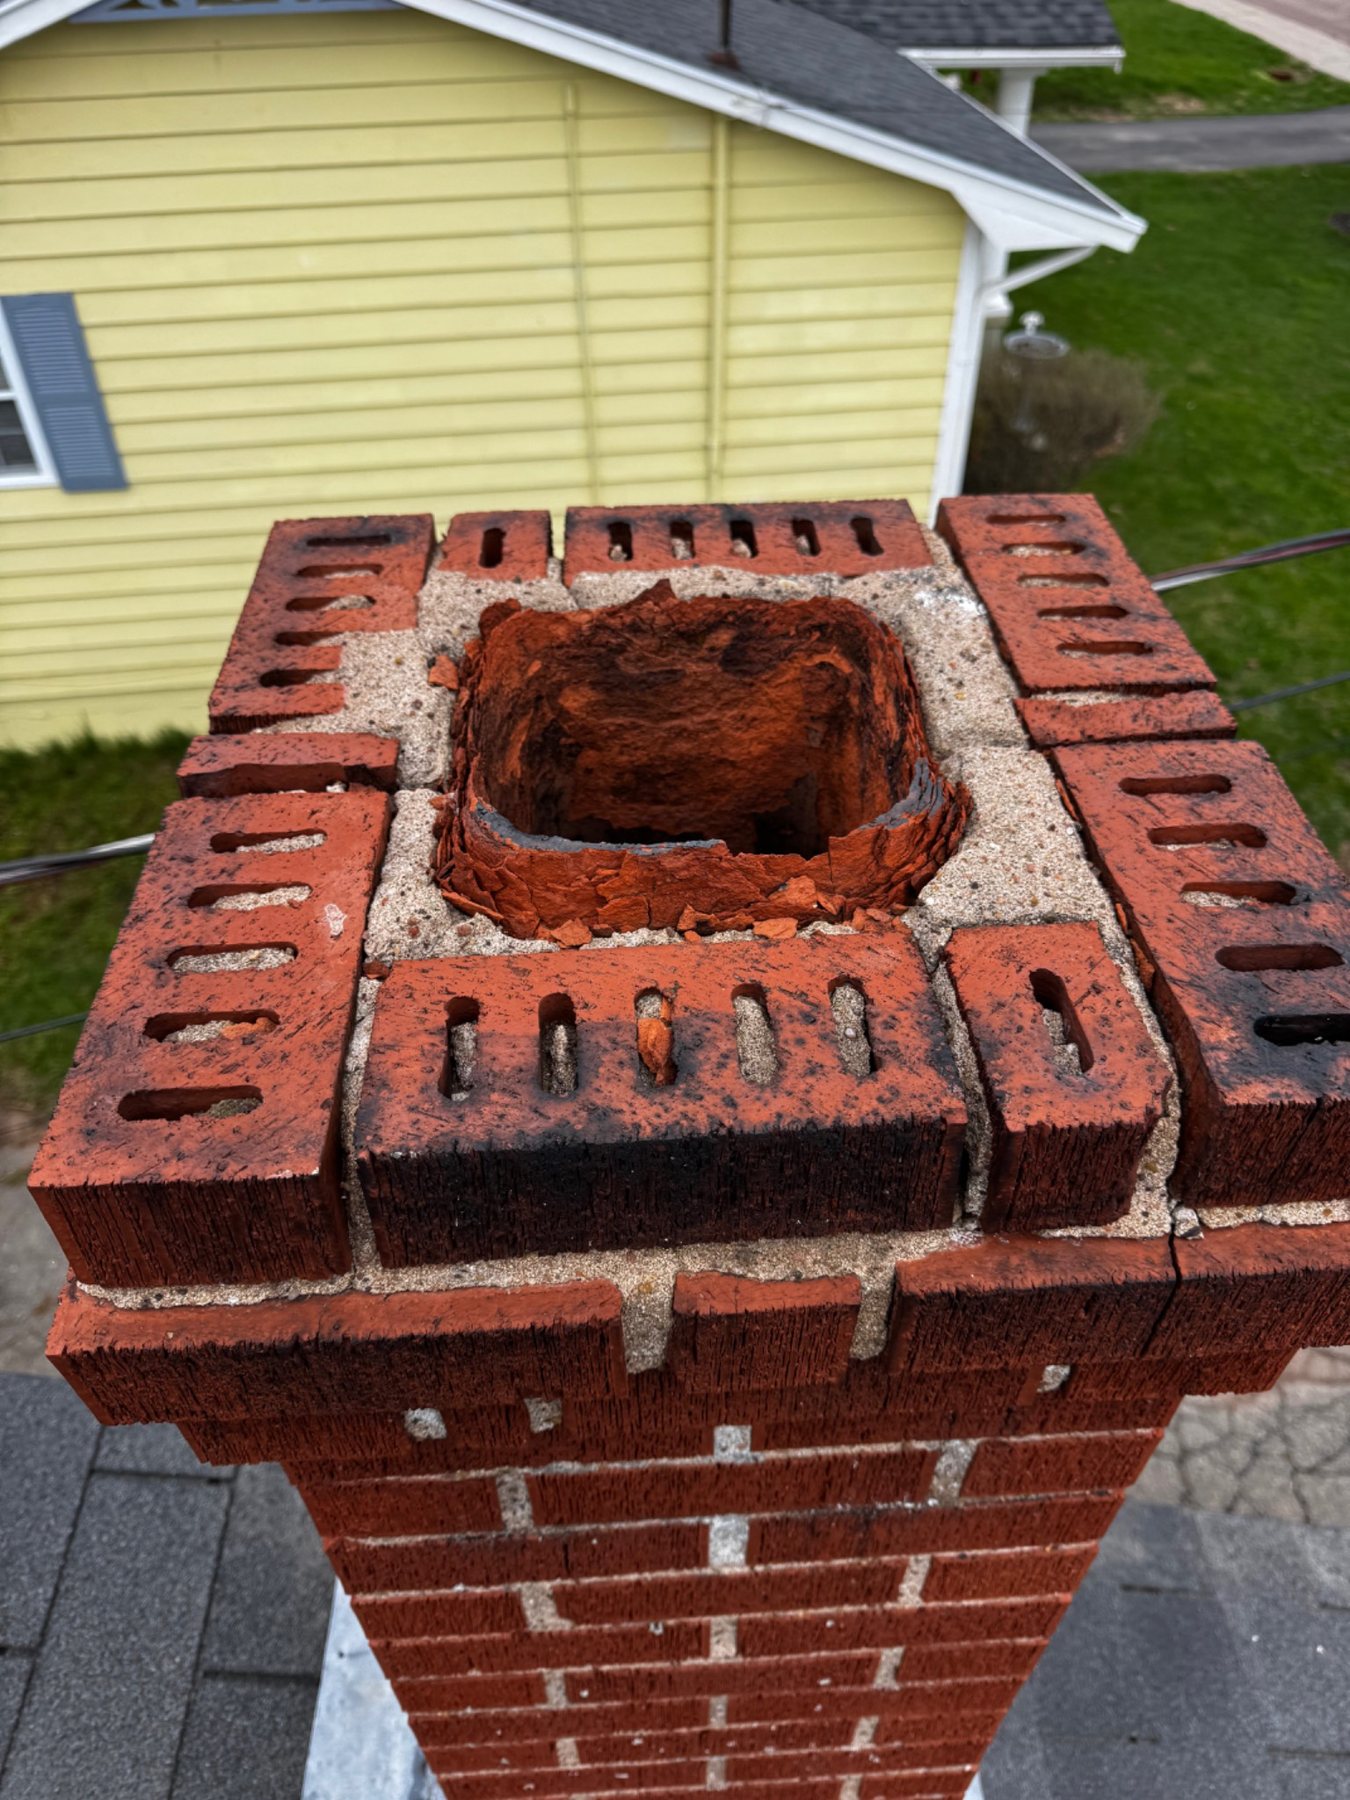
Field example: The exposed clay liner at this chimney top has visibly deteriorated. The condition of the upper liner raises a separate question from the condition of the surrounding brickwork.
The visible masonry is what most people call “the chimney.” Its condition depends on sound brick or stone, compatible mortar, stable support and good water management at the top and roof intersection.
Mortar joints are the most maintainable part of the assembly. When they weather, repointing can restore the joints if the masonry units remain stable. Once bricks have shifted, loosened or lost support, the repair has moved beyond ordinary repointing.
Exposure above the roofline is severe. All sides receive weather, and the top courses are especially vulnerable because they sit immediately below the crown or cap.
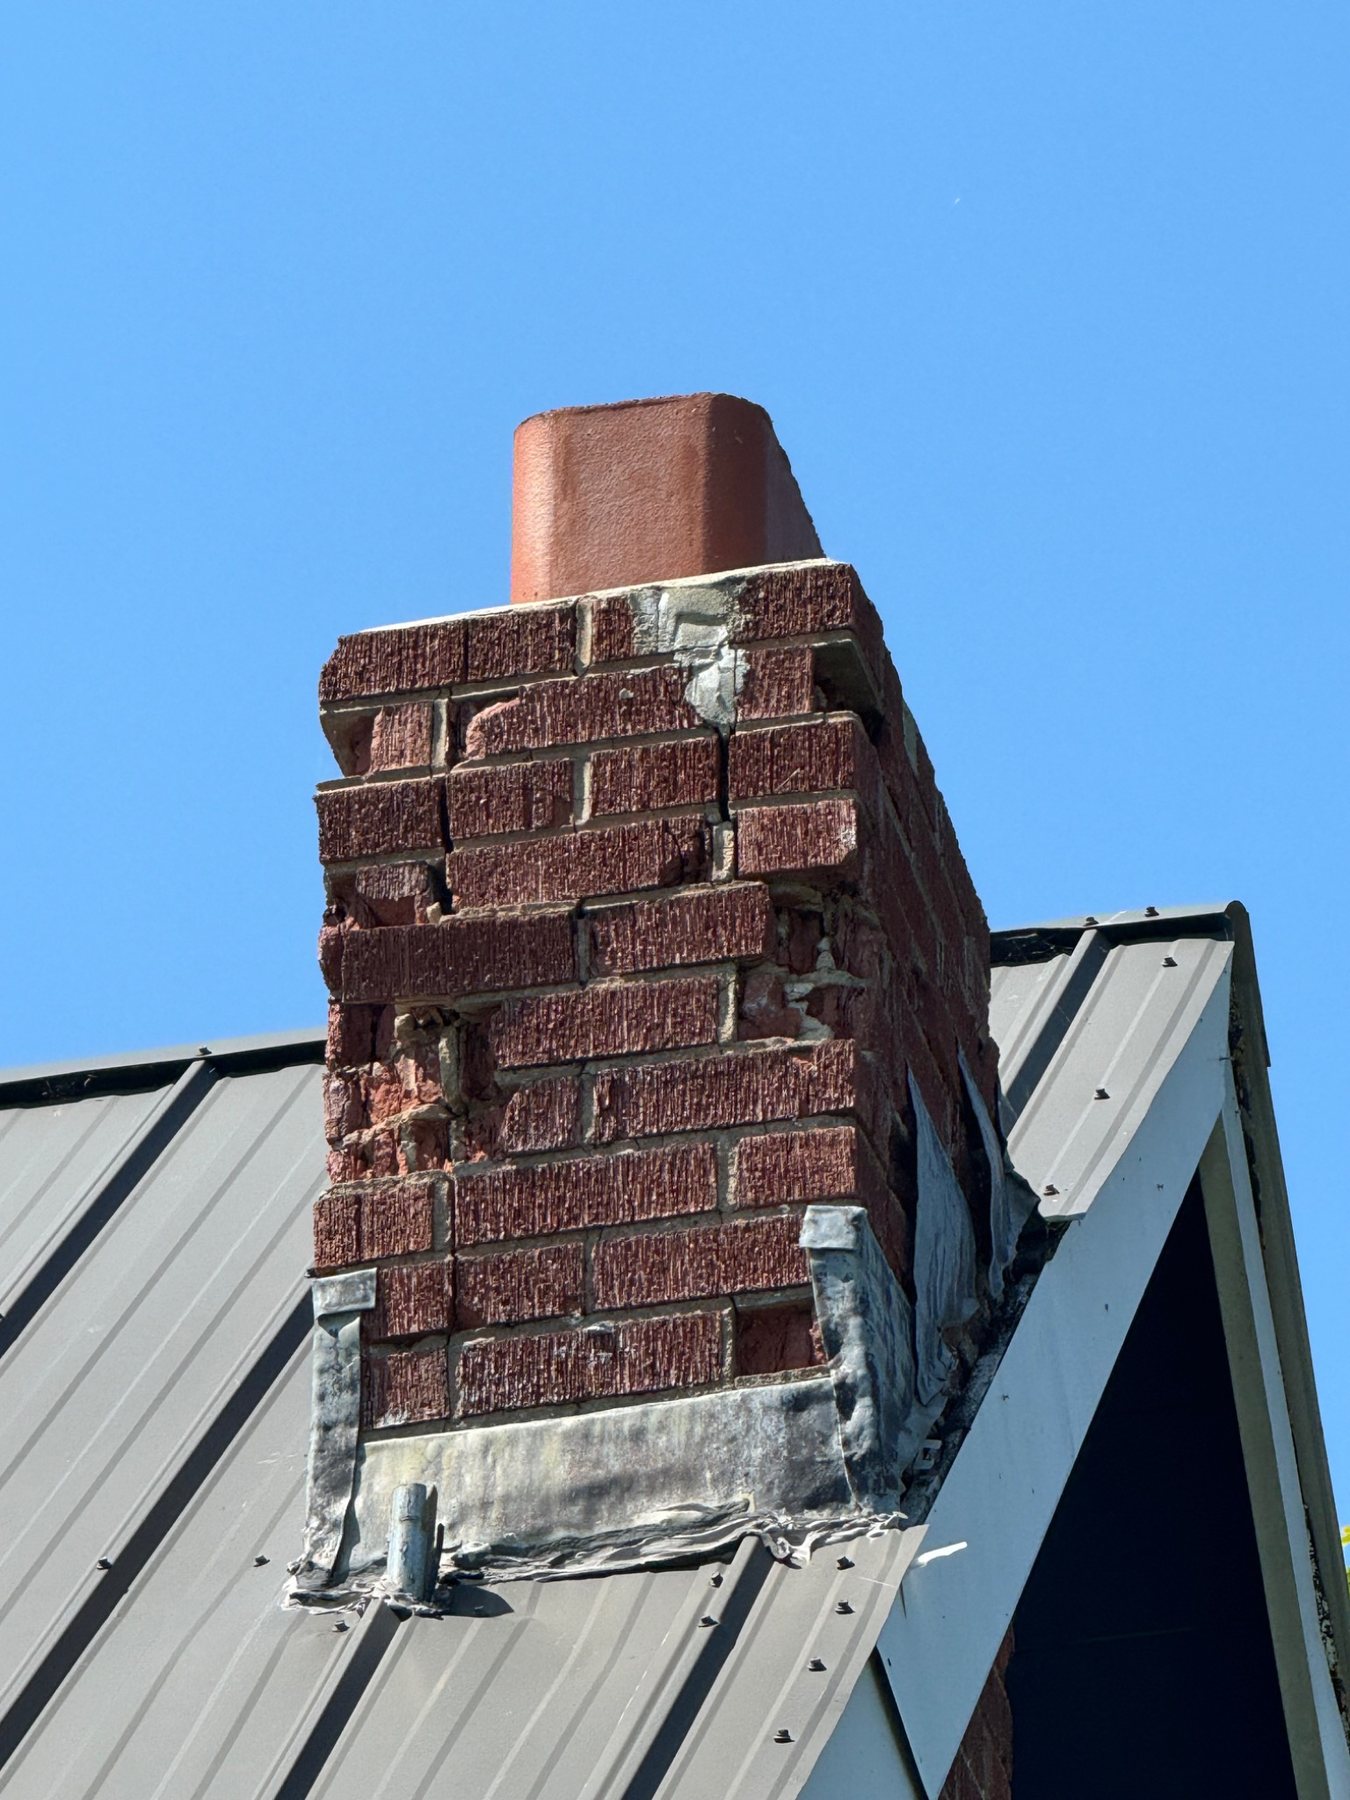
Missing units and unsupported courses show that the masonry shell is no longer acting as a fully bonded assembly. Filling the open joints alone would not restore that lost geometry.
The crown is one of the most important water-management details on the chimney. A good crown is shaped and sloped so precipitation leaves the top rather than soaking into the upper courses.
Brick Industry Association guidance treats the crown as a distinct component and recommends detailing that accounts for water penetration and differential movement between the crown and flue liner. The National Park Service likewise cautions against simple mortar washes because thin mortar caps tend to crack and can contribute to moisture penetration.
In the field, I look for cracking, flat or poorly sloped surfaces, thin feathered edges, failed joints around the flue and signs of water running directly down the chimney face.
A cast concrete chimney crown should not simply be bonded tightly to the clay flue liner. The liner and the surrounding masonry can move differently as temperatures change.
A proper crown detail commonly includes a separation or bond break around the liner, together with a suitable flexible seal at the top. This allows the liner to expand vertically without forcing movement into the crown.
The crown should also shed water away from the chimney, project beyond the masonry face, and include a drip detail where appropriate. These small details matter because cracks around the flue liner are one of the common places water begins entering a chimney.
See how crown and flue-liner defects can contribute to chimney leaks →
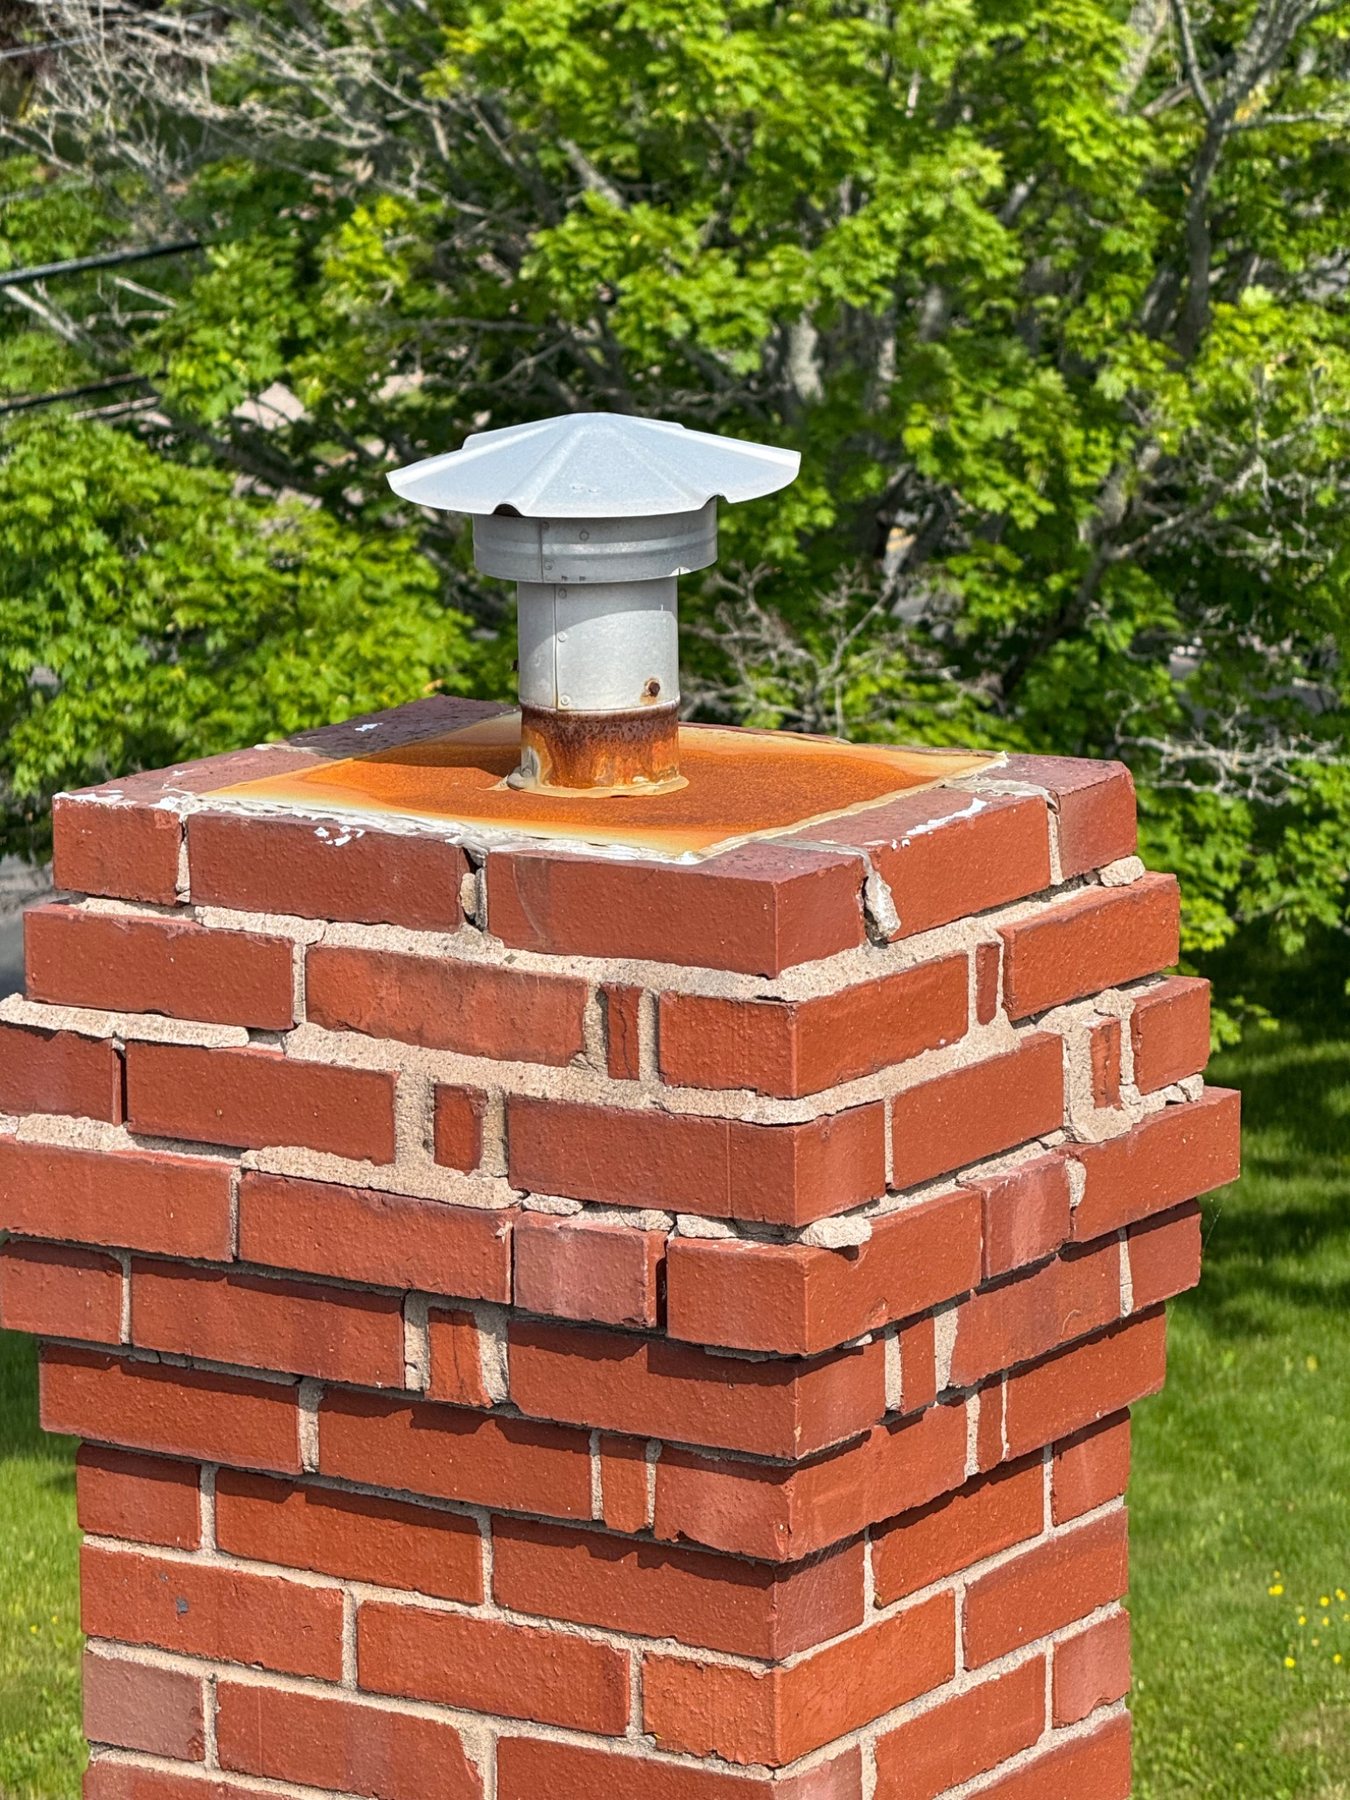
Field example: The top surface, flue opening and rain cap are separate components. The crown protects the masonry below; the cap protects the flue opening. One does not replace the function of the other.
The terms “cap” and “crown” are often mixed together in casual conversation. On this page, the crown is the solid sloped top around the flue, while the rain cap is the separate metal or manufactured component over the flue opening.
A cap can reduce direct rain, snow, leaves and debris entering the flue. Some designs also incorporate screening. Any cap still has to allow the connected system to vent correctly and should be suitable for the chimney and appliance.
A cap does not solve failed brickwork, an open crown or roof flashing problems. It addresses the flue opening, not the entire chimney.
“I had a chimney cap installed, so the chimney should no longer leak.”
Not necessarily. Water can still enter through a cracked crown, open mortar joints, damaged flashing or masonry saturation even when the flue opening itself is covered.
Flashing prevents roof water from following the joint between the roof covering and chimney into the building. In a traditional detail, base flashing works with counterflashing attached to or let into the masonry.
Brick Industry Association guidance identifies the roof intersection as one of the primary areas of potential chimney water penetration. The key idea is overlap: the upper flashing sheds water over the lower flashing so water is directed outward rather than behind the system.
Sealant can be part of certain details, but smearing sealant over failed flashing is not the same as rebuilding the water-shedding laps correctly. The National Park Service similarly notes that sealant repairs at exposed roof joints are not always effective long-term substitutes for proper metal flashing.
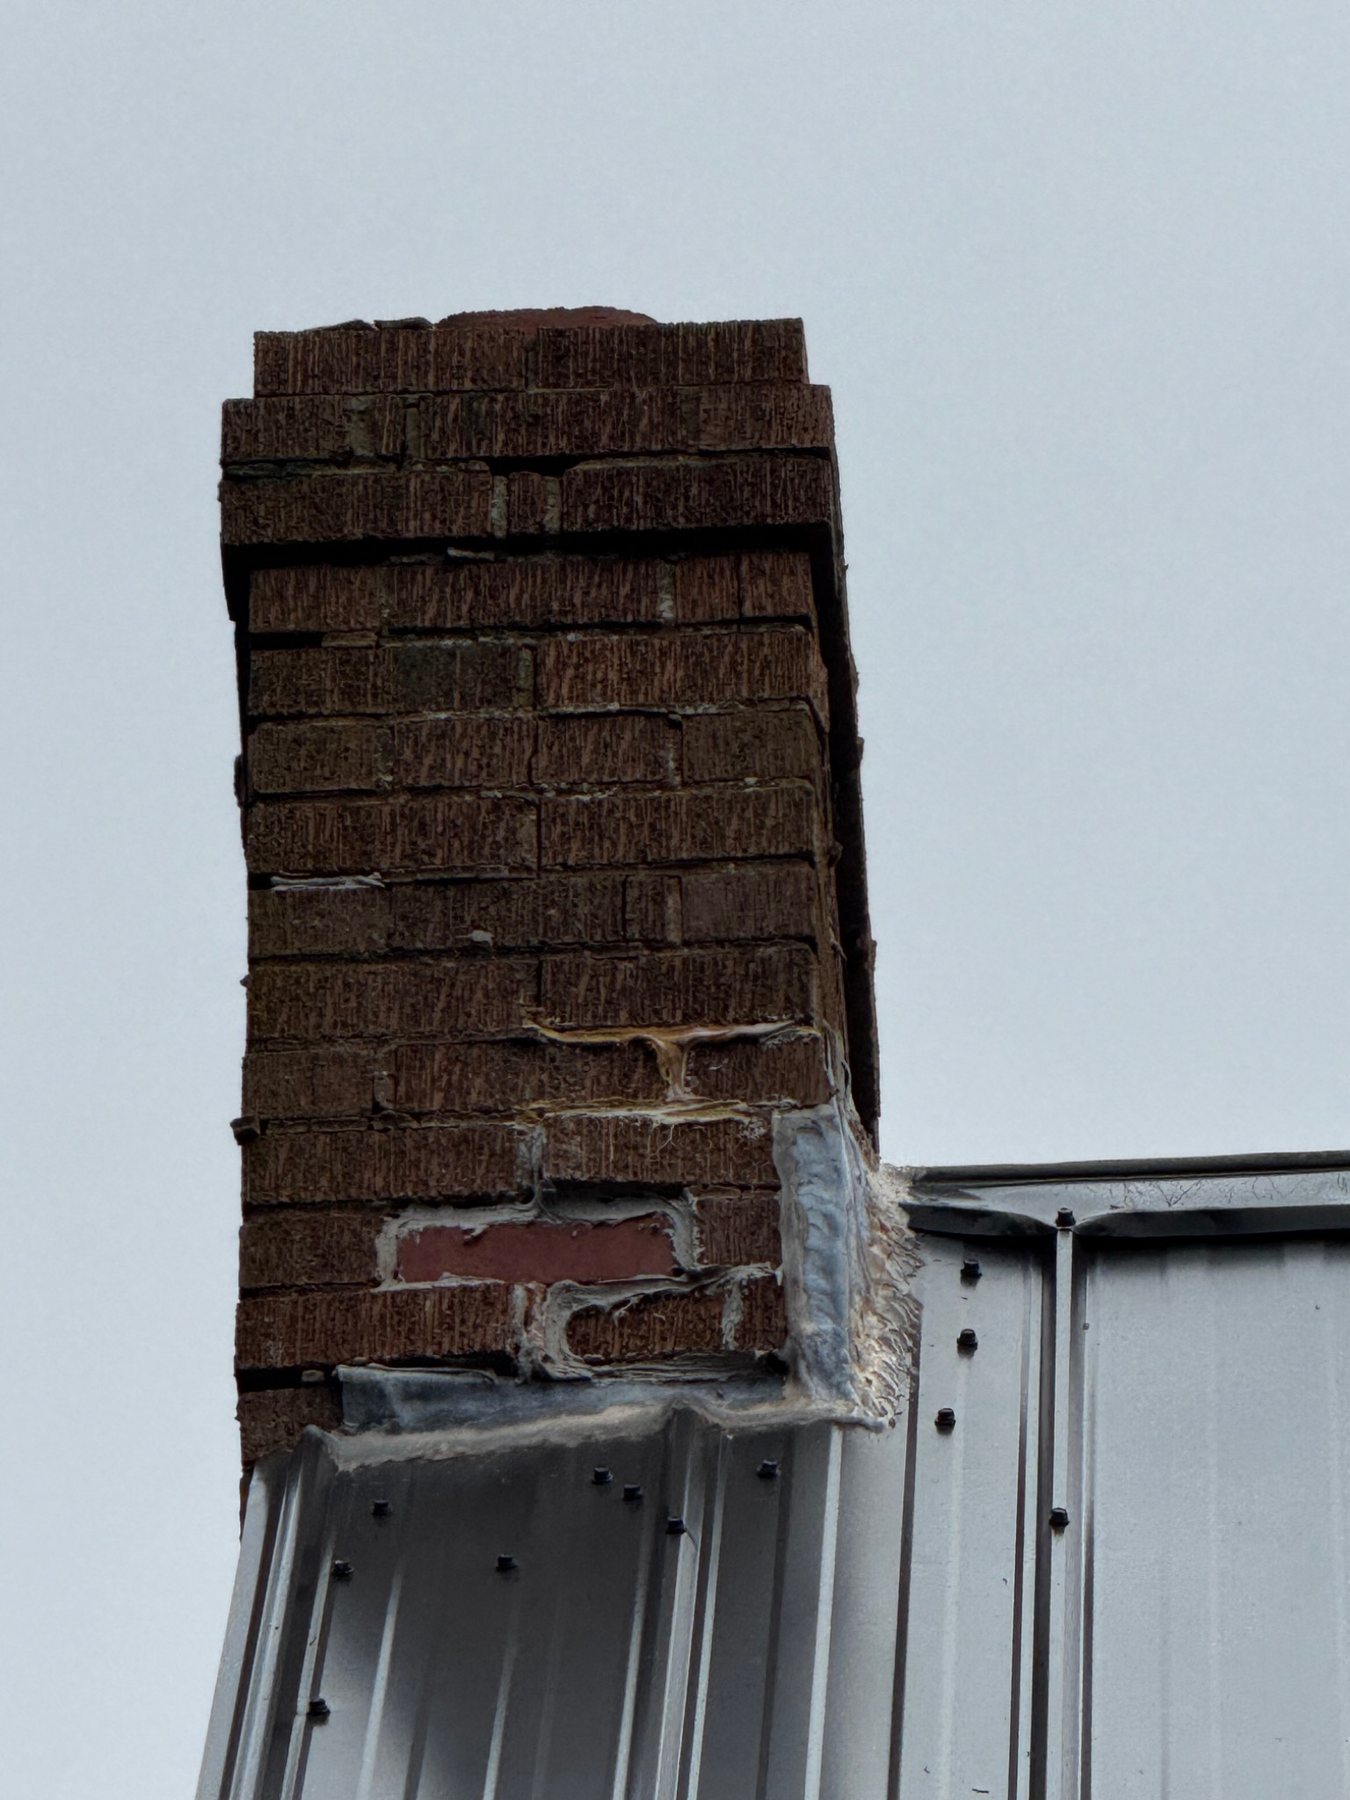
The flashing at the roofline has to be read as part of the roof system, not as decoration around the brick. Water that enters here may appear inside well away from the visible exterior joint.
Counterflashing covers the upper edge of the base flashing and helps stop water from reaching the joint behind it. Traditionally, it may be set into a masonry joint or otherwise integrated with the chimney wall.
Surface-applied patches can sometimes be temporary or supplemental, but a thick bead of sealant across a deteriorated roof/chimney joint is vulnerable to movement, weathering and adhesion failure.
When inspecting a leaking chimney, I look at where the flashing begins and ends, how pieces overlap, whether corners are closed properly and whether the masonry above is delivering water behind the flashing.
Some chimneys narrow as they rise, offset to avoid framing, or develop shoulders where a larger base transitions to a smaller stack. These surfaces may be protected by flashing, stone, concrete or another water-shedding detail.
I look for cracks, open joints and flat surfaces at these transitions. If water can rest on a shoulder and repeatedly enter the masonry, deterioration often appears directly below it.
Shape changes also matter structurally. A chimney that has shifted at an offset or shoulder may require more than cosmetic joint repair.
The more horizontal a chimney surface becomes, the less you should expect exposed mortar alone to act as permanent weather protection.
Below the roofline, the chimney may pass through an attic, wall cavity or occupied floors before reaching the fireplace or appliance connection. Deterioration can also occur in these concealed areas.
Fire separation, liner continuity, clearances to combustible construction, appliance connections and concealed movement all matter. These are not things that can always be confirmed by standing outside and looking at the stack.
In an open masonry fireplace, combustion gases do not move directly from the firebox into a straight flue. They pass through the throat and smoke chamber before entering the flue above. A damper, where present, controls the opening between the fireplace and chimney.
The smoke chamber is easy to overlook because much of it cannot be seen from the room. Deteriorated mortar, gaps, damaged surfaces or heavy deposits in this area can be separate from visible firebox damage below. Repairing firebrick therefore does not automatically correct a problem higher in the smoke path.
Firebox cracks and damaged firebrick explained →
WETT's inspection system specifically recognizes that some components are readily visible while others may require more detailed or invasive access. If a chimney has experienced a fire, major movement or suspected concealed damage, a deeper inspection can be appropriate.
Rebuilding the top of a chimney can restore damaged masonry, but the condition and suitability of the flue liner and connected appliance should be considered separately where needed.
These sit immediately below the crown and receive the highest direct weather exposure.
Different materials move differently. Cracks here can admit water into the top of the chimney.
Failed flashing or patching can introduce water at the point where two different building systems meet.
Horizontal or sloped transitions concentrate water and create additional movement and flashing details.
Hard mortar, surface patching and repeated sealant can change how the chimney drains and dries.
Liner cracks, hidden movement and clearance issues may not be visible from an exterior masonry inspection.
A cracked crown can allow water into the upper masonry. Saturated joints can deteriorate. Once enough mortar is lost, individual bricks can loosen or shift. Water can then penetrate deeper, and winter freeze-thaw cycling can accelerate the damage.
Likewise, failed roof flashing can create interior leakage even if the crown is perfect. Repointing the upper brickwork may improve the chimney but will not correct a roof intersection that still admits water.
That is why DinoMac evaluates chimneys as systems: top, masonry, flashing, liner and support all have to make sense together.
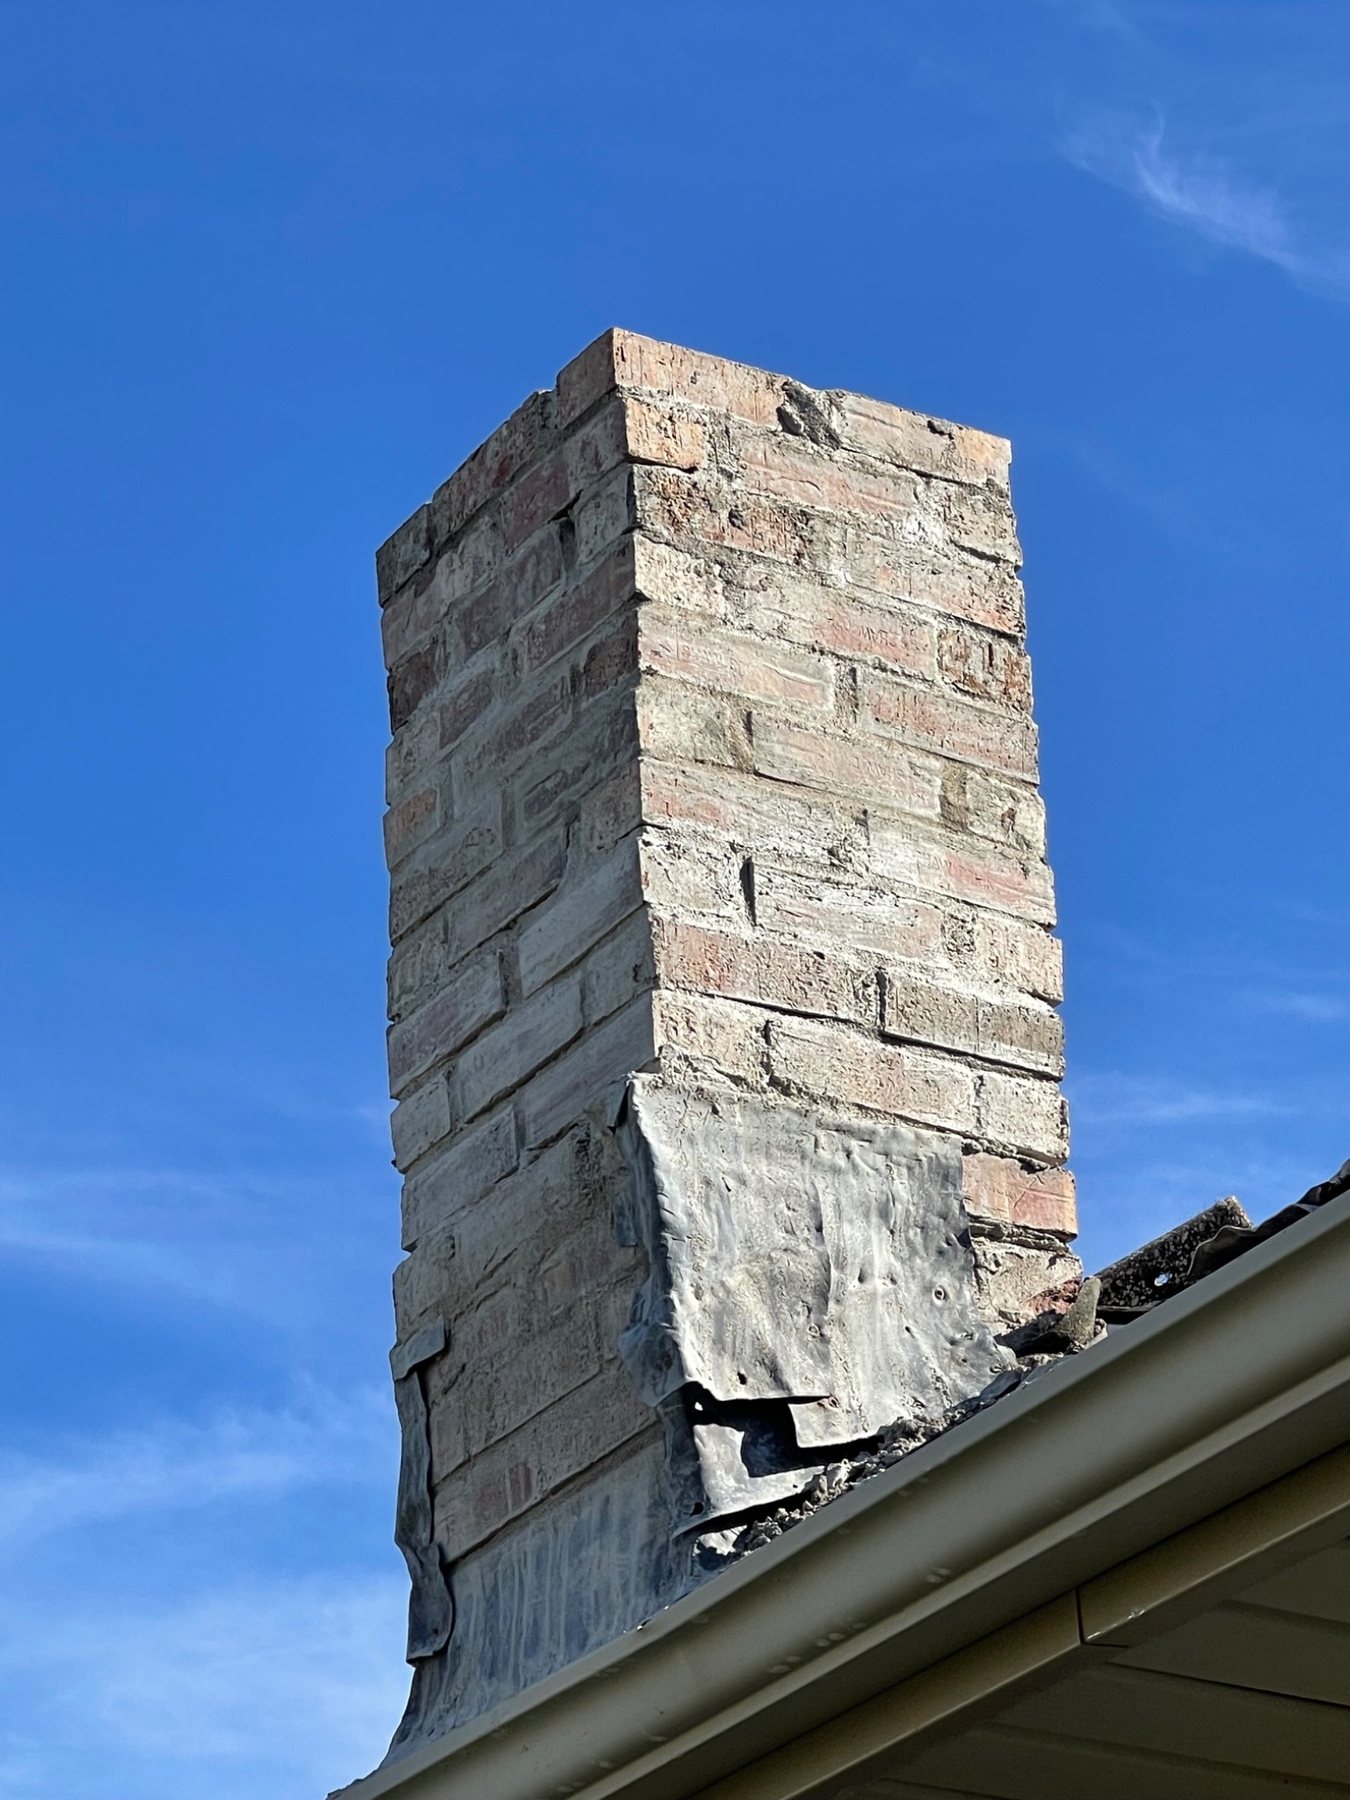
Field example: When multiple components have failed at once, there is rarely a single-joint repair that solves the whole condition. The remaining sound masonry and water-management details determine the scope.
The Brick Industry Association publishes separate technical guidance for residential chimney construction and chimney flashing. Its guidance identifies the chimney base, roof intersection and crown as primary moisture-control locations.
The National Park Service's exterior-maintenance guidance also recommends professional repair of chimneys and caps, cautions against simple mortar washes on chimney tops and emphasizes proper flashing over short-lived sealant-only repairs.
WETT provides standardized Canadian inspection levels for solid-fuel appliances and venting systems, including circumstances where concealed chimney components require more detailed evaluation.
Brick Industry Association: Residential Chimneys, Design and Construction →
Brick Industry Association: Flashing Chimneys →
National Park Service: Maintaining Historic Building Exteriors →
Dean is a third-generation mason with more than 20 years of hands-on experience working with brick, stone, chimneys, foundations, repointing and masonry restoration in Prince Edward Island.
Last reviewed: September 1, 2026
The chimney is the overall structure. The flue is the internal passage that carries combustion gases. A chimney can contain one or several flues.
It forms the inner passage that contains the exhaust. Existing chimneys may use clay tile or an appropriate relining system depending on the appliance and installation.
No. The crown is the sloped solid top around the flue. A rain cap is the separate component fitted above the flue opening.
The roof-to-chimney joint is a major water-entry location. Base flashing and counterflashing have to direct roof water over and away from that joint.
Not always. Repointing repairs joints. If courses have shifted or units are loose, rebuilding part of the chimney may be necessary to restore bond.
No. Exterior masonry condition and liner condition are related but separate questions. Concealed liner damage may require a dedicated inspection.
Ground-level photographs are often enough for an initial discussion. Do not climb onto a roof or unstable chimney just to take pictures.