1. Chimney tops
Look for open joints, loose upper courses, cracked crowns, displaced caps and fresh debris on the roof.
Spring is one of the best times to look closely at masonry after winter. Across PEI and Atlantic Canada, repeated wetting, freezing, snow accumulation and thawing can make existing weaknesses much easier to see.
This guide is based on more than 20 years of hands-on masonry experience from third-generation mason Dean MacArthur and uses conditions DinoMac sees on real PEI buildings to explain winter masonry problems that also occur throughout Atlantic Canada and other cold, wet climates.
If deterioration appears in the same location year after year, look for what keeps that area wet: a crown, sill, flashing detail, roof edge, downspout, grade condition or exposed horizontal surface.
After snow and ice disappear, new chips, loose mortar, fallen brick fragments and fresh staining can be easier to distinguish from older weathering. That makes spring a good time to establish a baseline.
The most useful question is often not “Does this look old?” but “Did this change over the winter?” A dated photograph from the same position every year can answer that better than memory.
National Research Council Canada research has shown that masonry freeze-thaw exposure is strongly affected by moisture content, wall orientation, season and local exposure. That is why deterioration can be severe on one elevation while another side of the same building remains comparatively sound.
The same winter can affect a chimney top, an exposed wall and a foundation differently because each location gets wet and dries differently.
Look for open joints, loose upper courses, cracked crowns, displaced caps and fresh debris on the roof.
Look for new flakes, popped faces, scaling or fragments that were not present before winter.
Check for fresh gaps, powdering, loose material or joints that have opened farther than before.
Horizontal surfaces collect precipitation and can feed water into the masonry below.
Compare cracks, bulges, loose stone and damp areas with previous photographs.
Look for lifted flashing, open sealant, roof damage or staining that could explain masonry saturation.
Efflorescence or new staining can help identify where moisture moved through the wall.
Check downspout discharge, grading, snow-storage areas and places where meltwater collects near foundations.
Spalling can be obvious, with a whole brick face missing, or subtle, with thin flakes beginning to separate. When fresh pieces appear after winter, I look at where the brick sits in relation to water exposure.
Is it below a cap? Beside flashing? Near grade? On the weather side of a chimney? Beside a hard previous repair? The location helps distinguish an isolated weak brick from a recurring wall-system problem.
Replacing failed units may be part of the repair, but if the same area continues to saturate, the replacement masonry can eventually be exposed to the same conditions.
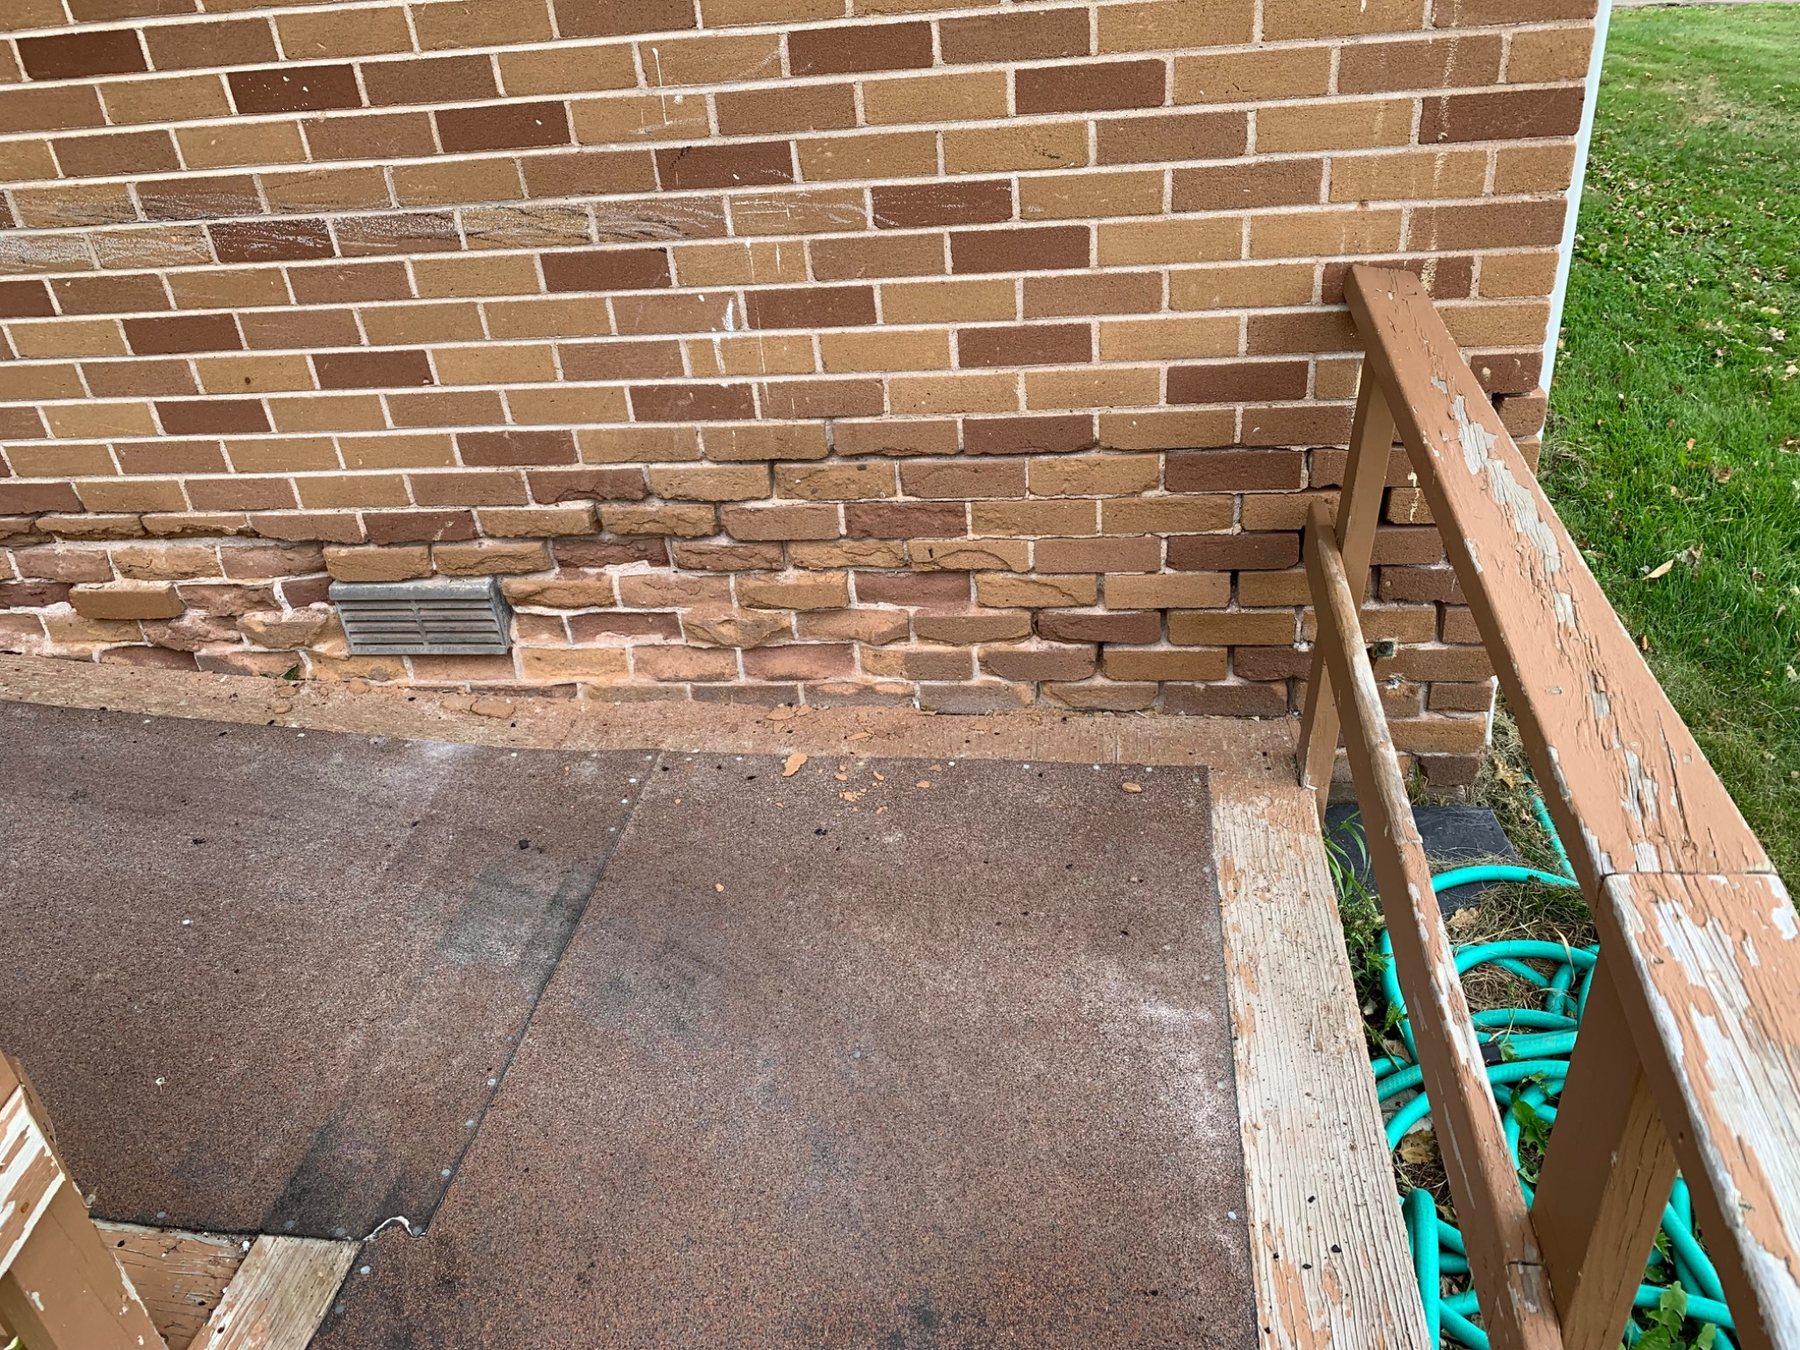
Field example: Deterioration is heavily concentrated near the lower portion of this wall. The pattern matters because low masonry is more vulnerable to splash-back, snow accumulation, wetting from adjacent surfaces and slower drying. Replacing individual bricks without considering why this zone stays wet can leave the same exposure in place.
Repointed joints should have meaningful depth and bond. A thin surface cap can break away after winter and expose the older loose mortar behind it.
When joints have become deeply recessed, water can remain in the wall longer and smaller stones or brick edges may lose support. On chimneys, open joints also increase direct weather exposure well above the roofline.
The decision is not simply “point it or do not point it.” I look at how much sound mortar remains, whether the masonry units are still stable, and whether movement has already begun.
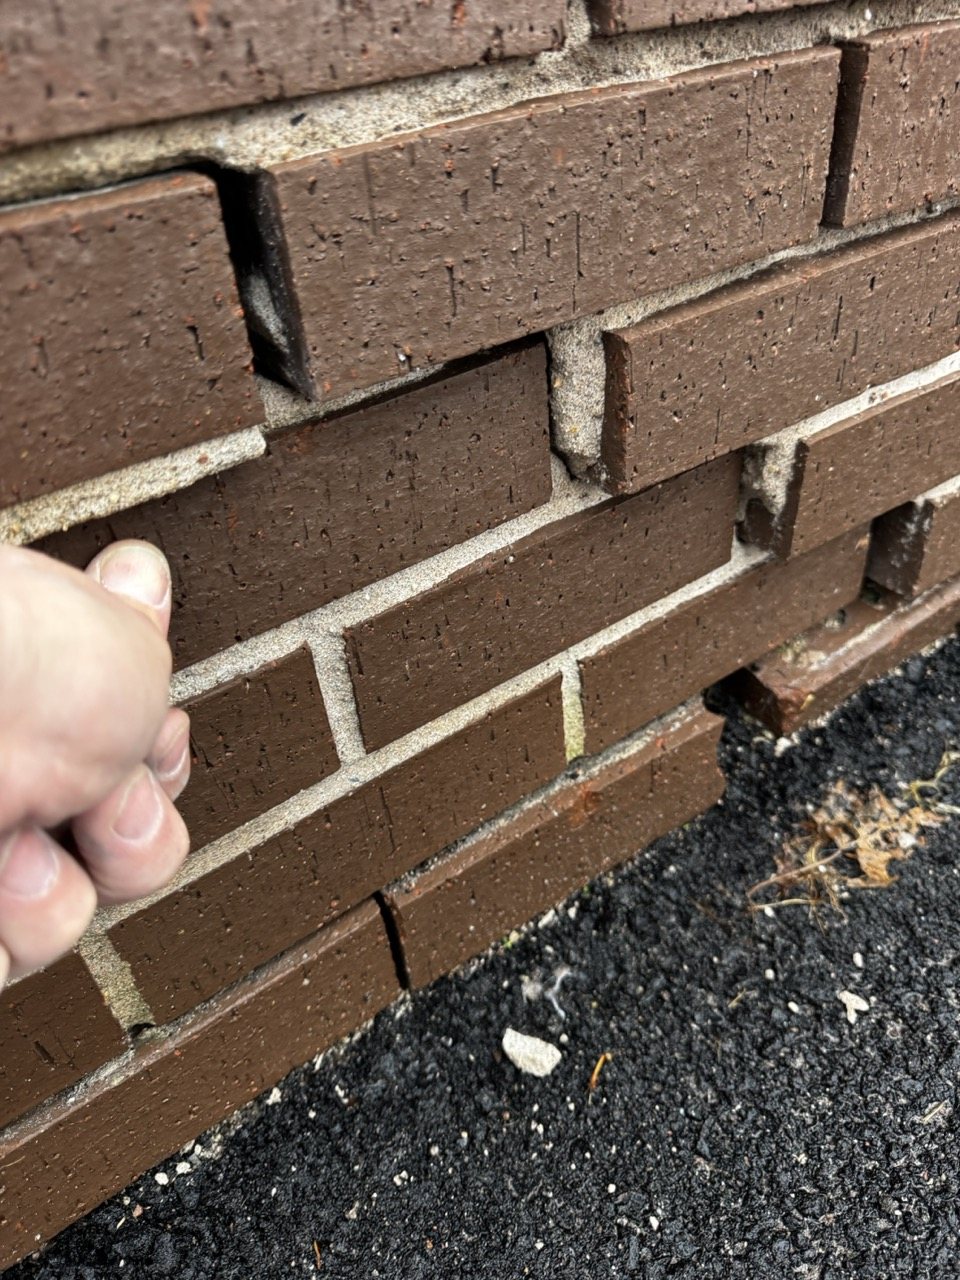
Field example: This brick can be moved by hand, showing that the problem has progressed beyond a weathered surface joint. Once a unit has lost meaningful bond, packing fresh mortar into the visible gap is not the same as restoring the masonry assembly.
A chimney sits above the roofline where all faces are exposed. Snow can collect on the crown or cap, wind-driven rain hits from multiple directions, and the masonry can cycle between wet and frozen conditions repeatedly.
In spring I look first at the top several courses, crown or wash, flue termination and the roof-to-chimney transition. If the top is open or cracked, deterioration lower down may be the result rather than the source.
Loose bricks at height should be treated as a safety concern, especially above entrances, driveways, sidewalks or occupied roof areas.
Chimney repointing vs rebuilding →
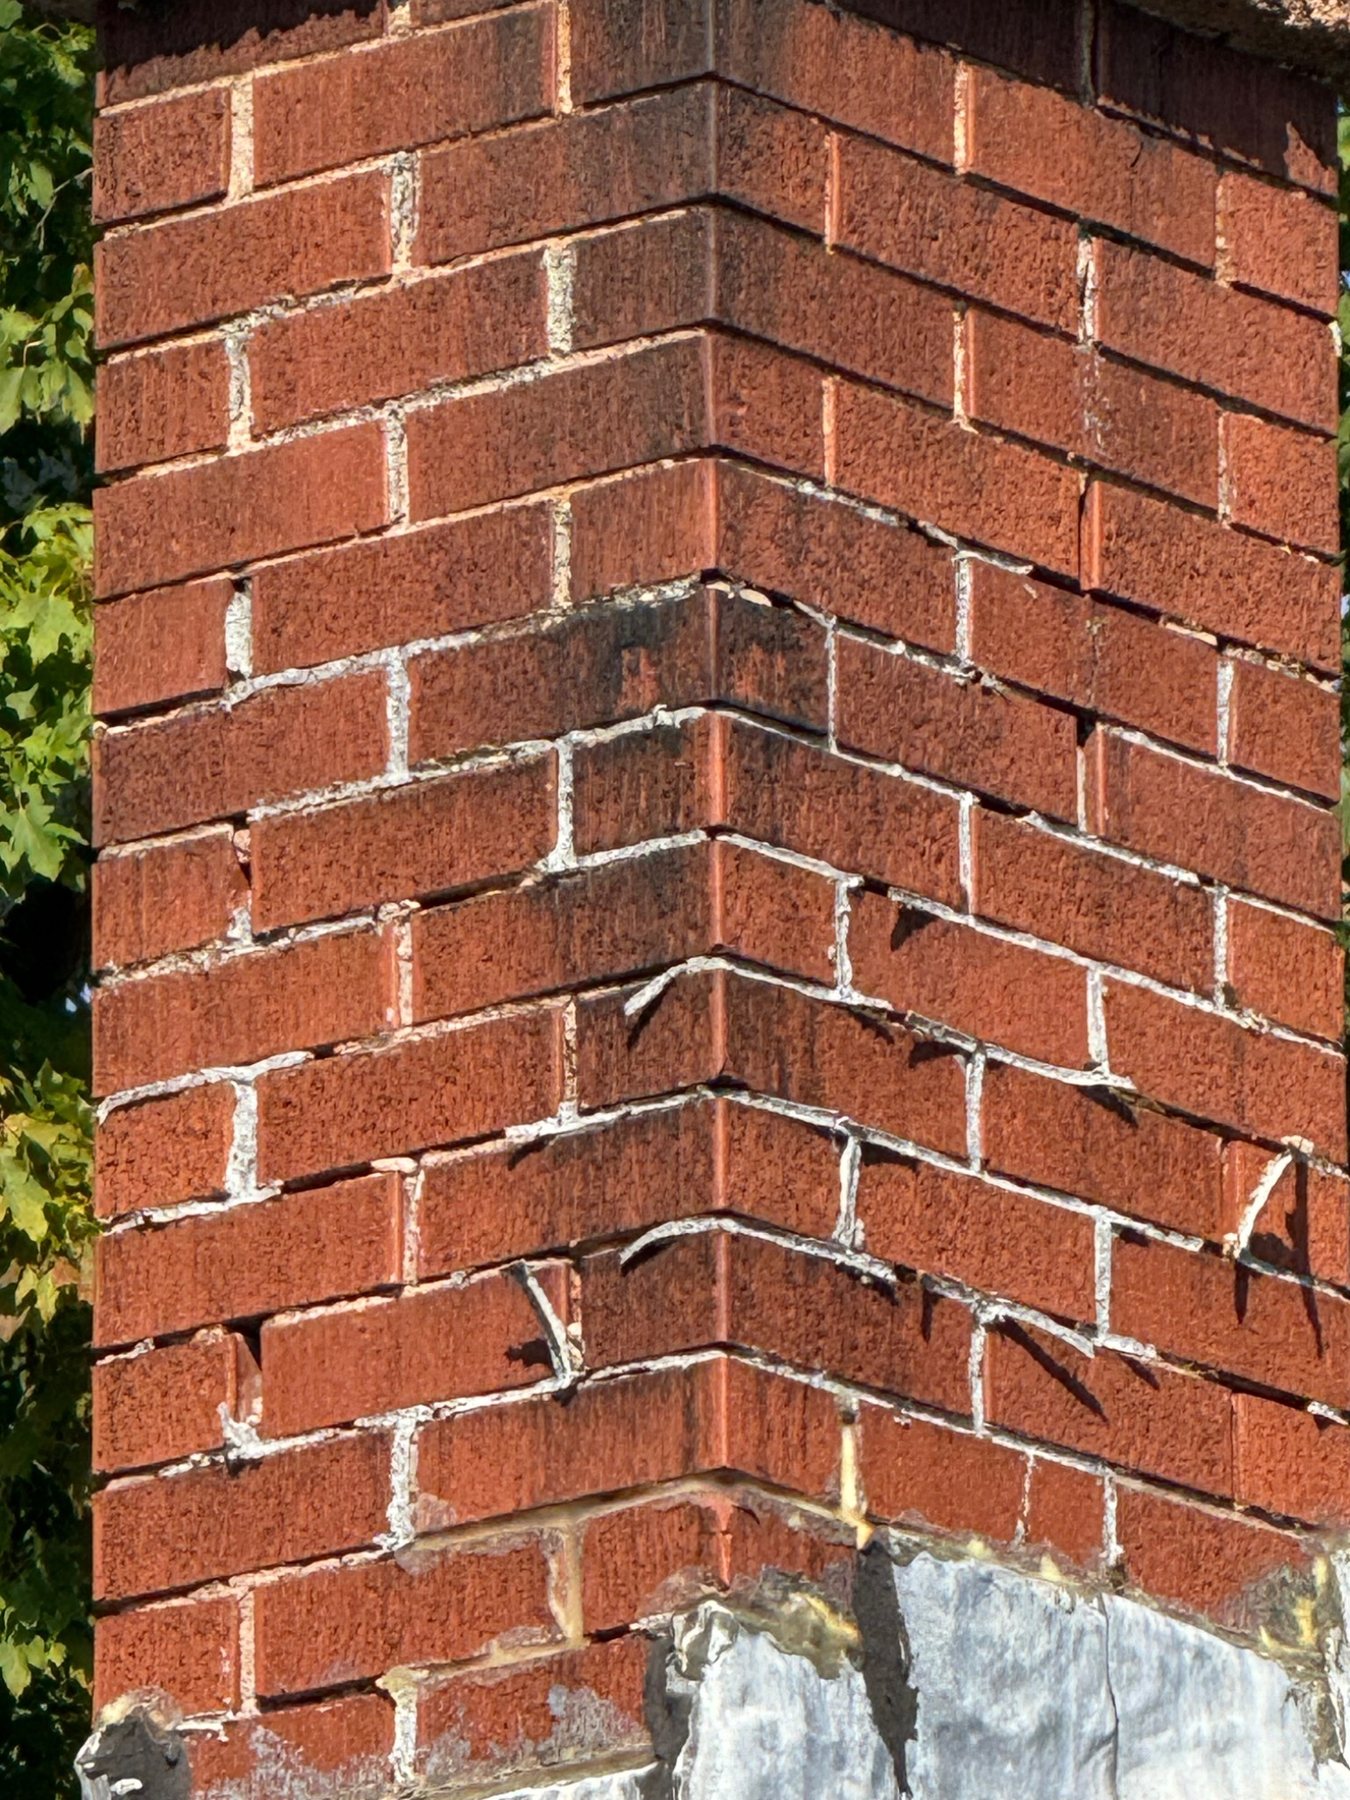
Course movement: Several brick courses have shifted visibly out of alignment. This is not routine mortar weathering. The remaining bond and stability of the chimney have to be assessed before deciding how much can safely be retained.
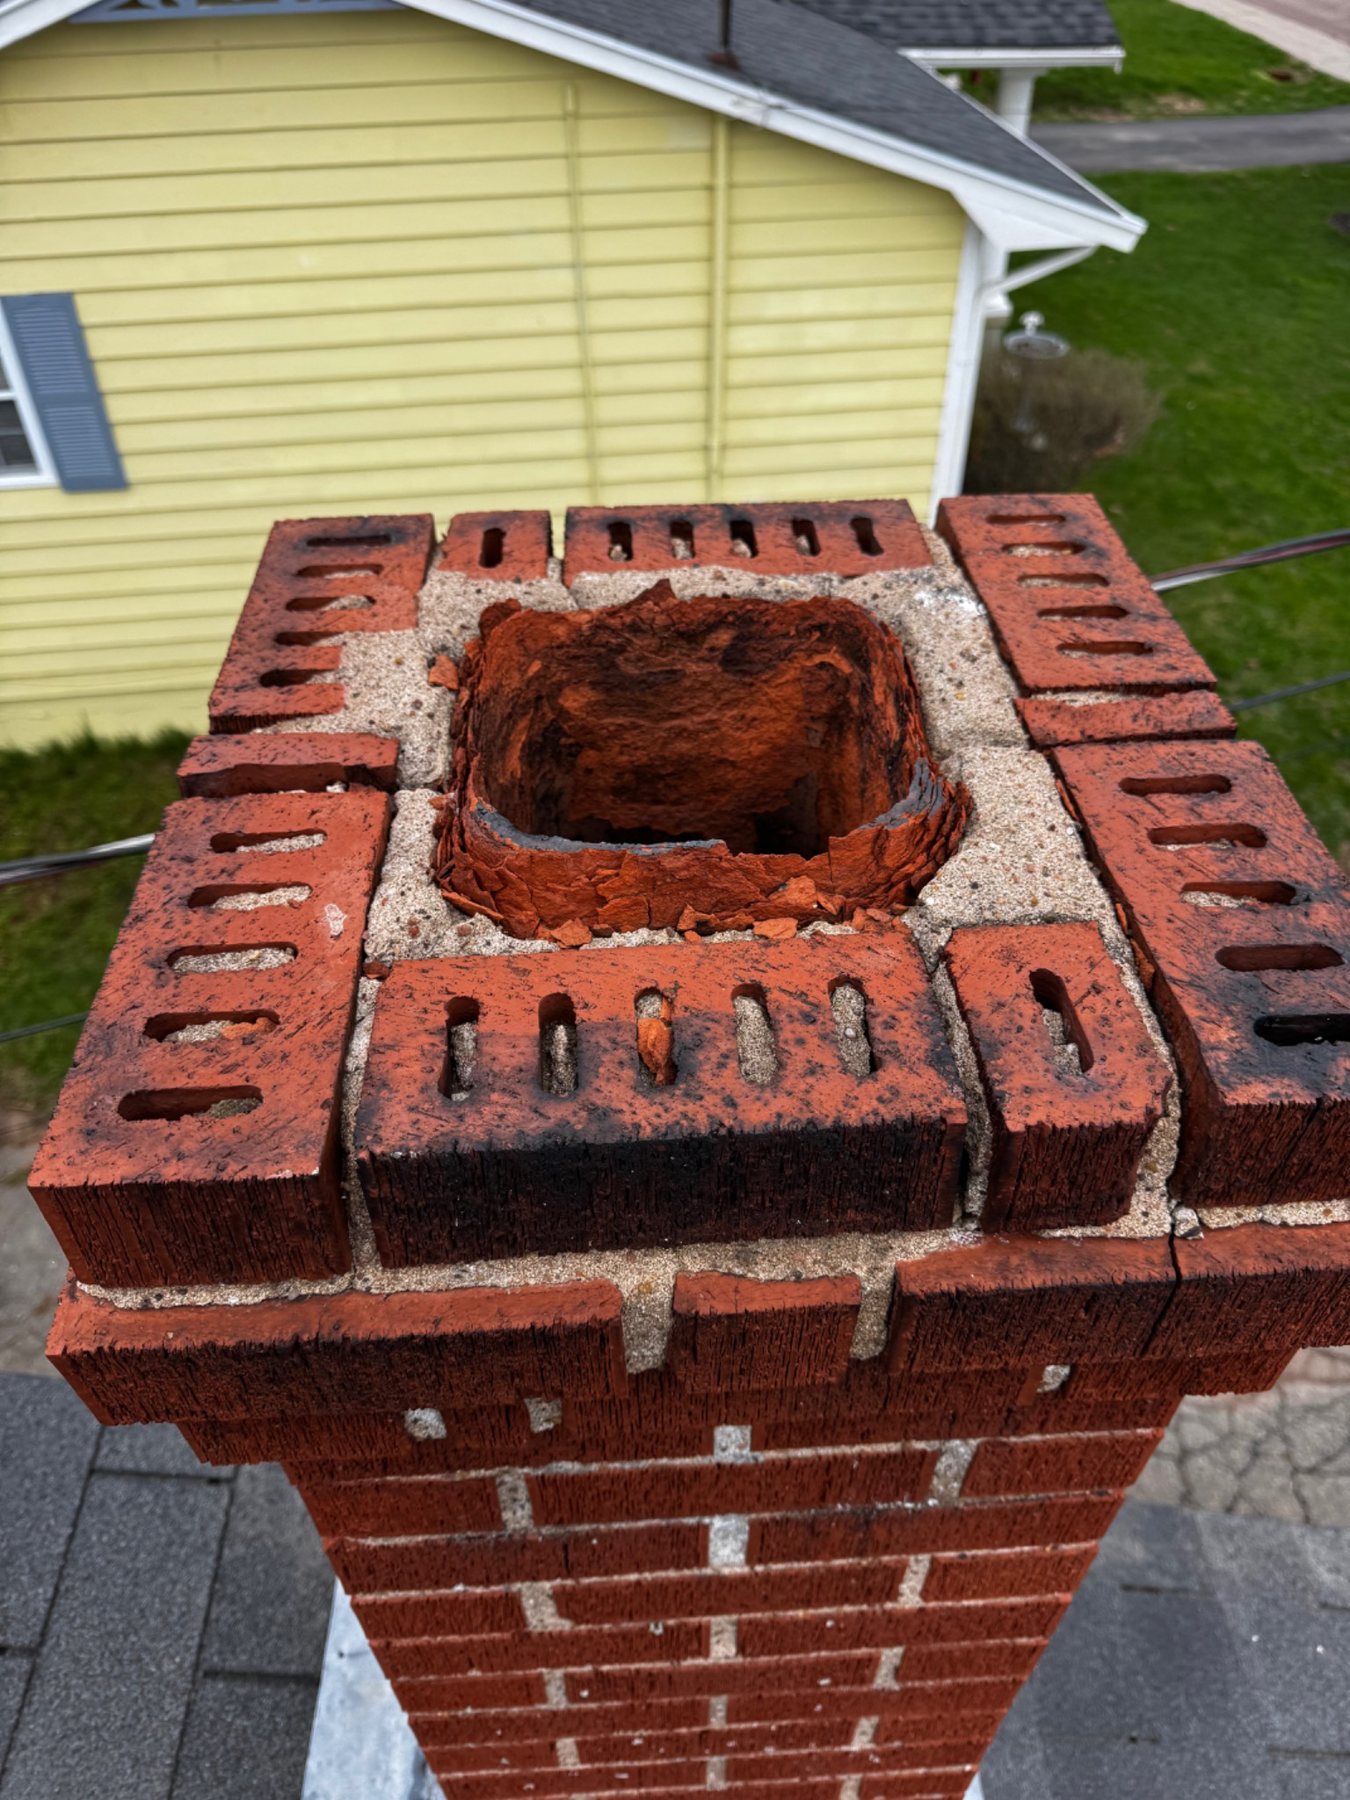
Top exposure: The uppermost masonry and flue area take direct rain, snow and freeze-thaw exposure. Damage concentrated here is a reason to inspect the top detail before treating deterioration lower on the chimney as an isolated problem.
Not all stone deterioration looks like brick spalling. Some stone flakes along layers, some loses corners or surface grains, and some remains sound while the mortar around it deteriorates first.
On older foundations and exterior stonework, I pay attention to where moisture is entering and whether previous repairs changed how the wall dries. Dense surface coatings or hard mortar can sometimes shift deterioration into the stone itself.
Stone replacement is not automatically the first choice. If a unit remains stable and has only superficial weathering, preserving it may be preferable to disturbing a larger area of sound masonry.
Best example: flaking, scaling or edge loss on exposed stone, especially where the surrounding moisture condition is visible.
Older stone, brick and block foundations can all contain irregularities or old repairs. What matters is change. Fresh gaps, newly displaced units, a growing bulge or a crack that widened through winter are much more meaningful than a condition that has remained stable for years.
Spring runoff can also expose drainage problems. If snow melt repeatedly saturates one section of foundation, deteriorated joints and loose stone may be symptoms of the water path around the building.
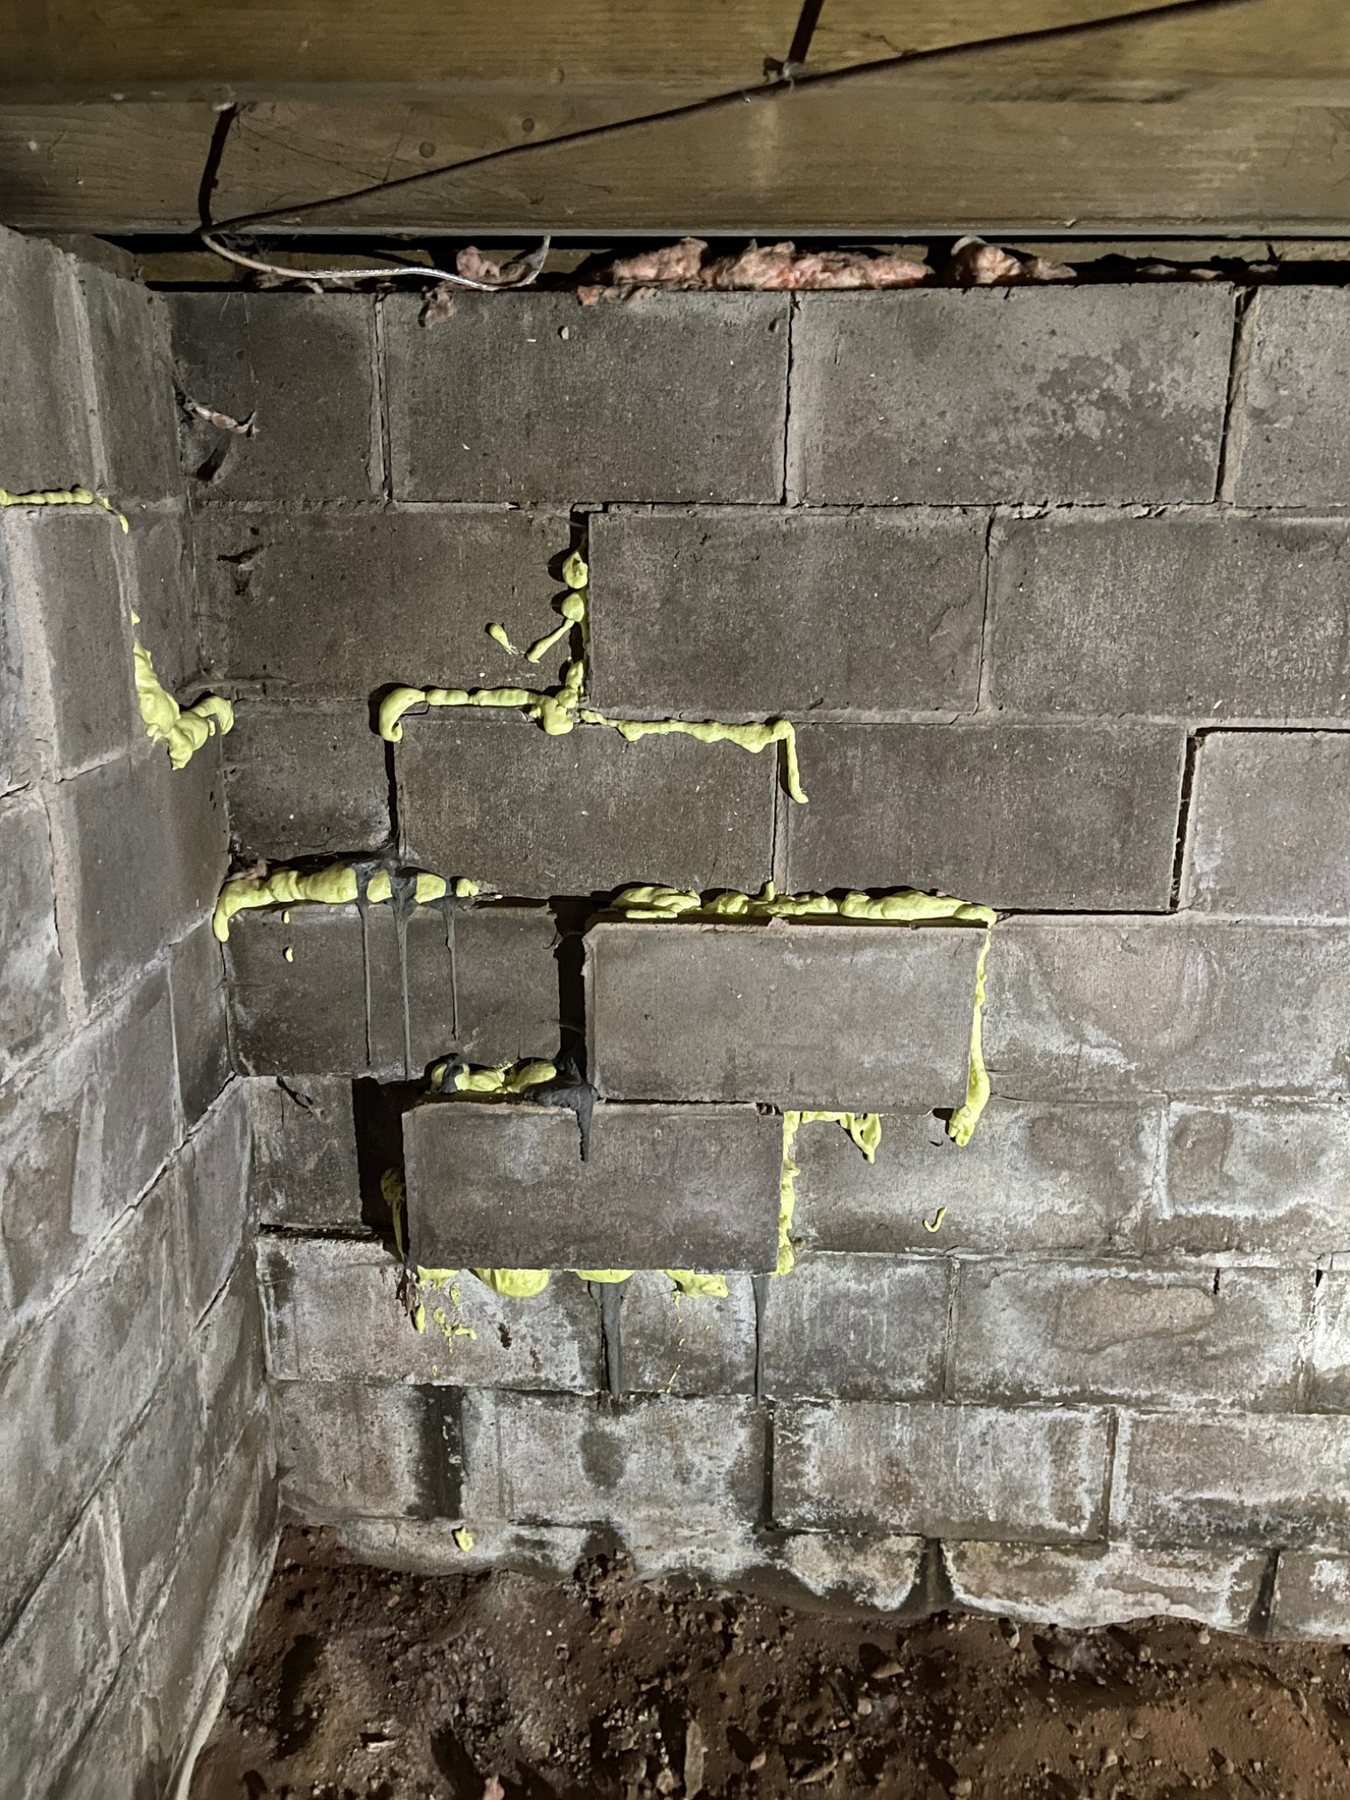
Field example: The displaced blocks and large open joints show that this wall has a geometry and support problem, not simply missing joint material. Spray foam can fill a visible void, but it does not restore the original masonry bond or explain why the units moved.
White crystalline deposits are often efflorescence, caused when moisture dissolves soluble salts and carries them toward the surface. The deposit is useful because it shows that water moved through the masonry.
On a chimney or wall, the pattern can help narrow the source. A vertical band below a cap, staining beneath flashing or concentration near grade each points toward a different moisture path.
Cleaning the surface may improve appearance, but the important repair question is why that part of the wall became wet enough for the salts to move.
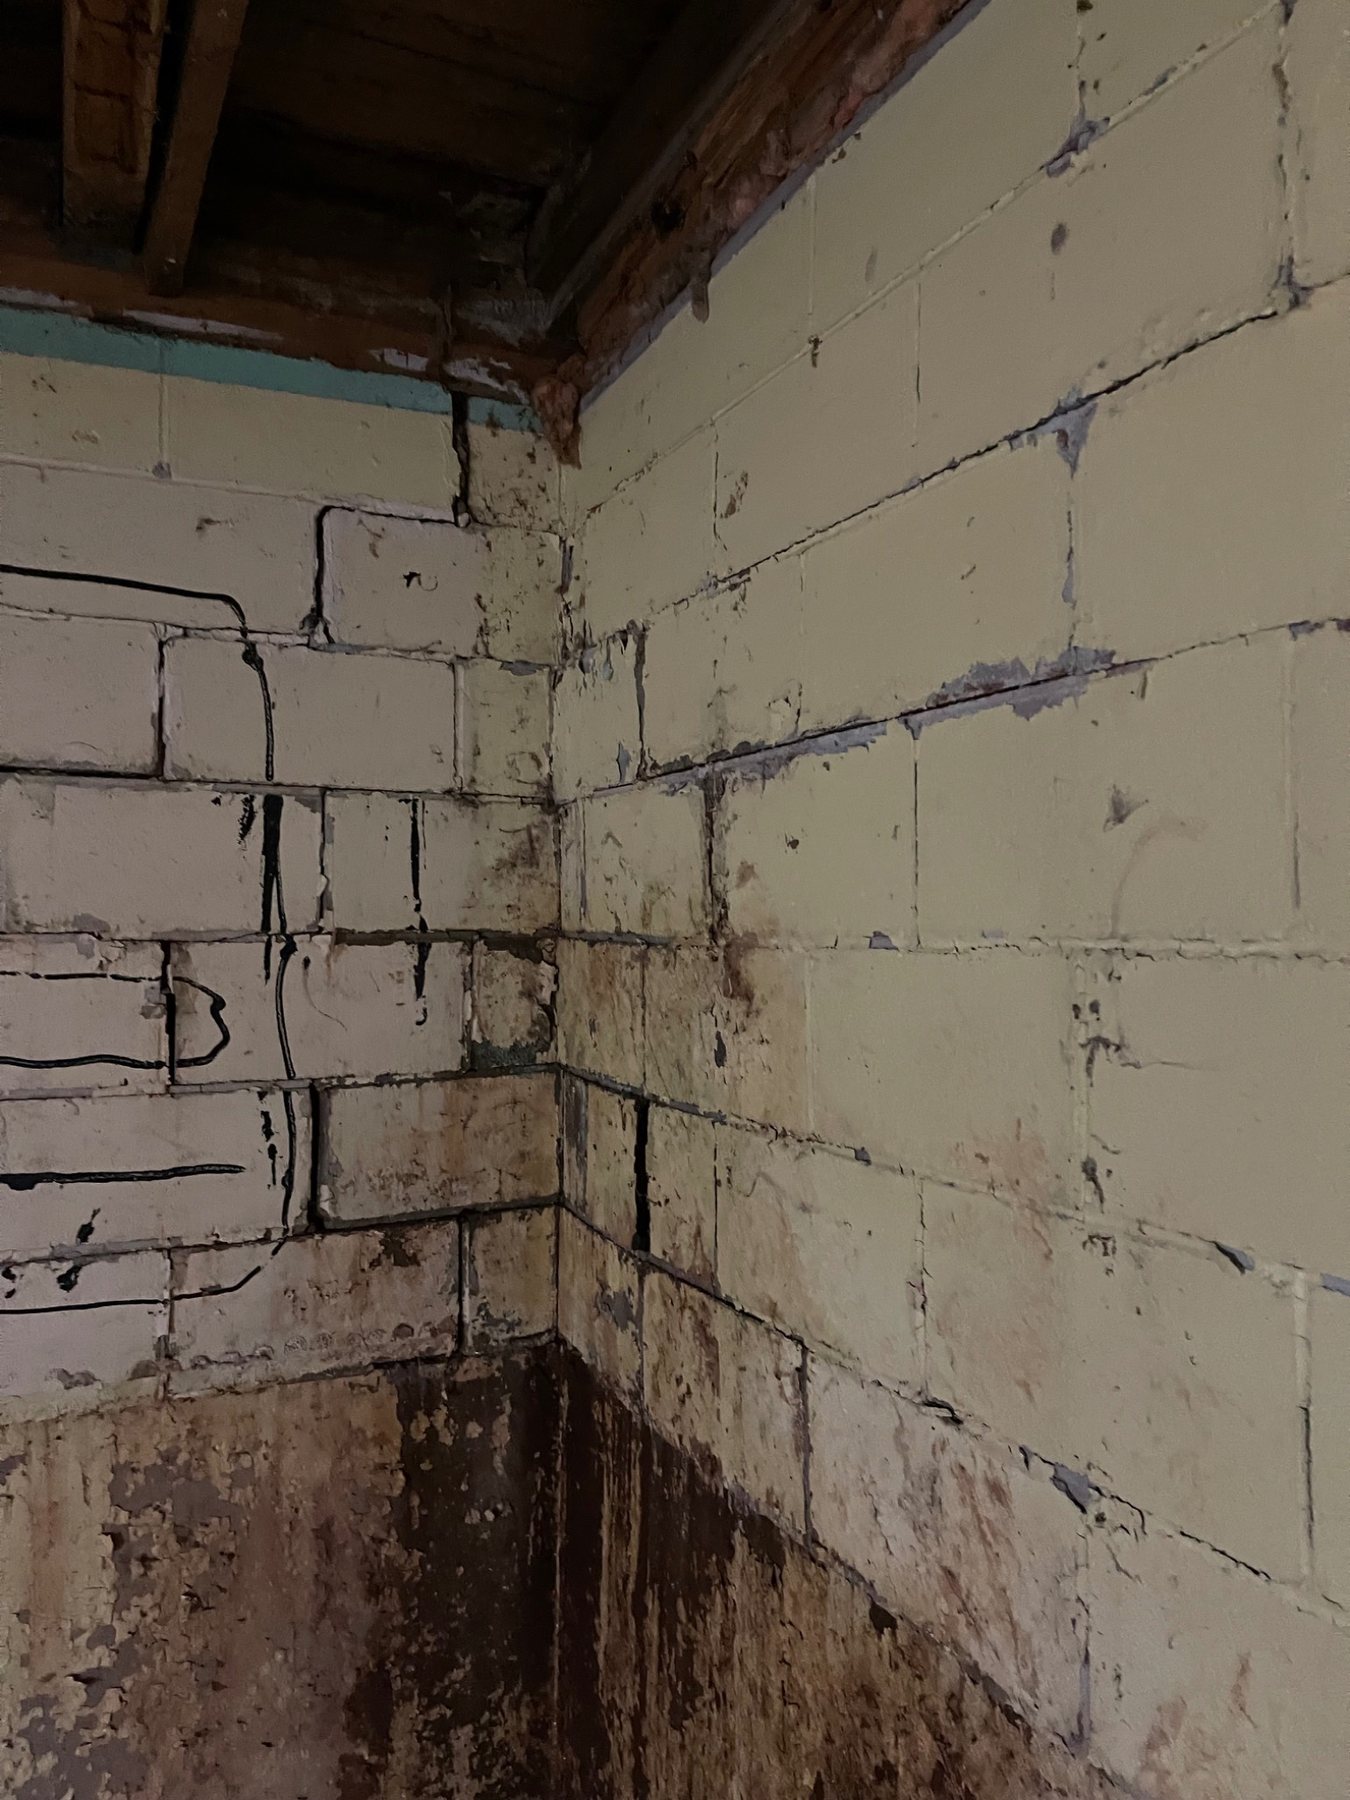
Field example: Interior staining is concentrated in a distinct lower and corner zone. The visible damp surface identifies where moisture is showing up, but the exterior grade, drainage, wall construction and water path still need to be investigated before selecting a repair.
Mortar residue, lime run, paint, mineral deposits and efflorescence can look similar in photographs. When the material is uncertain, identify it before aggressive cleaning.
If moisture enters a wall but drying is restricted by dense paint, waterproof coatings or very hard repair mortar, the visible failure may appear beside or behind the treatment rather than directly at the entry point.
Peeling coatings, salt deposits at edges, localized spalling and deterioration concentrated beside previous repairs are all reasons to look at how the wall is managing moisture.
The National Park Service recommends correcting moisture sources and failed masonry details before relying on water-repellent treatments on historic masonry.
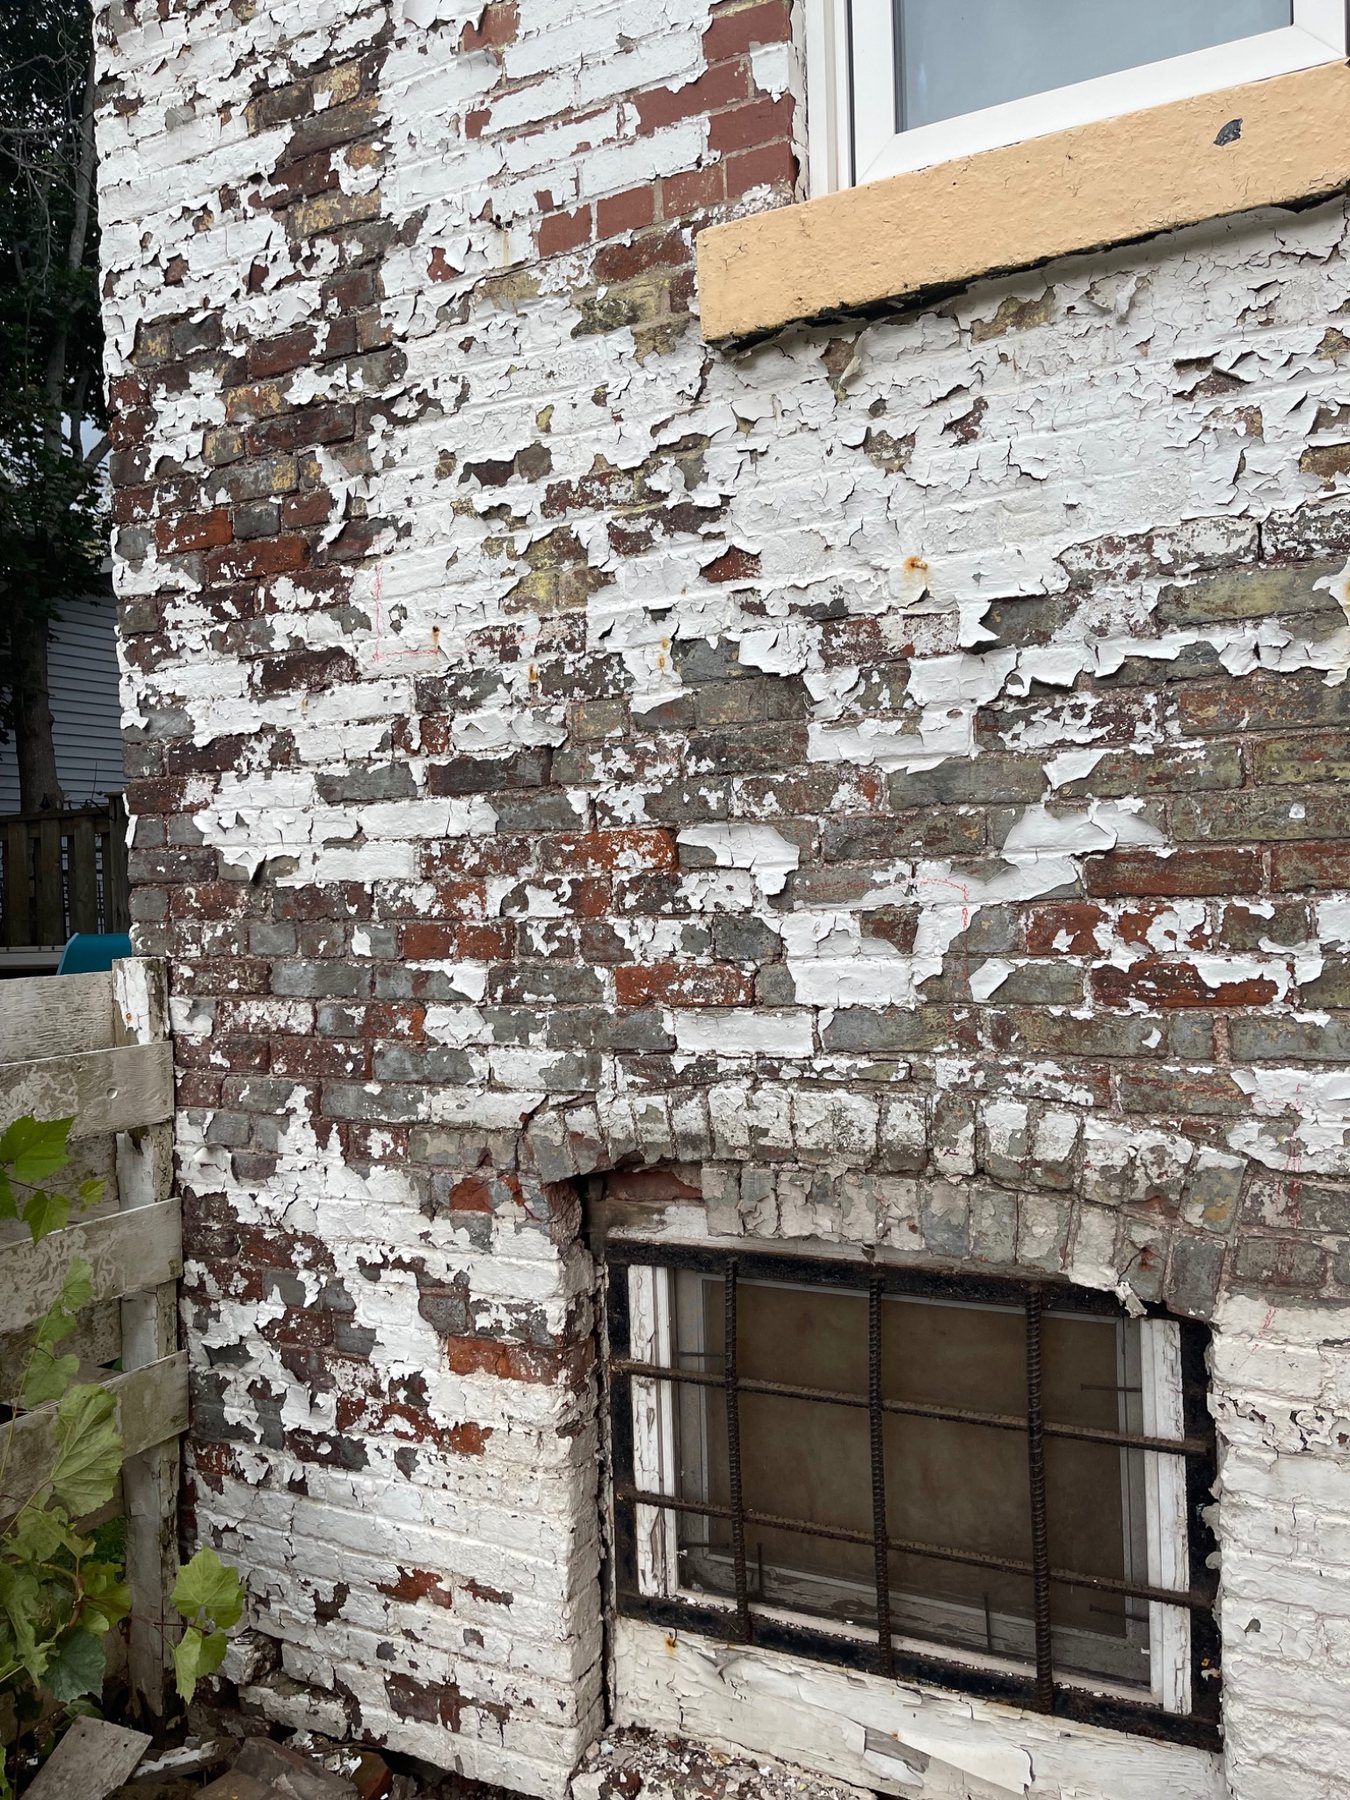
Field example: Large areas of coating are releasing from this older brick wall. The peeling surface is a symptom worth investigating: moisture movement, previous coatings, masonry condition and drying direction all matter before simply applying another coat.
Before repairing the wall, check what delivers water to it. A short downspout, blocked gutter, negative grade, snow storage area or damaged flashing can keep the masonry wet regardless of how well the joints are repaired.
This is especially important at foundations, wall bases and chimneys. Repointing can restore deteriorated joints, but it cannot compensate for gallons of roof water being discharged against the same area year after year.
Around driveways, walks and entrances, also look for a narrow band of deterioration where salty slush repeatedly contacts the masonry. De-icing salts can add another source of soluble salts while keeping lower masonry wet, so splash zones should be considered together with drainage and freeze-thaw exposure.
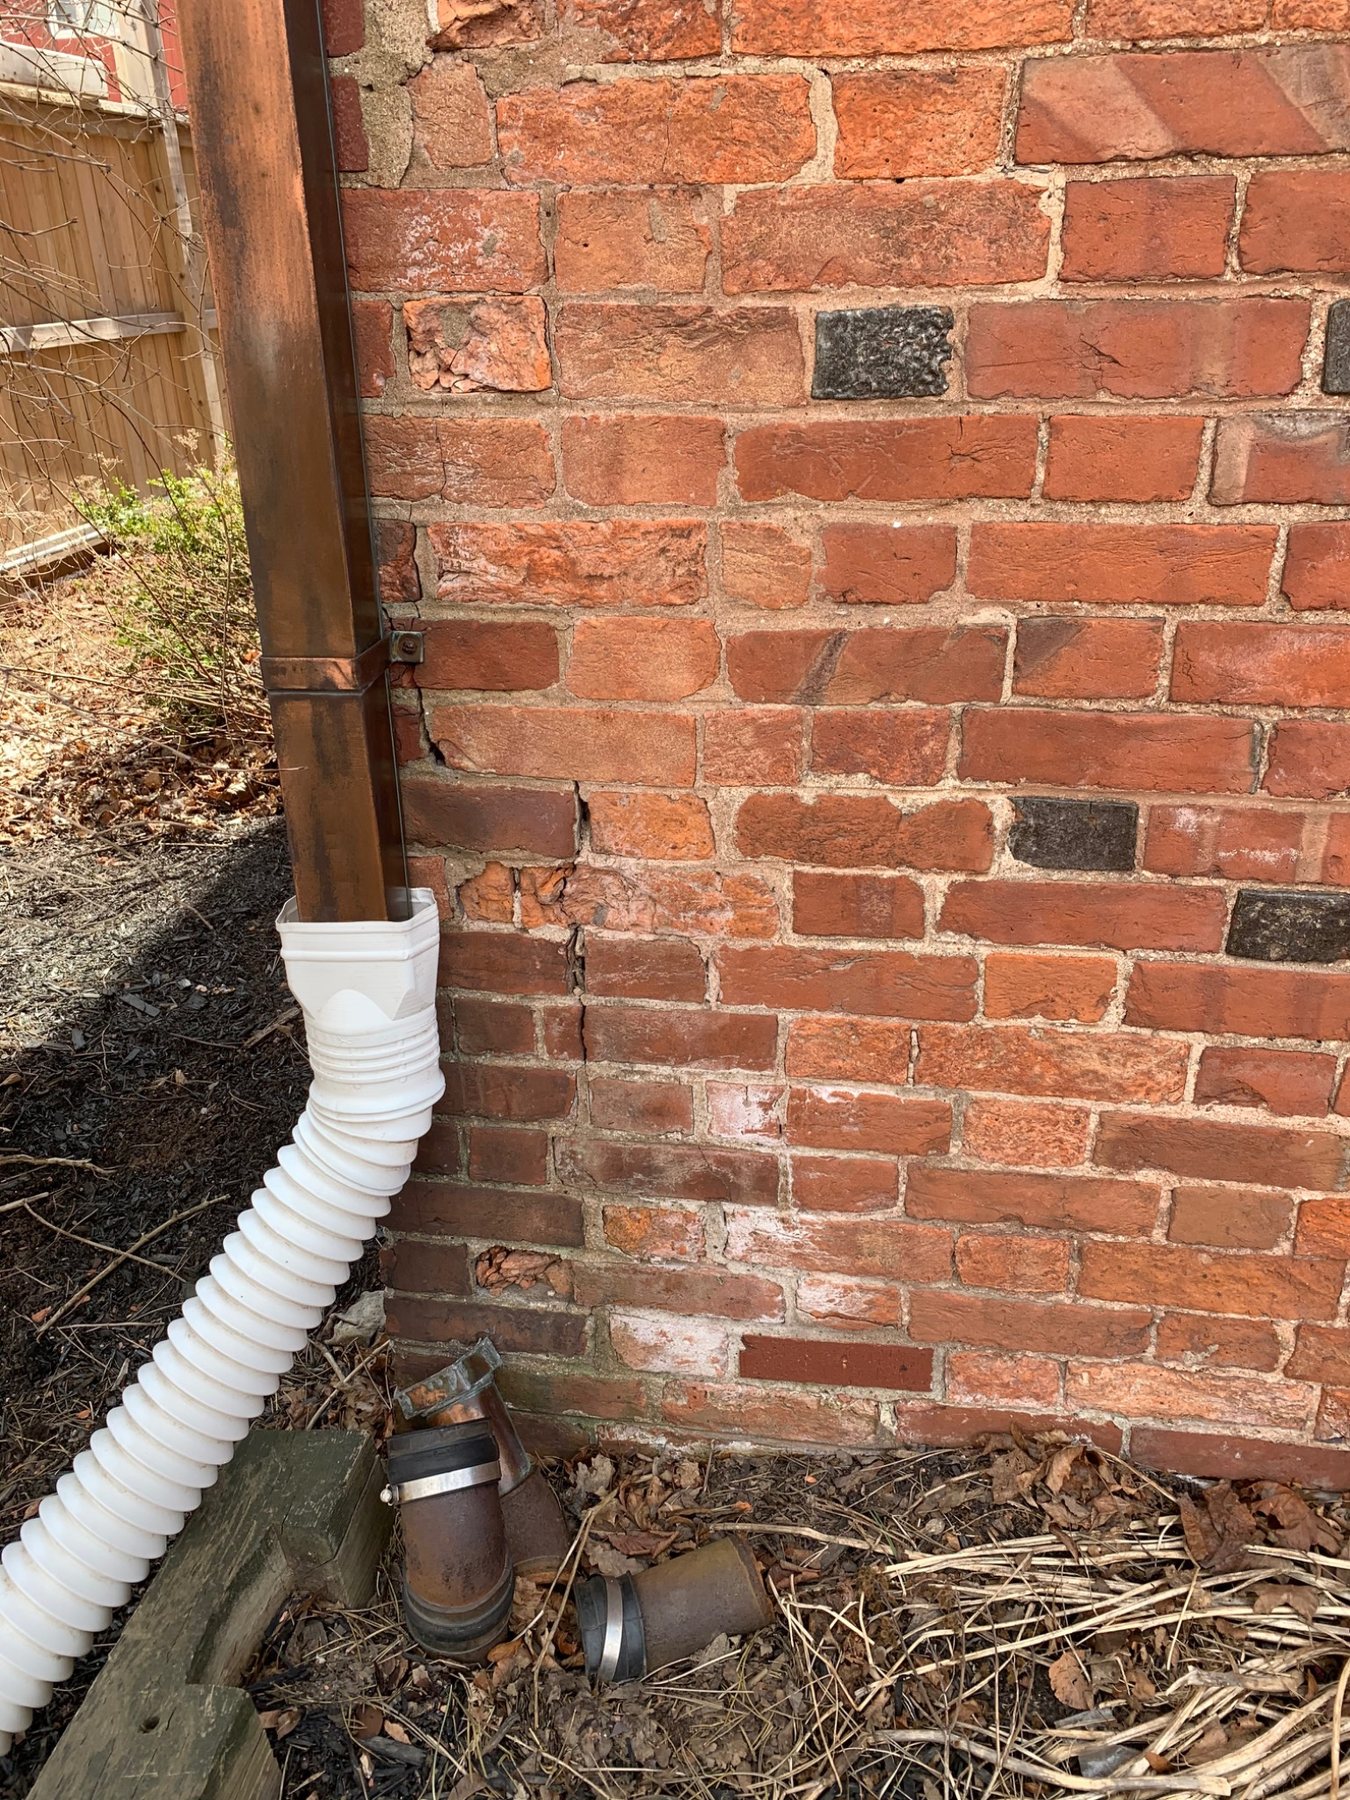
Field example: The downspout and lower-wall deterioration can be read together. Roof water delivered beside masonry increases the amount of moisture the wall and soil have to manage. Correcting drainage is often part of the masonry repair even though the downspout itself is not masonry.
Old stable cracks, shallow weathering, minor efflorescence and cosmetic irregularities can often be photographed and monitored before deciding on work.
Deep mortar loss, localized spalling, failed caps, open flashing details and recurring water entry should usually be addressed before another winter cycle.
Loose overhead masonry, visibly displaced chimney courses, rapidly changing bulges, major cracks or falling units deserve quicker attention.
One of the simplest maintenance tools is also one of the most useful. Stand in the same location, use roughly the same framing and photograph the chimney, foundation or wall once a year.
Over time, those images can show whether a crack is lengthening, a bulge is increasing, mortar loss is accelerating or a repaired water problem has actually stabilized.
This guide is written from practical field experience, but the underlying moisture and freeze-thaw principles are well established in Canadian building research and masonry conservation guidance.
National Research Council Canada: Freeze-Thaw Action on Brick →
NRC Canada: Moisture Content and Freeze-Thaw Cycles of Masonry Materials →
National Park Service: Controlling Unwanted Moisture in Historic Buildings →
National Park Service: Repointing Mortar Joints in Historic Masonry →
Dean is a third-generation mason with more than 20 years of hands-on experience in brick, natural stone, chimneys, foundations, repointing and restoration work. This guide draws on field conditions encountered on Prince Edward Island buildings.
Last reviewed: August 28, 2026
Fresh spalling, newly open joints, loose masonry, chimney-top deterioration, efflorescence, water staining, stone flaking and cracks or movement that were not obvious before winter.
Winter can expose moisture-related weaknesses. Masonry that became wet before freezing can experience repeated freeze-thaw cycles, while spring melt can reveal drainage and water-entry problems.
Not necessarily. Priority depends on depth, stability, water entry, height, falling material and whether the condition is actively changing.
Take a wide building view, a full view of the affected wall or chimney, close-ups of the damage and nearby water-management details such as flashing, caps, sills or grading.
Some can, once suitable masonry weather and curing conditions are available. The repair method and mortar still need to suit the substrate, exposure and temperatures.
Loose overhead masonry, a visibly leaning chimney or wall, falling units, rapidly increasing cracks or bulges, or movement affecting supports deserve faster assessment.
Include the property location, what changed and whether there was water entry or visible debris during the winter.